Home
/ Blog /
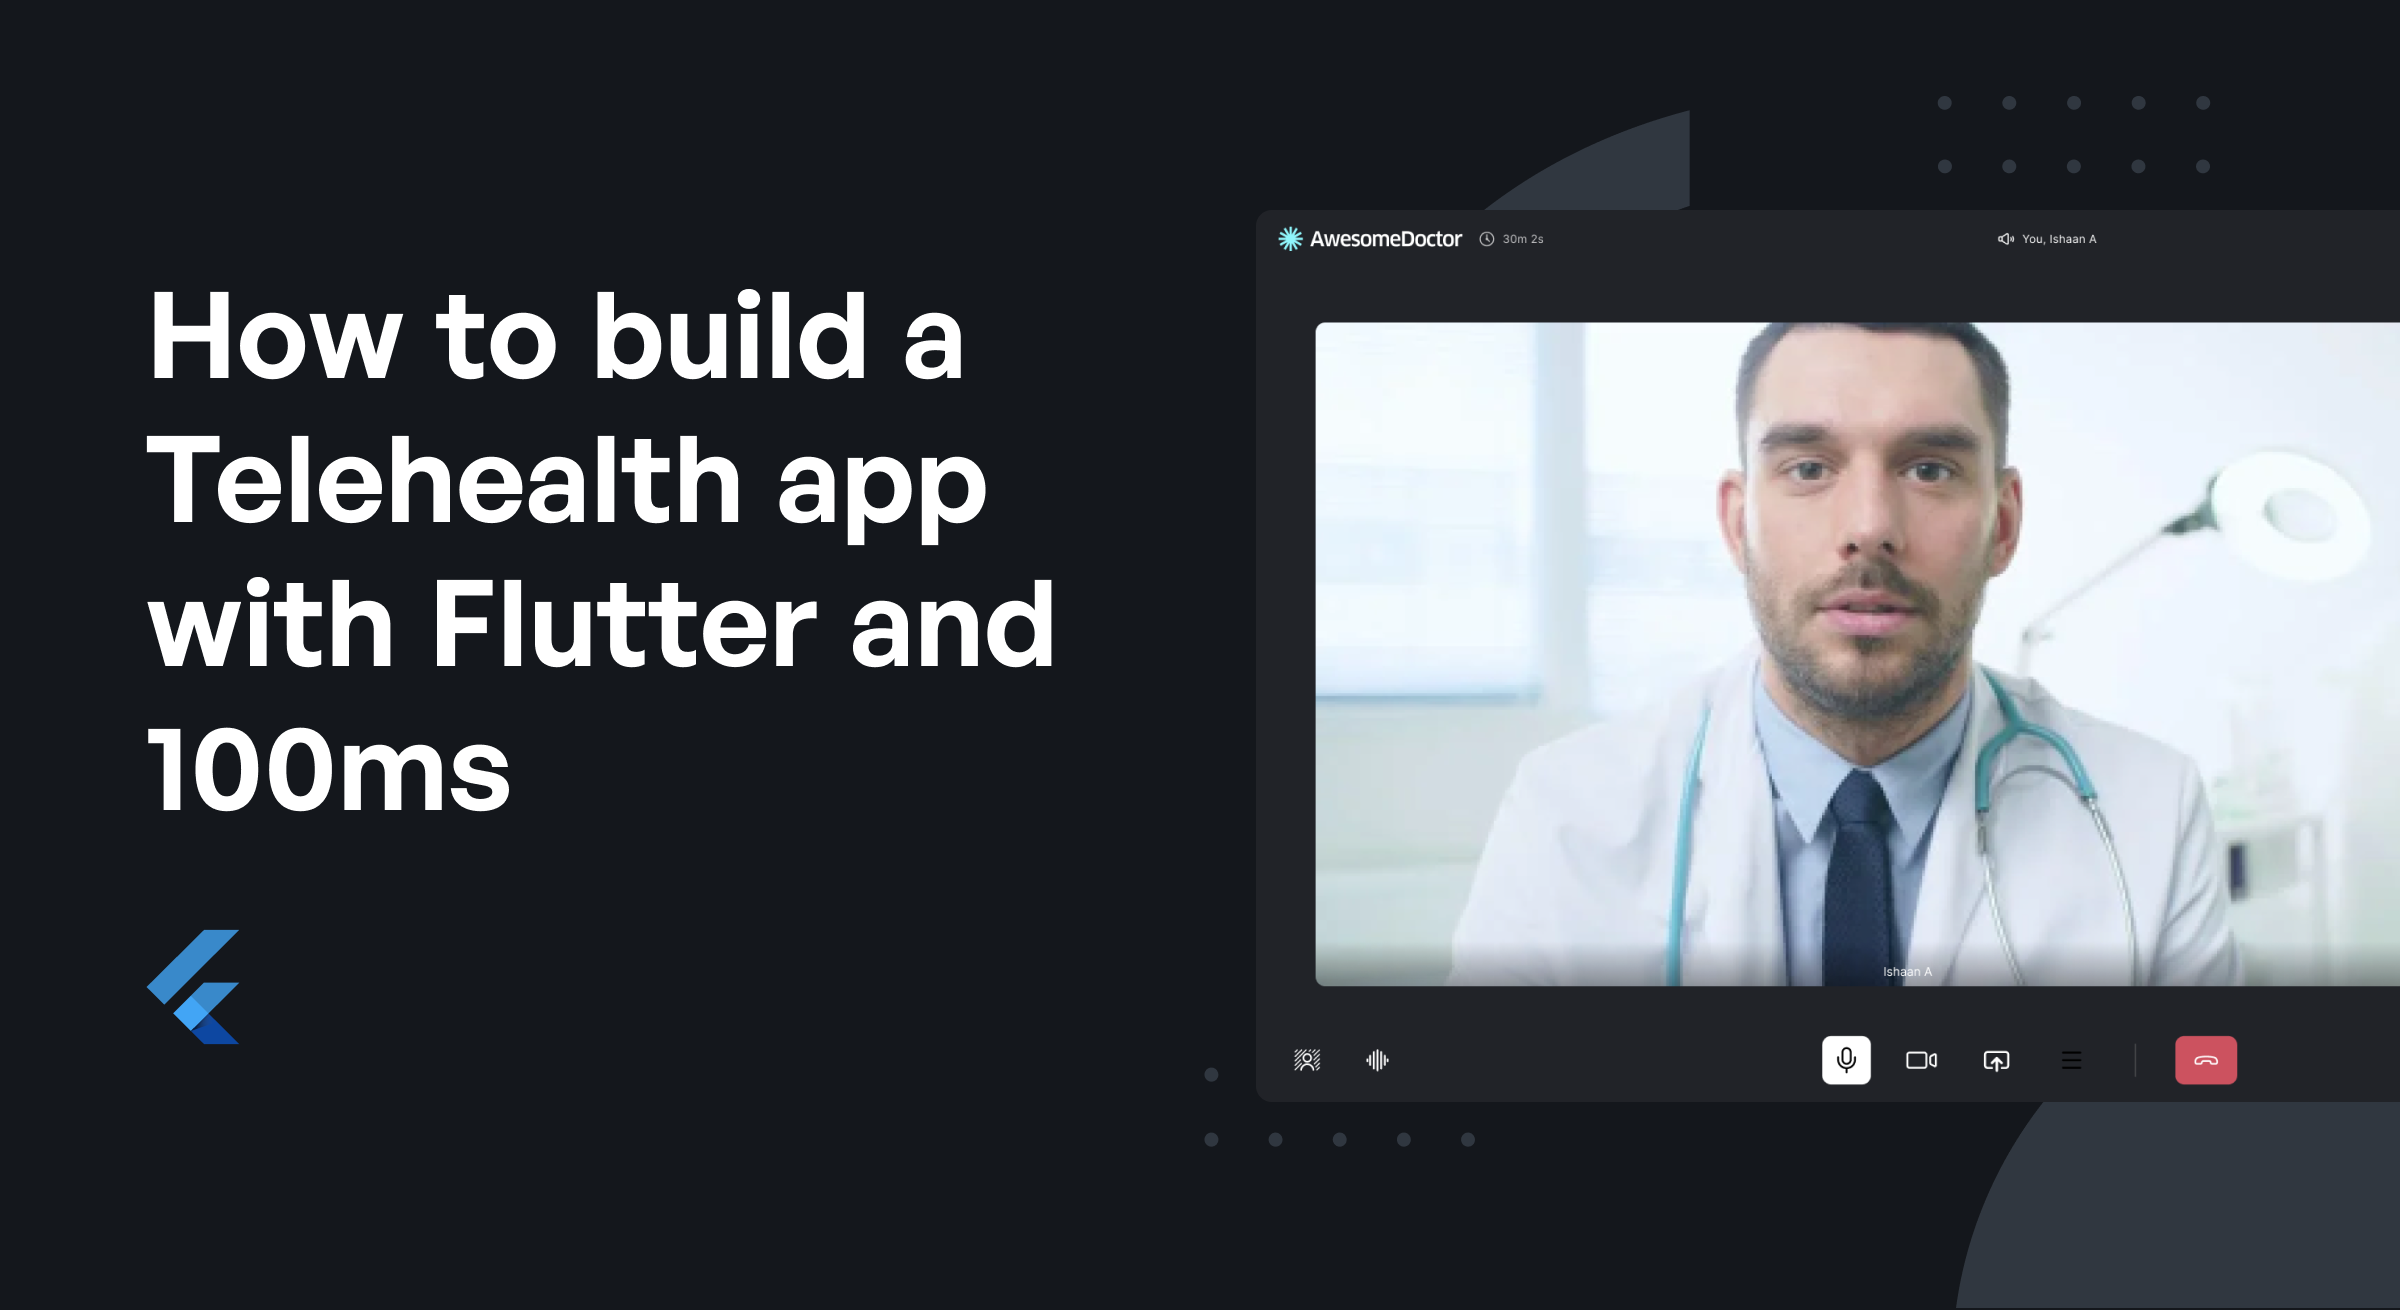
Telehealth App Clone with Flutter and 100msTelehealth App Clone with Flutter and 100ms
May 4, 202235 min read


Share


In recent years, the adoption of telehealth has increased dramatically, especially since the emergence of the pandemic. The CDC reported a 154% increase in the use of telehealth in the second quarter of 2020 compared to 2019. This can be attributed to the pandemic and the benefits of this mode of healthcare.
Simply put, telehealth, also referred to as telemedicine is the process of conducting medical diagnosis and delivering health care services over the internet via two-way communication between a medical practitioner and patient. This is carried out through video conferencing or any feasible remote option.
This tutorial will discuss telehealth clone app development with video and audio communication features. You’ll learn how to create an app with the 100ms SDK, set up a room for video/audio conferencing, and join a room.
This tutorial will focus on the client-side integration of 100ms using Flutter. You can check out the 100ms docs for more information on how to integrate with Android, iOS, web, and server-side services.
Why 100ms for Telemedicine App Development?
100ms is a cloud-based platform that lets you integrate video and audio conferencing into your application. It provides APIs and SDKs through which you can set up and manage telecommunication services on the client and server-side applications.
Prerequisites
- Proficiency in building mobile apps using the Flutter framework.
- Dart, Android, and Flutter SDKs installed on your machine.
- Any suitable IDE of your choice.
- A registered account on 100ms. Register here.
Create a new 100ms App
The first step is to create a room on the 100ms dashboard.
- Step 1: Assign a name to your app.
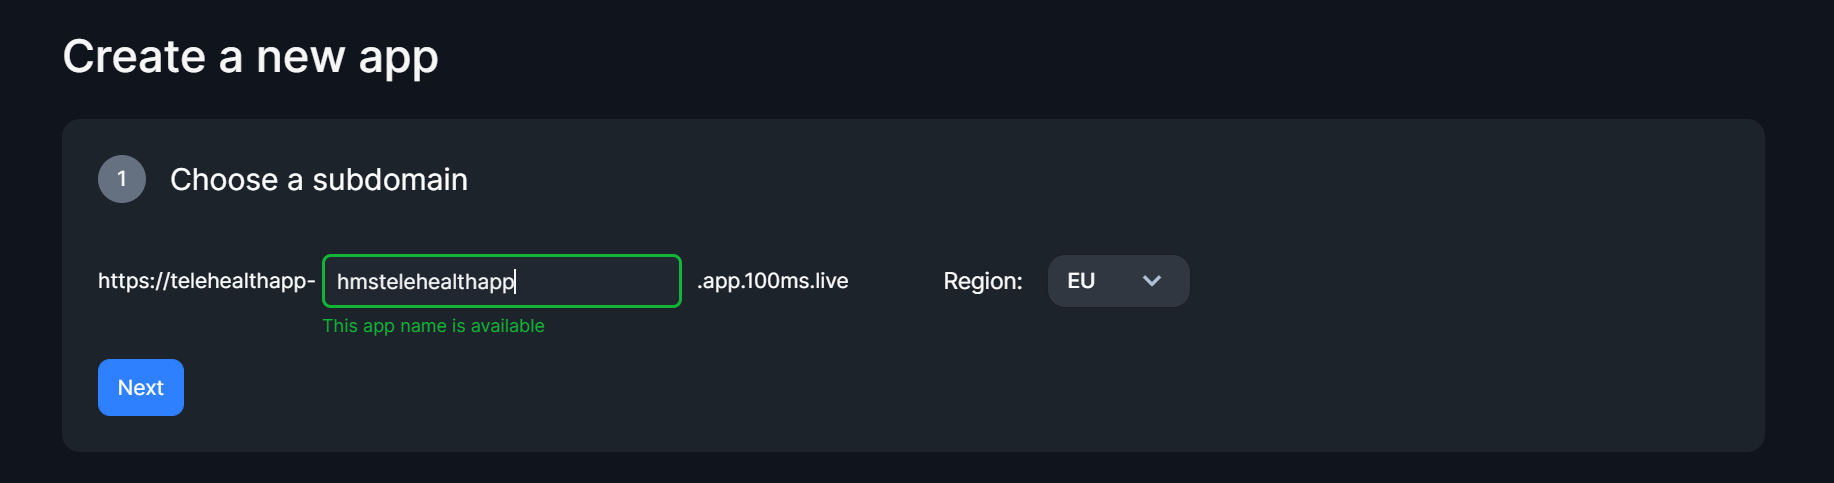
- Step 2: Provide additional information as required.

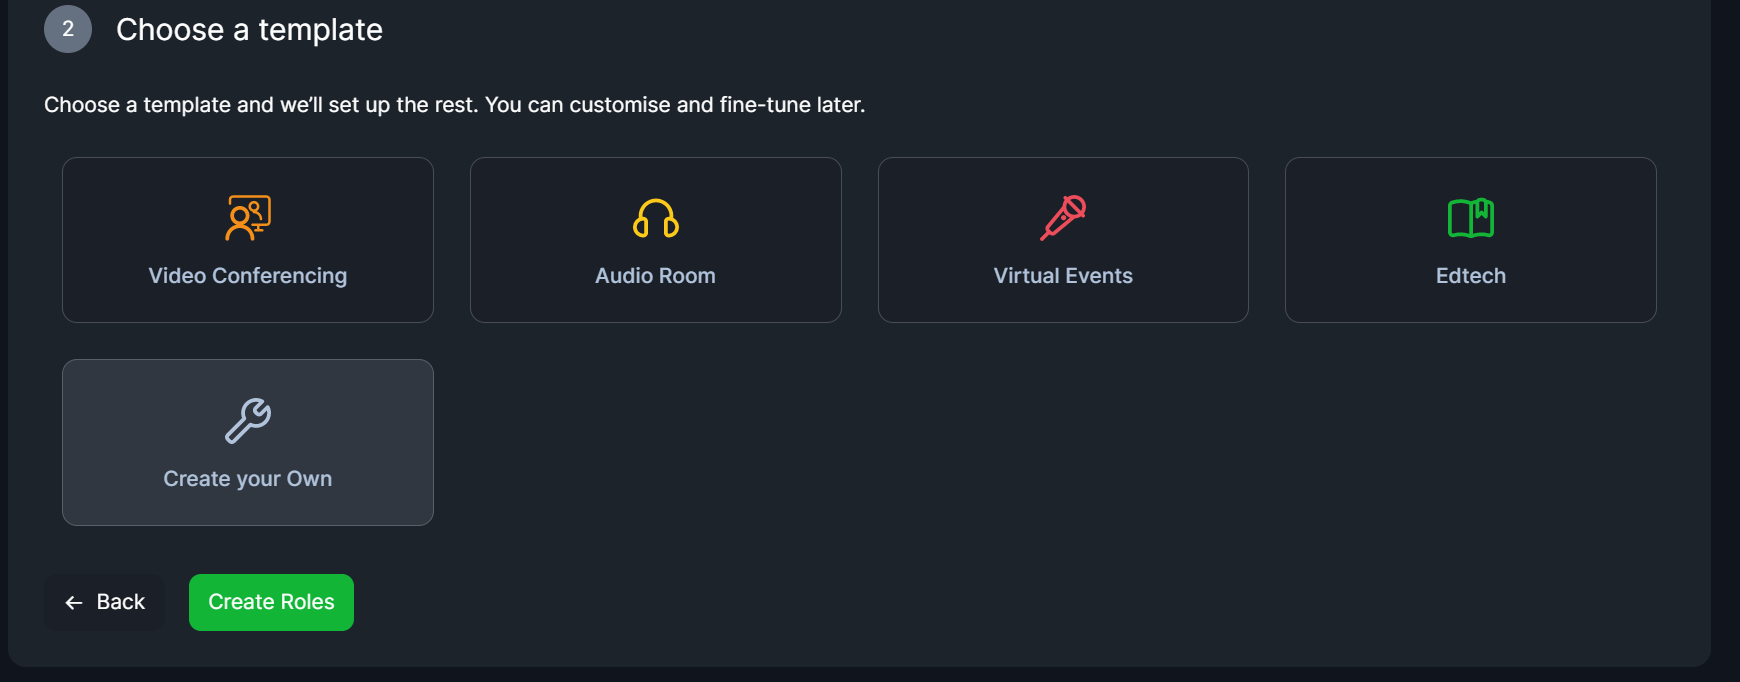
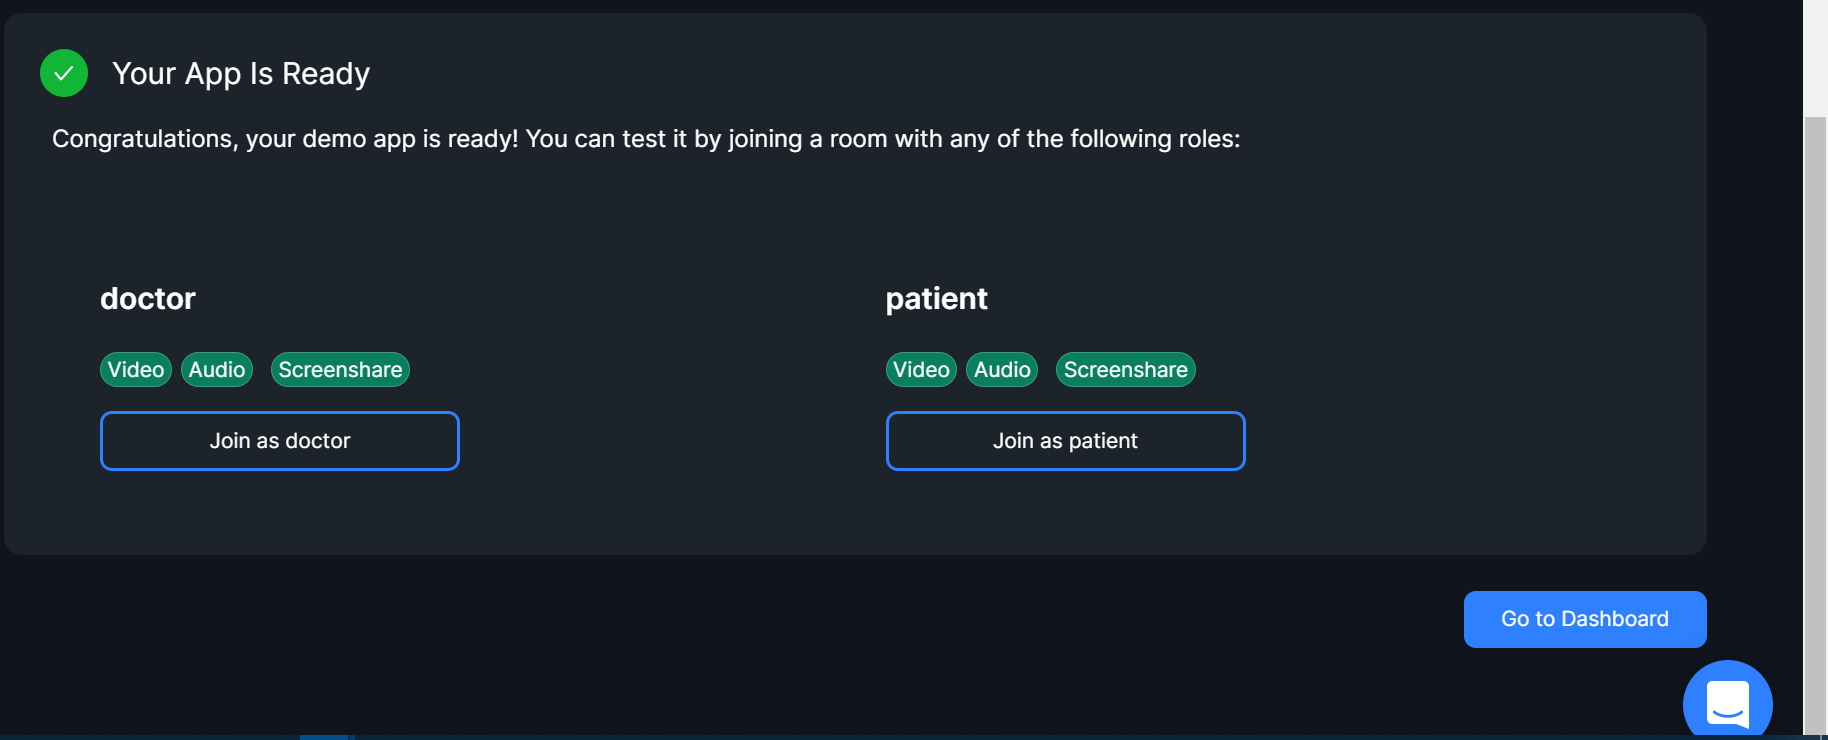
- Step 3: Click on the “Create your own” option and proceed to create roles.
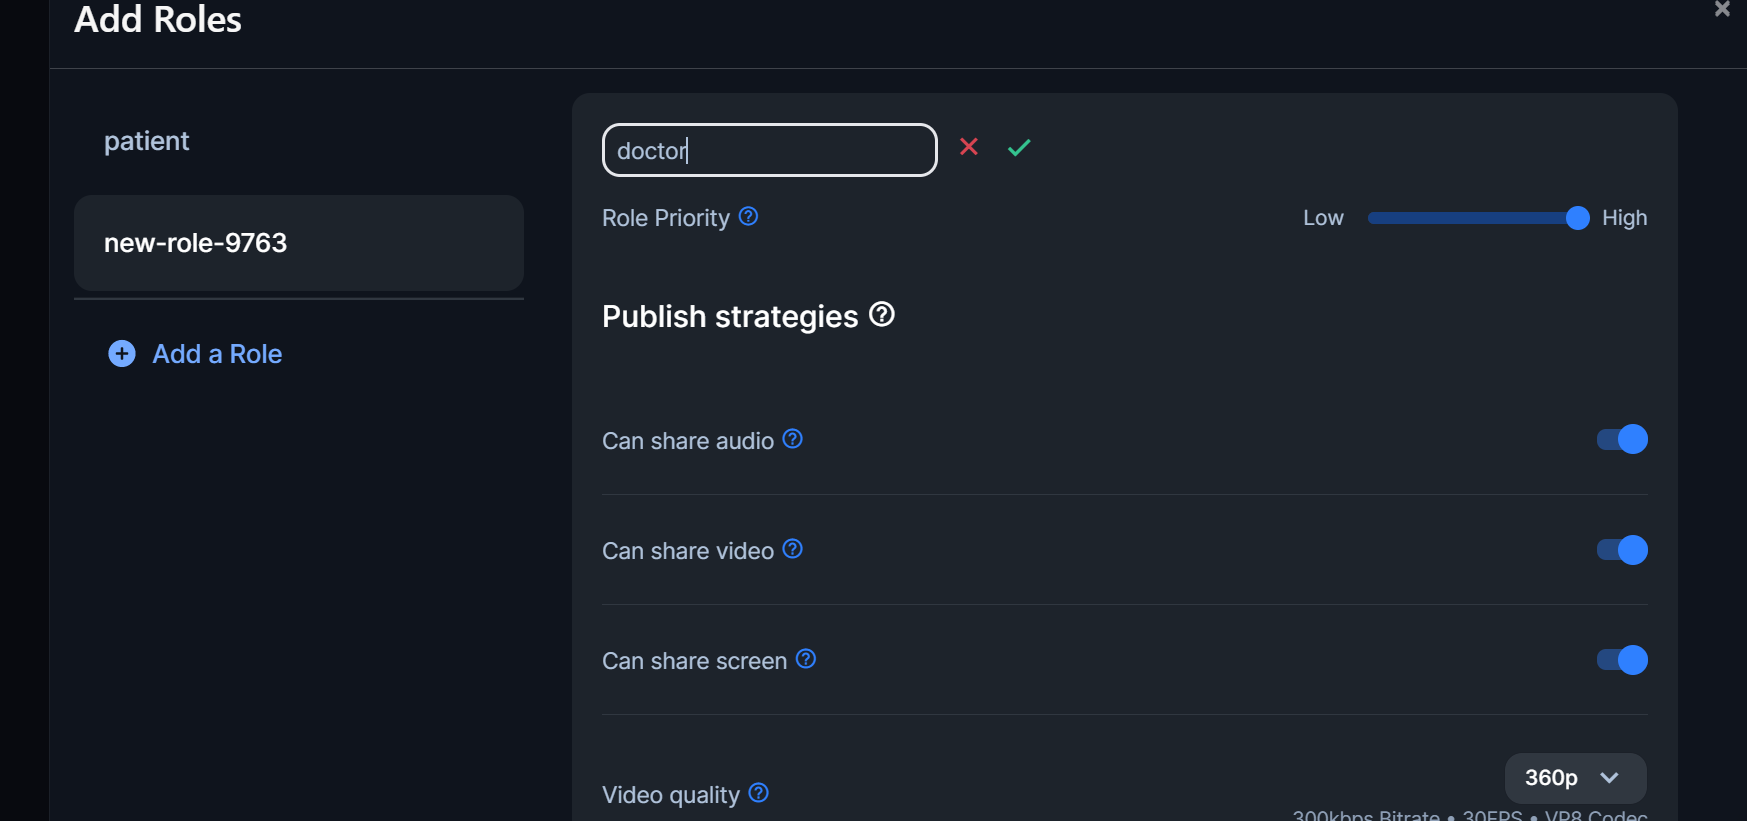
Roles determine what permission a peer has on the app, whether or not they can share audio/video, and the quality of the video shared. In the context of this application, there are two roles - doctor and patient.
Although both roles will have the same permissions and settings, it creates a better user experience to distinguish peers with clear names for ease of identification.
After clicking on the “Create Roles” button, a pop-up opens with default settings for a role. Change the name of the role to “doctor” and leave the default settings. Then create another role with the name “patient”.
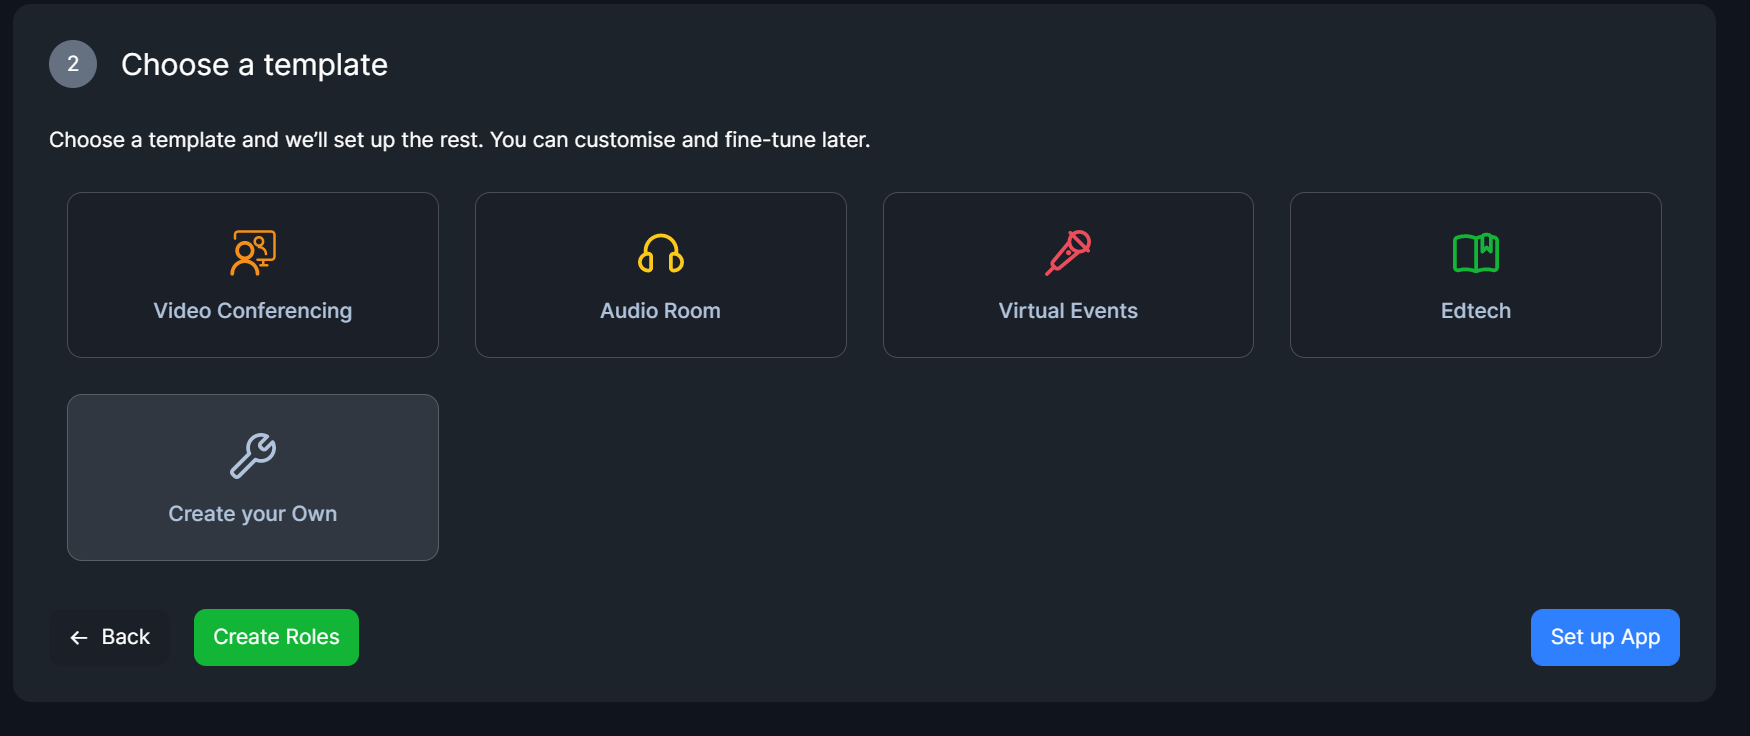
- Step 4: Close the popup screen and click on the “Set up App” button.
Upon successful creation of the app on the dashboard, you should get the response shown below.
Setup the Room
A room is a platform where peers (in this context, doctor, and patient) interact with each other. On the dashboard, click on the “Room” tab. 100ms automatically creates a room for you when you create an app.
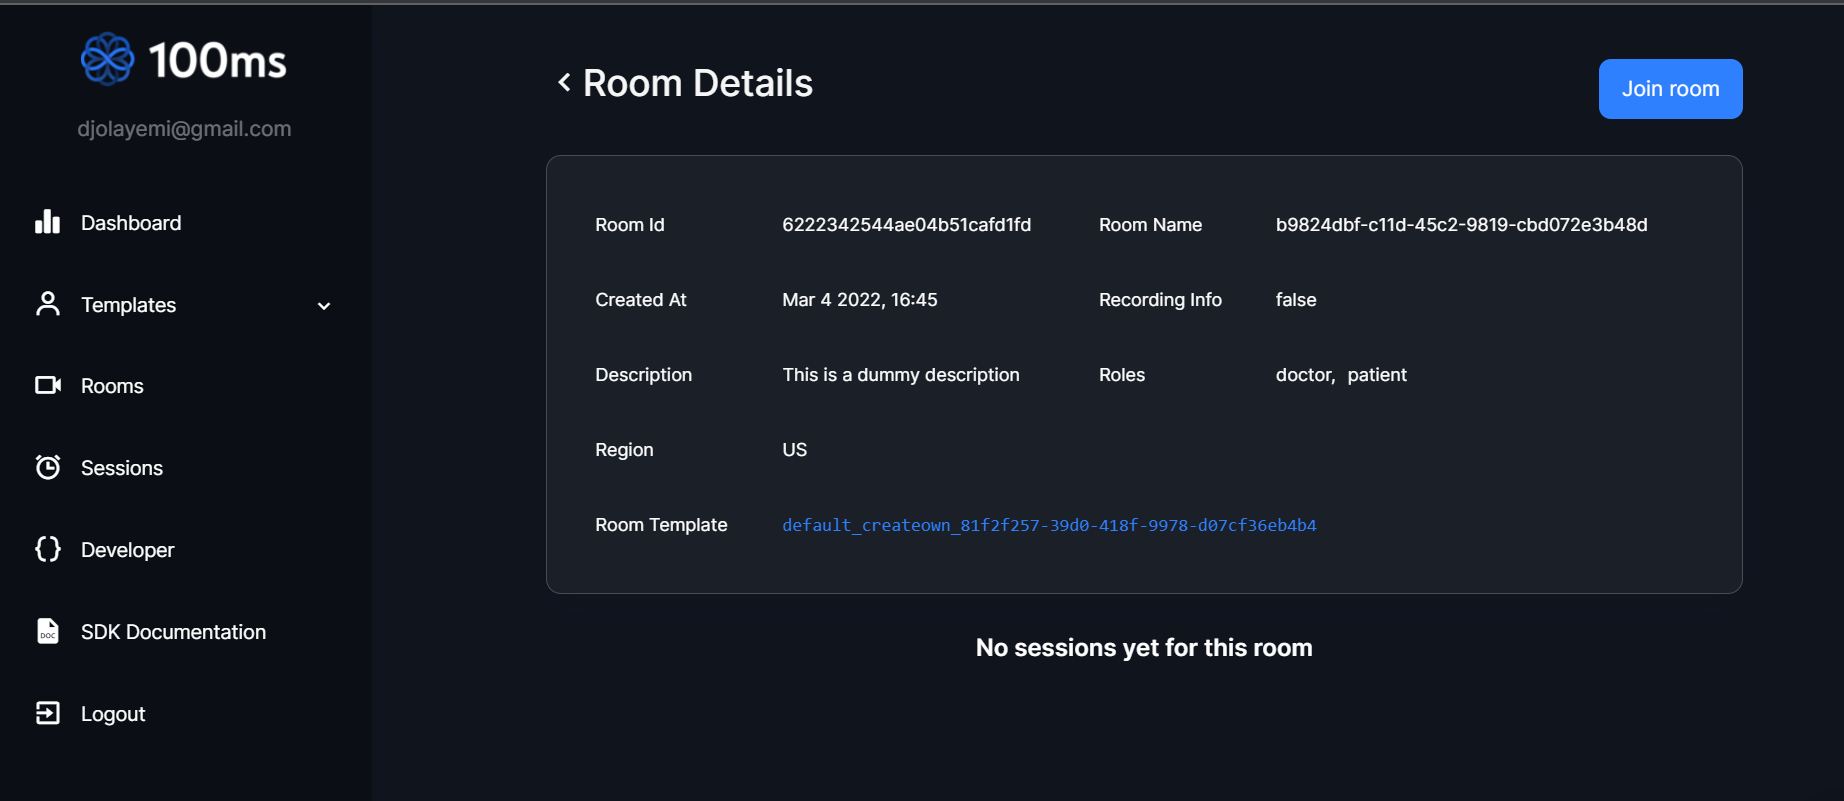
Copy the Room Id for joining the room. This will be required later.
Set up the Flutter app
Now, let’s create the Flutter app for this demo. Clone the starter app from the Github repo here, install the dependencies and run the application.
The following dependencies are used to build the application:
- hmssdk_flutter: This is the 100ms Flutter package that comes with all tools required to enable audio/video communication on the app.
- HTTP: This will be used to send the HTTP request to the 100ms server in order to generate the auth token.
- Provider: This package will be responsible for managing the state of the application, as well as how data passed around is communicated to widgets that need the current value of the data.
- Permission_handler: This package will invoke the requests to permit audio and video functionalities on the user’s device.
- Intl: This will be used for the date and time formatting.
- Flash: This is mainly to offer a better user experience. It will communicate to the user that an appointment has been successfully booked.
Add 100ms & other plugins in the pubspec.yaml as follows:
hmssdk_flutter: 0.6.0
permission_handler: 9.0.2
http: 0.13.4
provider: 6.0.2
intl: 0.17.0
flash: 2.0.3
Now run the fluter pub get command.
Setup permissions
Update target Android version
In the android/app/build.gradle file, update the android SDK version to 21 or later.
android{
    compileSdkVersion 32
    ...
    defaultConfig{
        minSdkVersion 21
        ...
    }
}
Android permission
To enable camera, internet, and audio features, add the following permissions to your AndroidManifest.xml file located in android/app/src/main/AndroidManifest.xml.
<uses-feature android:name="android.hardware.camera"/>
<uses-feature android:name="android.hardware.camera.autofocus"/>
<uses-permission android:name="android.permission.CAMERA"/>
<uses-permission android:name="android.permission.CHANGE_NETWORK_STATE"/>
<uses-permission android:name="android.permission.MODIFY_AUDIO_SETTINGS"/>
<uses-permission android:name="android.permission.RECORD_AUDIO"/>
<uses-permission android:name="android.permission.INTERNET"/>
<uses-permission android:name="android.permission.ACCESS_NETWORK_STATE"/>
<uses-permission android:name="android.permission.FOREGROUND_SERVICE" />
<uses-permission android:name="android.permission.BLUETOOTH" android:maxSdkVersion="30" />
<uses-permission android:name="android.permission.BLUETOOTH_SCAN" />
<uses-permission android:name="android.permission.BLUETOOTH_ADVERTISE" />
<uses-permission android:name="android.permission.BLUETOOTH_CONNECT" />
iOS Permissions
Add the following permissions to your info.plist file:
<key>NSCameraUsageDescription</key>
<string>Allow access to Camera to enable video calling.</string>
<key>NSLocalNetworkUsageDescription</key>
<string>Allow access to Camera to network to enable video calling.</string>
<key>NSMicrophoneUsageDescription</key>
<string>Allow access to Camera to mic to enable video calling.</string>
Implement Listeners
Before we start building the features for the application, we must implement the listeners that will enable us to interact with the 100ms SDK and leverage the functionalities that will empower the app with audio/video and messaging features.
The AppManager class below uses the Provider state management tool to communicate any changes to the state of the application:
import 'package:flutter/cupertino.dart';
import 'package:hmssdk_flutter/hmssdk_flutter.dart';
import 'package:telehealth_app/models/message.dart';
import 'package:telehealth_app/setup/sdkinitializer.dart';

class AppManager extends ChangeNotifier implements HMSUpdateListener {
  //To store remote peer tracks and peer objects
  HMSTrack? remoteVideoTrack;
  HMSPeer? remotePeer;
  HMSTrack? remoteAudioTrack;
  HMSVideoTrack? localVideoTrack;
  bool _disposed = false;
  List<Message> messages = [];
  late HMSPeer localPeer;

  //Method to attach listener to sdk
  void startListen() {
    SdkInitializer.hmssdk.addUpdateListener(listener: this);
  }

  //To dispose the objects when user leaves the room
  @override
  void dispose() {
    _disposed = true;
    super.dispose();
  }

  //Method provided by Provider to notify the listeners whenever there is a change in the model
  @override
  void notifyListeners() {
    if (!_disposed) {
      super.notifyListeners();
    }
  }

  //Method to listen to local Peer join update
  @override
  void onJoin({required HMSRoom room}) {
    print("before joining");
    for (HMSPeer each in room.peers!) {
      if (each.isLocal) {
        localPeer = each;
        break;
      }
    }
  }

  //Method to listen to peer Updates we are only using peerJoined and peerLeft updates here
  @override
  void onPeerUpdate({required HMSPeer peer, required HMSPeerUpdate update}) {
    switch (update) {
      //To handle when peer joins
      //We are setting up remote peers audio and video track here.
      case HMSPeerUpdate.peerJoined:
        messages = [];
        remotePeer = peer;
        remoteAudioTrack = peer.audioTrack;
        remoteVideoTrack = peer.videoTrack;
        break;
      // Setting up the remote peer to null so that we can render UI accordingly
      case HMSPeerUpdate.peerLeft:
        messages = [];
        remotePeer = null;
        break;
      case HMSPeerUpdate.audioToggled:
        break;
      case HMSPeerUpdate.videoToggled:
        break;
      case HMSPeerUpdate.roleUpdated:
        break;
      case HMSPeerUpdate.metadataChanged:
        break;
      case HMSPeerUpdate.nameChanged:
        break;
      case HMSPeerUpdate.defaultUpdate:
        break;
    }
    notifyListeners();
  }

  //Method to get Track Updates of all the peers
  @override
  void onTrackUpdate(
      {required HMSTrack track,
      required HMSTrackUpdate trackUpdate,
      required HMSPeer peer}) {
    switch (trackUpdate) {
      //Setting up tracks for remote peers
      //When a track is added for the first time
      case HMSTrackUpdate.trackAdded:
        if (track.kind == HMSTrackKind.kHMSTrackKindAudio) {
          if (!track.peer!.isLocal) remoteAudioTrack = track;
        } else if (track.kind == HMSTrackKind.kHMSTrackKindVideo) {
          if (!track.peer!.isLocal) {
            remoteVideoTrack = track;
          } else {
            localVideoTrack = track as HMSVideoTrack;
          }
        }
        break;
      //When a track is removed
      case HMSTrackUpdate.trackRemoved:
        if (track.kind == HMSTrackKind.kHMSTrackKindAudio) {
          if (!track.peer!.isLocal) remoteAudioTrack = null;
        } else if (track.kind == HMSTrackKind.kHMSTrackKindVideo) {
          if (!track.peer!.isLocal) {
            remoteVideoTrack = null;
          } else {
            localVideoTrack = null;
          }
        }
        break;
      //Case when someone mutes audio/video
      case HMSTrackUpdate.trackMuted:
        if (track.kind == HMSTrackKind.kHMSTrackKindAudio) {
          if (!track.peer!.isLocal) remoteAudioTrack = track;
        } else if (track.kind == HMSTrackKind.kHMSTrackKindVideo) {
          if (!track.peer!.isLocal) {
            remoteVideoTrack = track;
          } else {
            localVideoTrack = null;
          }
        }
        break;
      //Case when someone unmutes audio/video
      case HMSTrackUpdate.trackUnMuted:
        if (track.kind == HMSTrackKind.kHMSTrackKindAudio) {
          if (!track.peer!.isLocal) remoteAudioTrack = track;
        } else if (track.kind == HMSTrackKind.kHMSTrackKindVideo) {
          if (!track.peer!.isLocal) {
            remoteVideoTrack = track;
          } else {
            localVideoTrack = track as HMSVideoTrack;
          }
        }
        break;
      case HMSTrackUpdate.trackDescriptionChanged:
        break;
      case HMSTrackUpdate.trackDegraded:
        break;
      case HMSTrackUpdate.trackRestored:
        break;
      case HMSTrackUpdate.defaultUpdate:
        break;
    }
    notifyListeners();
  }

  //Method to listen to remote peer messages
  @override
  void onMessage({required HMSMessage message}) {
    Message _newMessage = Message(
        message: message.message,
        peerId: message.sender!.peerId,
        time: message.time,
        senderName: message.sender!.name);
    messages.add(_newMessage);
    notifyListeners();
  }

  //Method to listen to Error Updates
  @override
  void onError({required HMSException error}) {
    print(error.message);
  }

  //Method to get the list of current speakers
  @override
  void onUpdateSpeakers({required List<HMSSpeaker> updateSpeakers}) {}

  //Method to listen to room updates
  @override
  void onRoomUpdate({required HMSRoom room, required HMSRoomUpdate update}) {}

  //Method to listen when the reconnection is successful
  @override
  void onReconnected() {}

  //Method to listen while reconnection
  @override
  void onReconnecting() {}

  //Method to be listened when remote peer remove local peer from room
  @override
  void onRemovedFromRoom(
      {required HMSPeerRemovedFromPeer hmsPeerRemovedFromPeer}) {}

  //Method to listen to role change request
  @override
  void onRoleChangeRequest({required HMSRoleChangeRequest roleChangeRequest}) {}

  //Method to listen to change track request
  @override
  void onChangeTrackStateRequest(
      {required HMSTrackChangeRequest hmsTrackChangeRequest}) {}
}
Application architecture
The application is designed to comply with the data flow below:
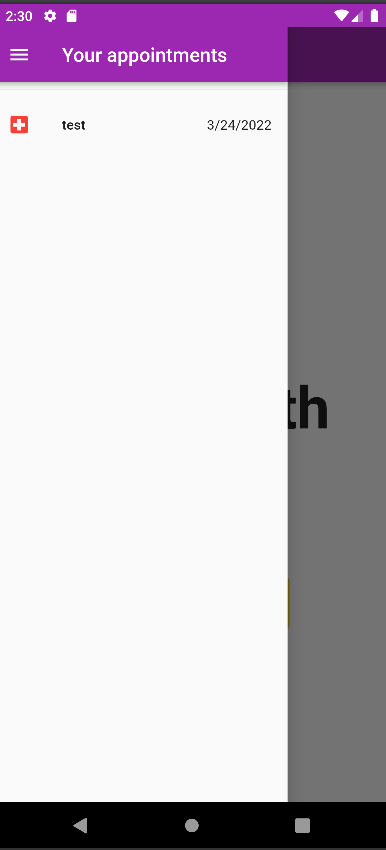
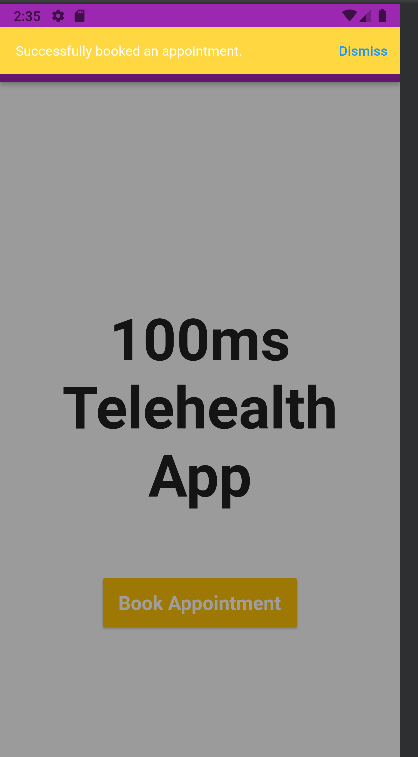
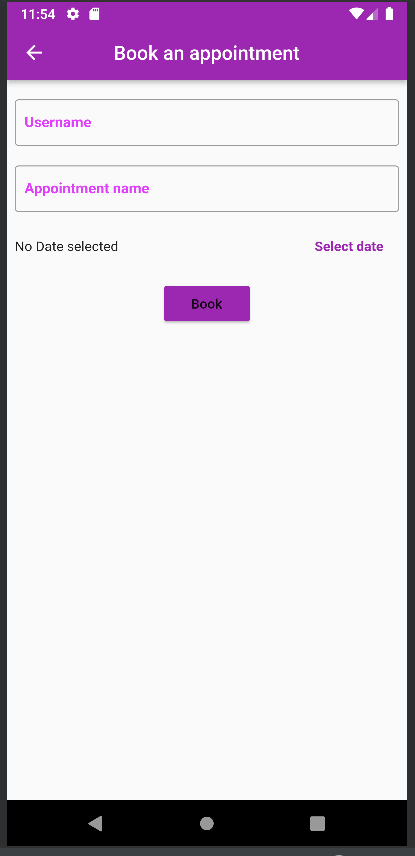
- On the home page, the patient clicks on the “Book Appointment” button which leads to the “Book Appointment” page.
- On the “Book Appointment” page, the patient enters a username and a preferred name that describes the meeting.
- The patient selects the preferred date for the meeting and submits the form.
- Upon submitting the form, the application creates a new appointment in the “Appointments screen” and then returns to the home page.
- From the home page, the user can navigate to the “Appointment screen” and join any previously booked meeting at its stipulated time.
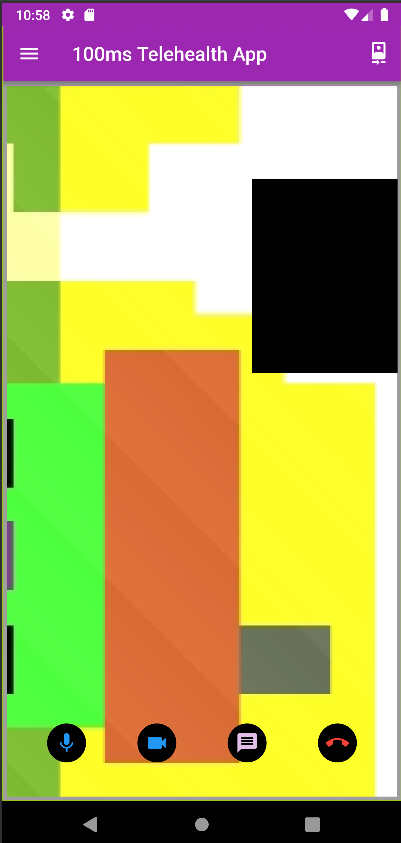
Here is a demo of the application flow:

Book appointment
The code snippet below demonstrates how the application books an appointment for the patient. The patient begins by providing their username, a second name that describes what the meeting will entail, and the date of the meeting.
Upon clicking the “Book” button, the _submitData() method is invoked and the Appointment() object is created on the appointmentsDrawer widget.
The _displayDatePicker() method uses the Flutter showDatePicker to display the date selection feature for the appointment.
class _BookAppointmentState extends State<BookAppointment> {
  final TextEditingController _usernameController = TextEditingController();
  final TextEditingController _appointmentNameController =
      TextEditingController();
  final FocusNode _usernameNode = FocusNode();
  final FocusNode _appointmentNameNode = FocusNode();
  DateTime? _selectedDate;

  // This method displays the date picker to select the appointment date.
  void _displayDatePicker() {
    showDatePicker(
            context: context,
            initialDate: DateTime.now(),
            firstDate: DateTime.now(),
            lastDate: DateTime(2023))
        .then((value) {
      if (value == null) return;
      setState(() {
        _selectedDate = value;
      });
    });
  }
...
}

The _addNewAppointment() method creates a new Appointment()object and adds the newly created appointment to the AppointmentsDrawer() screen that lists all booked appointments for a user.
//This method adds the created appointment to the appointments screen.
void _addNewAppointment() {
  final appointment = Appointment(
    _usernameController.value.text,
    _appointmentNameController.value.text,
    _selectedDate as DateTime,
  );

  setState(() {
    widget.appointmentsDrawer.appointments.add(appointment);
  });
}
The _showTopFlash() method displays the flash message after the user successfully books an appointment.
void _showTopFlash({FlashBehavior style = FlashBehavior.fixed}) {
  showFlash(
    context: context,
    duration: const Duration(seconds: 10),
    persistent: true,
    builder: (_, controller) {
      return Flash(
        controller: controller,
        backgroundColor: Colors.amberAccent,
        brightness: Brightness.light,
        barrierColor: Colors.black38,
        barrierDismissible: true,
        behavior: style,
        position: FlashPosition.top,
        child: FlashBar(
          content: const Text(
            'Successfully booked an appointment.',
            style: TextStyle(color: Colors.white),
          ),
          primaryAction: TextButton(
            onPressed: () {},
            child:
                const Text('Dismiss', style: TextStyle(color: Colors.blue)),
          ),
        ),
      );
    },
  );
}
The _submitData() method receives the user input and validates the values to ensure it is not empty. It then invokes the _addNewAppointment() and _showTopFlash() methods.
void _submitData() {
  final username = _usernameController.text;

  if (username.isEmpty || _selectedDate == null) {
    return;
  }
  _addNewAppointment();
  Navigator.of(context).pop();
  _showTopFlash();
}
Below is the build method for the BookAppointment() screen.
@override
Widget build(BuildContext context) {
  return Scaffold(
    appBar: AppBar(
      title: const Text('Book an appointment'),
      centerTitle: true,
    ),
    body: ListView(children: <Widget>[
      Padding(
        padding: const EdgeInsets.fromLTRB(8, 20, 8, 0),
        child: Column(
          children: [
            TextFormField(
              controller: _usernameController,
              style: const TextStyle(color: Colors.purpleAccent),
              decoration: const InputDecoration(
                  contentPadding: EdgeInsets.all(10),
                  border: OutlineInputBorder(),
                  labelText: 'Username',
                  labelStyle: TextStyle(
                      color: Colors.purpleAccent,
                      fontSize: 15,
                      fontWeight: FontWeight.bold)),
              textInputAction: TextInputAction.next,
              focusNode: _usernameNode,
            ),
            const SizedBox(
              height: 20,
            ),
            TextFormField(
              controller: _appointmentNameController,
              style: const TextStyle(color: Colors.purpleAccent),
              decoration: const InputDecoration(
                  contentPadding: EdgeInsets.all(10),
                  border: OutlineInputBorder(),
                  labelText: 'Appointment name',
                  labelStyle: TextStyle(
                      color: Colors.purpleAccent,
                      fontSize: 15,
                      fontWeight: FontWeight.bold)),
              textInputAction: TextInputAction.next,
              focusNode: _appointmentNameNode,
            ),
            SizedBox(
              height: 70,
              child: Row(
                children: <Widget>[
                  Expanded(
                    child: Text(_selectedDate == null
                        ? 'No Date selected'
                        : 'Appointment date: ${DateFormat.yMd().format(_selectedDate!)}'),
                  ),
                  FlatButton(
                      onPressed: _displayDatePicker,
                      textColor: Theme.of(context).primaryColor,
                      child: const Text(
                        'Select date',
                        style: TextStyle(fontWeight: FontWeight.bold),
                      )),
                ],
              ),
            ),
            RaisedButton(
              onPressed: () => _submitData(),
              child: const Text('Book'),
              textColor: Theme.of(context).textTheme.button!.color,
              color: Theme.of(context).primaryColor,
            ),
          ],
        ),
      ),
    ]),
  );
}
Join a room
To reiterate, the room is the environment or platform where the peers actually interact. In the context of this telehealth application, this is where the e-appointment between the patient and the doctor will take place.
The process of joining a room is broken down into two methods as shown in the snippet below. In the join() method, a POST request is sent to the 100ms token API to generate a token that you will use to join the room via the HMSConfig() and HMSSDK instances.
Future<bool> join(HMSSDK hmssdk, String username) async {
  String roomId = Constants.roomId;
  Uri endPoint = Uri.parse(
      "https://prod-in.100ms.live/hmsapi/decoder.app.100ms.live/api/token");
  Response response = await post(endPoint,
      body: {'user_id': username, 'room_id': roomId, 'role': "host"});
  var body = json.decode(response.body);
  if (body == null || body['token'] == null) {
    return false;
  }
  print(body);
  HMSConfig config = HMSConfig(authToken: body['token'], userName: username);
  await hmssdk.join(config: config);
  return true;
}

Future<bool> initiateMeeting(String username) async {
  setState(() {
    isLoading = true;
  });

  SdkInitializer.hmssdk.build();
  bool ans = await join(SdkInitializer.hmssdk, username);
  if (!ans) {
    return false;
  }
  _appManager = AppManager();
  _appManager.startListen();
  setState(() {
    isLoading = false;
  });
  return true;
}
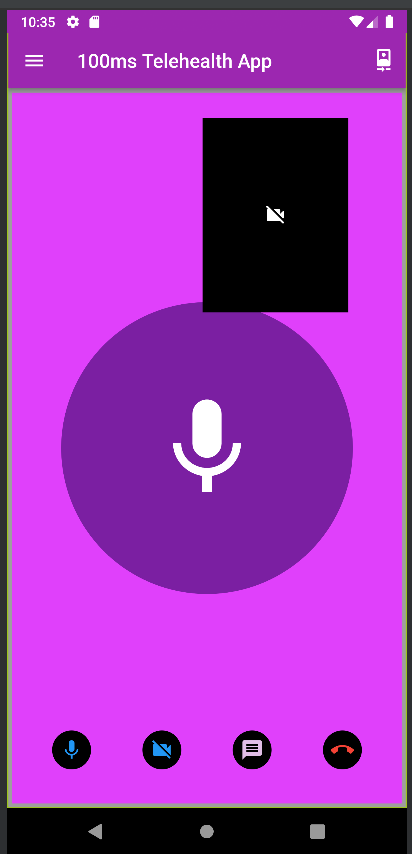
Mute/Unmute
The code snippet below implements the mute/unmute feature of the application for peers:
CircleAvatar(
  backgroundColor: Colors.black,
  child: IconButton(
    icon: isAudioOn
        ? const Icon(Icons.mic)
        : const Icon(Icons.mic_off),
    onPressed: () {
      SdkInitializer.hmssdk.switchAudio();
      setState(() {
        isAudioOn = !isAudioOn;
      });
    },
    color: Colors.blue,
  ),
)
The hmssdk instance contains a method that performs the mute/unmute operation. It takes a boolean argument that determines whether or not the audio should be mute.
Video
The below code snippet implements the video rendering feature of the application for peers:
CircleAvatar(
  backgroundColor: Colors.black,
  child: IconButton(
    icon: isVideoOn
        ? const Icon(Icons.videocam)
        : const Icon(Icons.videocam_off),
    onPressed: () {
      SdkInitializer.hmssdk.switchVideo(isOn: isVideoOn);
      if (!isVideoOn) {
        SdkInitializer.hmssdk.startCapturing();
      } else {
        SdkInitializer.hmssdk.stopCapturing();
      }
      setState(() {
        isVideoOn = !isVideoOn;
      });
    },
    color: Colors.blue,
  ),
)
In the above code snippet, you’re able to turn your camera feature on/off by invoking the hmssdk.switchVideo() method. This method takes a boolean parameter that determines whether or not the camera should be turned on.
100ms renders the video on the interface using the HMSVideoView() object. When you pass a track to this object, the application listens to the state of the track and will render the video on the track based on whether or not the camera is turned on.
Widget localPeerVideo(HMSVideoTrack? localTrack) {
    return Container(
      height: 200,
      width: 150,
      color: Colors.black,
      child: (isVideoOn && localTrack != null)
          ? HMSVideoView(
              track: localTrack,
            )
          : const Icon(
              Icons.videocam_off_rounded,
              color: Colors.white,
            ),
    );
  }
You can also switch the camera option from front view to rear view using the hmssdk.switchCamera() method.
IconButton(
    onPressed: () {
        SdkInitializer.hmssdk.switchCamera();
    },
    icon: const Icon(Icons.camera_front)
)
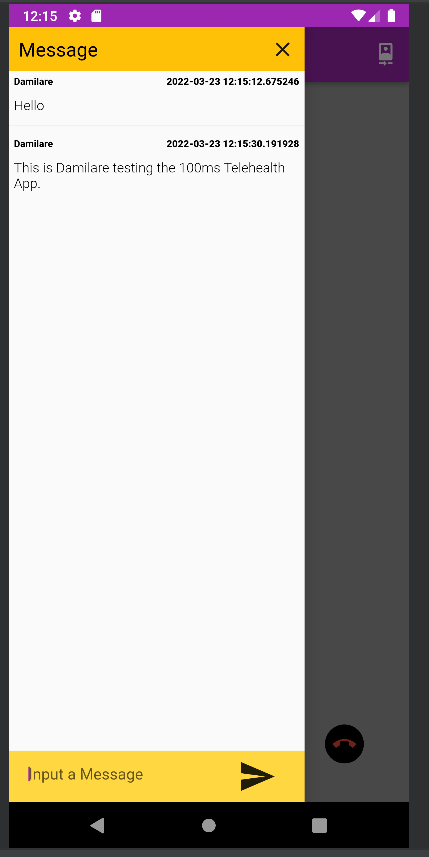
Chat
To implement the chat feature, we’ll leverage the onMessage() listener. Each time a peer sends a message, it invokes the hmssdk.sendBroadcastMessage() method. This method contains a message parameter that represents the message you want to send to the chat.
GestureDetector(
  onTap: () {
    if (messageTextController.text.trim().isNotEmpty) {
      SdkInitializer.hmssdk.sendBroadcastMessage(
          message: messageTextController.text);
      setState(() {
        _messages.add(Message(
            message: messageTextController.text.trim(),
            time: DateTime.now().toString(),
            peerId: "localUser",
            senderName: localPeer.name));
      });
      messageTextController.text = "";
    }
  },
  child: const Icon(
    Icons.send,
    size: 40.0,
  ),
)
So how does the app communicate these chat messages among peers in the room? The appManager has a messages property that holds a list of Message objects. Each time the hmssdk broadcasts a message, it invokes the onMessage() listener that adds that message to the list of messages.
//Method to listen to remote peer messages
@override
void onMessage({required HMSMessage message}) {
  Message _newMessage = Message(
      message: message.message,
      peerId: message.sender!.peerId,
      time: message.time,
      senderName: message.sender!.name);
  messages.add(_newMessage);
  notifyListeners();
}
On the MessageScreen(), the app listens to this list of messages using the Provider state manager. Here, it renders the messages on the screen using specified formats detailed in the ListView() widget, as shown in the snippet below:
class _MessageScreenState extends State<MessageScreen> {
  late double width;
  TextEditingController messageTextController = TextEditingController();

  @override
  Widget build(BuildContext context) {
    width = MediaQuery.of(context).size.width;
    List<Message> _messages =
        Provider.of<AppManager>(context, listen: true).messages;
    final localPeer = Provider.of<AppManager>(context, listen: false).localPeer;
    return Drawer(
      child: SafeArea(
          bottom: true,
          minimum:
              EdgeInsets.only(bottom: MediaQuery.of(context).viewInsets.bottom),
          child: Center(
            child: Column(
              mainAxisSize: MainAxisSize.min,
              children: [
                Container(
                  padding: const EdgeInsets.all(10.0),
                  color: Colors.amber,
                  child: Row(
                    children: [
                      const Expanded(
                        child: Text(
                          "Message",
                          style: TextStyle(color: Colors.black, fontSize: 20.0),
                        ),
                      ),
                      GestureDetector(
                        onTap: () {
                          Navigator.of(context).pop();
                        },
                        child: const Icon(
                          Icons.clear,
                          size: 25.0,
                        ),
                      )
                    ],
                  ),
                ),
                Expanded(
                  child: _messages.isEmpty
                      ? const Center(child: Text('No messages'))
                      : ListView.separated(
                          itemCount: _messages.length,
                          itemBuilder: (itemBuilder, index) {
                            return Container(
                              padding: const EdgeInsets.all(5.0),
                              child: Column(
                                crossAxisAlignment: CrossAxisAlignment.start,
                                mainAxisSize: MainAxisSize.min,
                                children: [
                                  Row(
                                    children: [
                                      Expanded(
                                        child: Text(
                                          _messages[index].senderName,
                                          style: const TextStyle(
                                              fontSize: 10.0,
                                              color: Colors.black,
                                              fontWeight: FontWeight.bold),
                                        ),
                                      ),
                                      Text(
                                        _messages[index].time.toString(),
                                        style: const TextStyle(
                                            fontSize: 10.0,
                                            color: Colors.black,
                                            fontWeight: FontWeight.w900),
                                      )
                                    ],
                                  ),
                                  const SizedBox(
                                    height: 10.0,
                                  ),
                                  Text(
                                    _messages[index].message.toString(),
                                    style: const TextStyle(
                                        fontSize: 14.0,
                                        color: Colors.black,
                                        fontWeight: FontWeight.w300),
                                  ),
                                ],
                              ),
                            );
                          },
                          separatorBuilder: (BuildContext context, int index) {
                            return const Divider();
                          },
                        ),
                ),
                Container(
                  color: Colors.amberAccent,
                  margin: const EdgeInsets.only(top: 10.0),
                  child: Row(
                    children: [
                      Container(
                        margin: const EdgeInsets.only(bottom: 5.0, left: 5.0),
                        child: TextField(
                          autofocus: true,
                          controller: messageTextController,
                          decoration: const InputDecoration(
                              focusedBorder: InputBorder.none,
                              contentPadding: EdgeInsets.only(
                                  left: 15, bottom: 11, top: 11, right: 15),
                              hintText: "Input a Message"),
                        ),
                        width: 230,
                      ),
                      GestureDetector(
                        onTap: () {
                          if (messageTextController.text.trim().isNotEmpty) {
                            SdkInitializer.hmssdk.sendBroadcastMessage(
                                message: messageTextController.text);
                            setState(() {
                              _messages.add(Message(
                                  message: messageTextController.text.trim(),
                                  time: DateTime.now().toString(),
                                  peerId: "localUser",
                                  senderName: localPeer.name));
                            });
                            messageTextController.text = "";
                          }
                        },
                        child: const Icon(
                          Icons.send,
                          size: 40.0,
                        ),
                      )
                    ],
                  ),
                )
              ],
            ),
          )),
    );
  }
}
The ListView() widget renders the message, the name of the sender, and the date/time the message was sent.
And that’s it. You now have a functioning telehealth application with the basic features, ready to go. The starter app and final project are available on Github here.
This tutorial demonstrated how you can integrate the 100ms SDK into your Flutter application. As depicted, the process of creating an app for such a specific use case (online consultations) is made much easier with 100ms’ SDK and its concept of roles, in particular.
To learn more about 100ms and how to integrate the tools on your application, the 100ms documentation is a good place to start. You can also explore other articles to gain more practical insights into using 100ms to build applications catering to various scenarios, audiences and use-cases.
Engineering
Share
Related articles
See all articles