Workspaces
A Workspace in the context of 100ms is an isolated and secure environment within an account that manages resources for video conferencing and live streaming applications. It includes templates, rooms, session history, and developer credentials such as API keys and secrets. This centralized platform stores usage and activity data, while also offering granular access control and permissions management for team members.
Using Workspaces
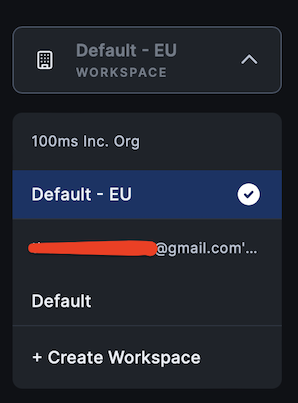
You can create or switch between workspaces using the intuitive workspace switcher located in the top-left section of your dashboard. This user-friendly interface ensures that you can easily navigate and manage multiple workspaces, all belonging to your organization's account.
By leveraging workspaces, you can maintain a clear separation of resources, data, and team members, while benefiting from a centralized platform to streamline your development and collaboration efforts. Workspaces are versatile and can be used to either represent different sub-organizations or operational environments, such as "Production," "Development," or "Staging."
IMPORTANT
Workspaces cannot be deleted.
Default Workspace
When an account is created, the first Workspace is created by default.
Workspace Members - Role Based Access Control (RBAC)
Workspaces facilitate efficient teamwork and access control by allowing you to invite users and assign them specific permissions or roles. This feature ensures that sensitive information is shared securely.
To create workspace-specific teams, you can add members to each workspace. Members are exclusive to the workspace they are added to and won't be visible in other workspaces unless explicitly added.
The ability to edit templates, create rooms, and modify settings within a workspace depends on the member's membership type. The following table outlines the available membership types and their respective access permissions:
| Membership Type | Permissions | Rooms (Create or modify) | Templates (Create or modify) | Developer Configuration | Workspace Settings | Organization Settings |
|---|---|---|---|---|---|---|
| Organization Owner | Full access to manage related workspaces | ✅ | ✅ | ✅ | ✅ | ✅ |
| Admin | Create, edit, and delete templates and rooms | ✅ | ✅ | ✅ | ✅ | ❌ |
| Member | Create, edit and delete templates and rooms | ✅ | ✅ | ❌ | ❌ | ❌ |
| Read Only | Only view templates, rooms, and sessions | ❌ | ❌ | ❌ | ❌ | ❌ |
Inviting Users to Workspaces
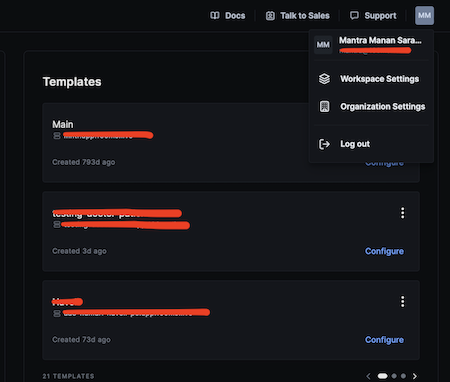
Developers and team members can be invited to collaborate within a specific workspace to facilitate a coordinated development and management process. Here’s how you can invite new members:
- Access Workspace Settings:
- Click on your account initials located at the top-right corner of the 100ms dashboard to open a drop-down menu.
- Select 'Workspace Settings' from the menu.
- Invite Members:
- Once in the 'Workspace Settings', navigate to the 'Members' tab.
- Click on 'Invite Members' to proceed with adding new collaborators.
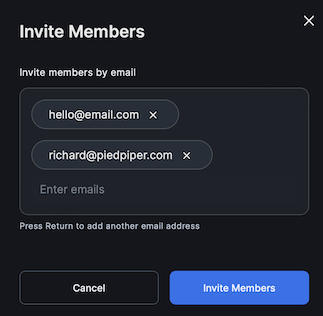
- Send Invitations:
- Enter the email addresses of the individuals you wish to invite.
- An invitation email will be automatically sent to these addresses, containing a link to join the workspace.
- Set Member Roles:
- After the invitees accept the invitation and join the workspace, you can update their role type to one of the predefined membership roles, allowing appropriate access and permissions based on their responsibilities. This can be done by clicking on the overflow menu (three dots) beside the member emails, and then clicking on 'Change Role'.
Workspace Developer Credentials
Each Workspace has a unique set of access key and secret keys present under Developer section. These keys can be used for the following purposes:
- Generating authentication tokens for clients when peers join a room.
- Accessing server-side APIs through management tokens.
In addition to workspace keys, the Developer section also contains:
- SIP credentials - They are required to authenticate the requests to connect to 100ms’ SIP bridge along with our SIP Address. These credentials consist of a
usernameandpasswordfor a workspace. - Webhook configuration - Webhook URL can be configured for a Workspace with a custom headers. Read more about how to configure webhooks.
Note that only Organization Owner and Admin have access to the developer sections.
Data Residency of Workspaces
Data residency refers to the geographical location where data is stored and processed. In 100ms, users have the flexibility to choose the data residency for each Workspace to ensure compliance with local data protection regulations and to optimize the application's performance by minimizing latency.
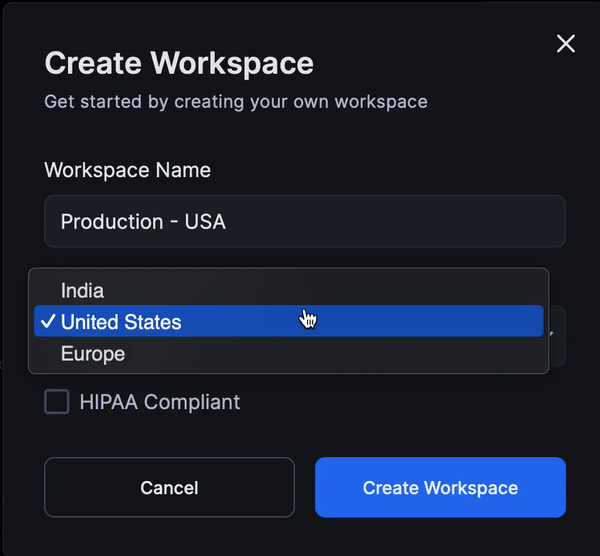
When creating a new Workspace, users can select the preferred data residency from among the available regions: USA, Europe, and India. This selection dictates that all data associated with the Workspace, including templates, rooms, session details, and recordings, will be stored in the selected region. Additionally, the media servers in the chosen region will be utilized for video conferencing activities.
By default, the first Workspace created by a user will have its data residency set to the server region geographically nearest to the user when signing up on the 100ms platform. This default setting is designed to optimize latency and overall user experience without manual configuration. Subsequent workspaces can be configured individually to meet specific needs or preferences regarding data location. To know about the data residency of a Workspace, navigate to 'Workspace Settings' to get 'Workspace Details'.

Managing Multiple Regions with Workspaces
For operations spanning multiple geographic regions, it is recommended to create separate Workspaces for each region. This approach allows you to manage data residency effectively by ensuring that each Workspace operates within its specified region, thus adhering to local data protection laws and optimizing the performance of your video conferencing applications.
Additionally, if there is a need to specify a region for a room that differs from the default region configured in the Workspace or template, you can achieve this by using the Create Room REST API. This API allows you to explicitly set the region for a room during its creation, providing flexibility in cases where the default data residency settings do not meet specific requirements for a particular session or use case.
HIPAA Workspaces
Users can create workspaces that are instrumented to be HIPAA compliant. This can be accomplished by selecting the 'HIPAA Compliant' checkbox when creating a new Workspace. Read more about HIPAA workspaces.