SDK Mental Model
Our Web SDK enables you to build live, interactive apps that can run in browser-like environments. This page provides an overview of the SDK's design to help you develop a mental model for structuring your app and browsing through other parts of the documentation.
We have designed our SDK with three main goals:
- Absorbing Complexity - The application code should be simple, even if it is at the cost of the SDK's internal complexity.
- Ease of debugging - The SDK's interface should encourage simplicity and minimise errors. If something does go wrong, it should be easy to identify the issue. For example, the SDK connects with a Browser extension to show the entire state at any time.
- Making Docs Redundant - The API surface should be small, intuitive, and optimized for intellisense. All details should be accessible without leaving the editor window, from types(the SDK is written in Typescript) to documentation.
100ms Mental Model - What do we do
We’re building infrastructure to power live interactions. Live interaction refers to anything happening in real-time or near real-time. Examples include video and audio calls(such as Google Meet or Zoom), live streaming(like Twitch or YouTube Live), real-time chat messages(often included as part of the previous two), and collaborative tools like whiteboards and document editors. Additionally, there are offshoots of these live interactions, such as post-call recordings or transcriptions, which can be accessed later.
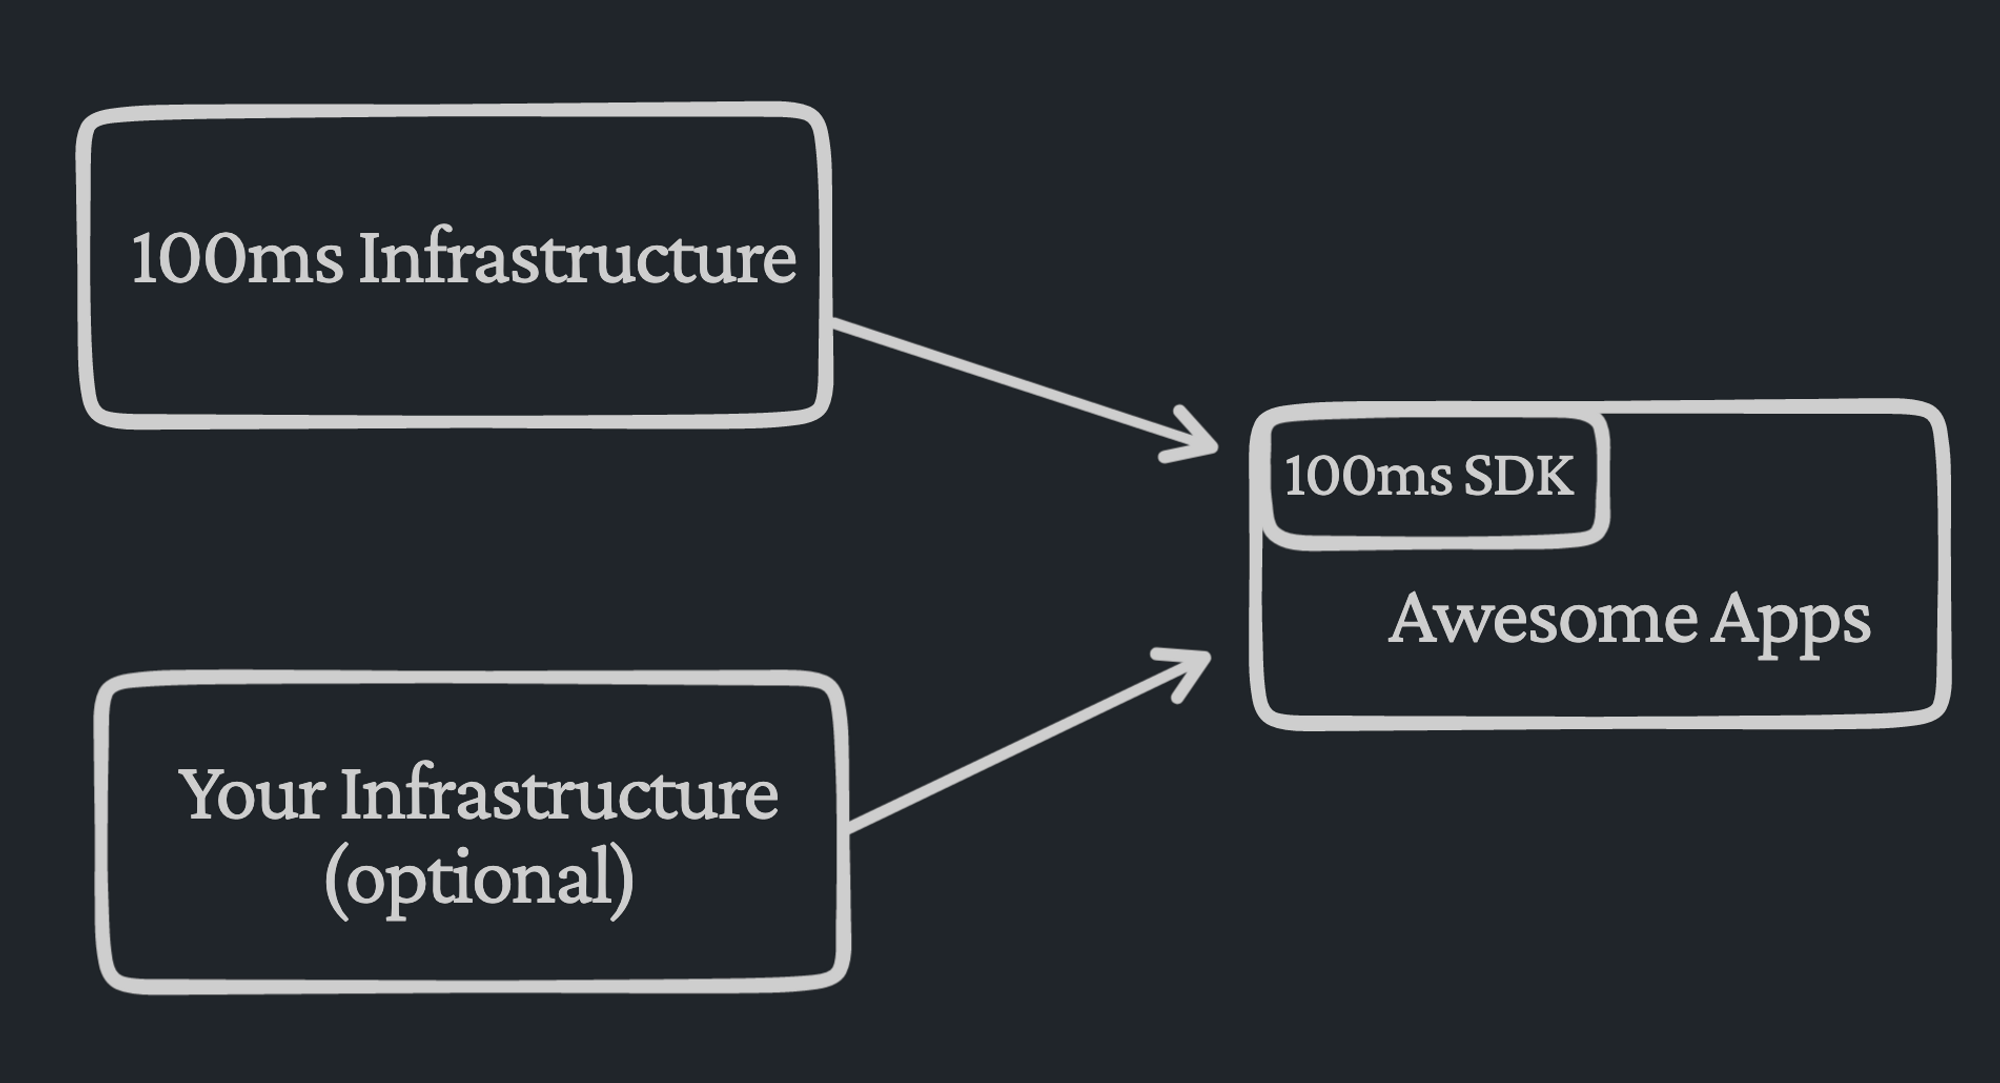
But why would you use 100ms instead of say Google Meet? Well, if you just want to have a one-time call with your friends, you probably won’t. What we enable you to do is build your own Google Meet or build a deeper integration in your app for live interactions. This gives you multiple benefits -
- Build richer interactions - you can customize the user interface (UI) to your liking. For example, you can show funny avatars when someone mutes their video or add a button to fly emojis across the screen. The possibilities are endless.
- Enhance collaboration - embed whiteboards, games, documents, and more to make the app engaging and enjoyable.
- Richer analytics and visibility - with increased control, you can go beyond tracking just the users joining and leaving the call. For example you can do posture tracking to make a Yoga call more helpful.
- Add another dimension to the core functionality like adding audio calls in your gaming app or a way to upgrade to video calls in your chat module.
- Integrate with IoT devices - connect your drone's camera to a mobile app, or stream your CCTV feed in real-time.
Glossary
-
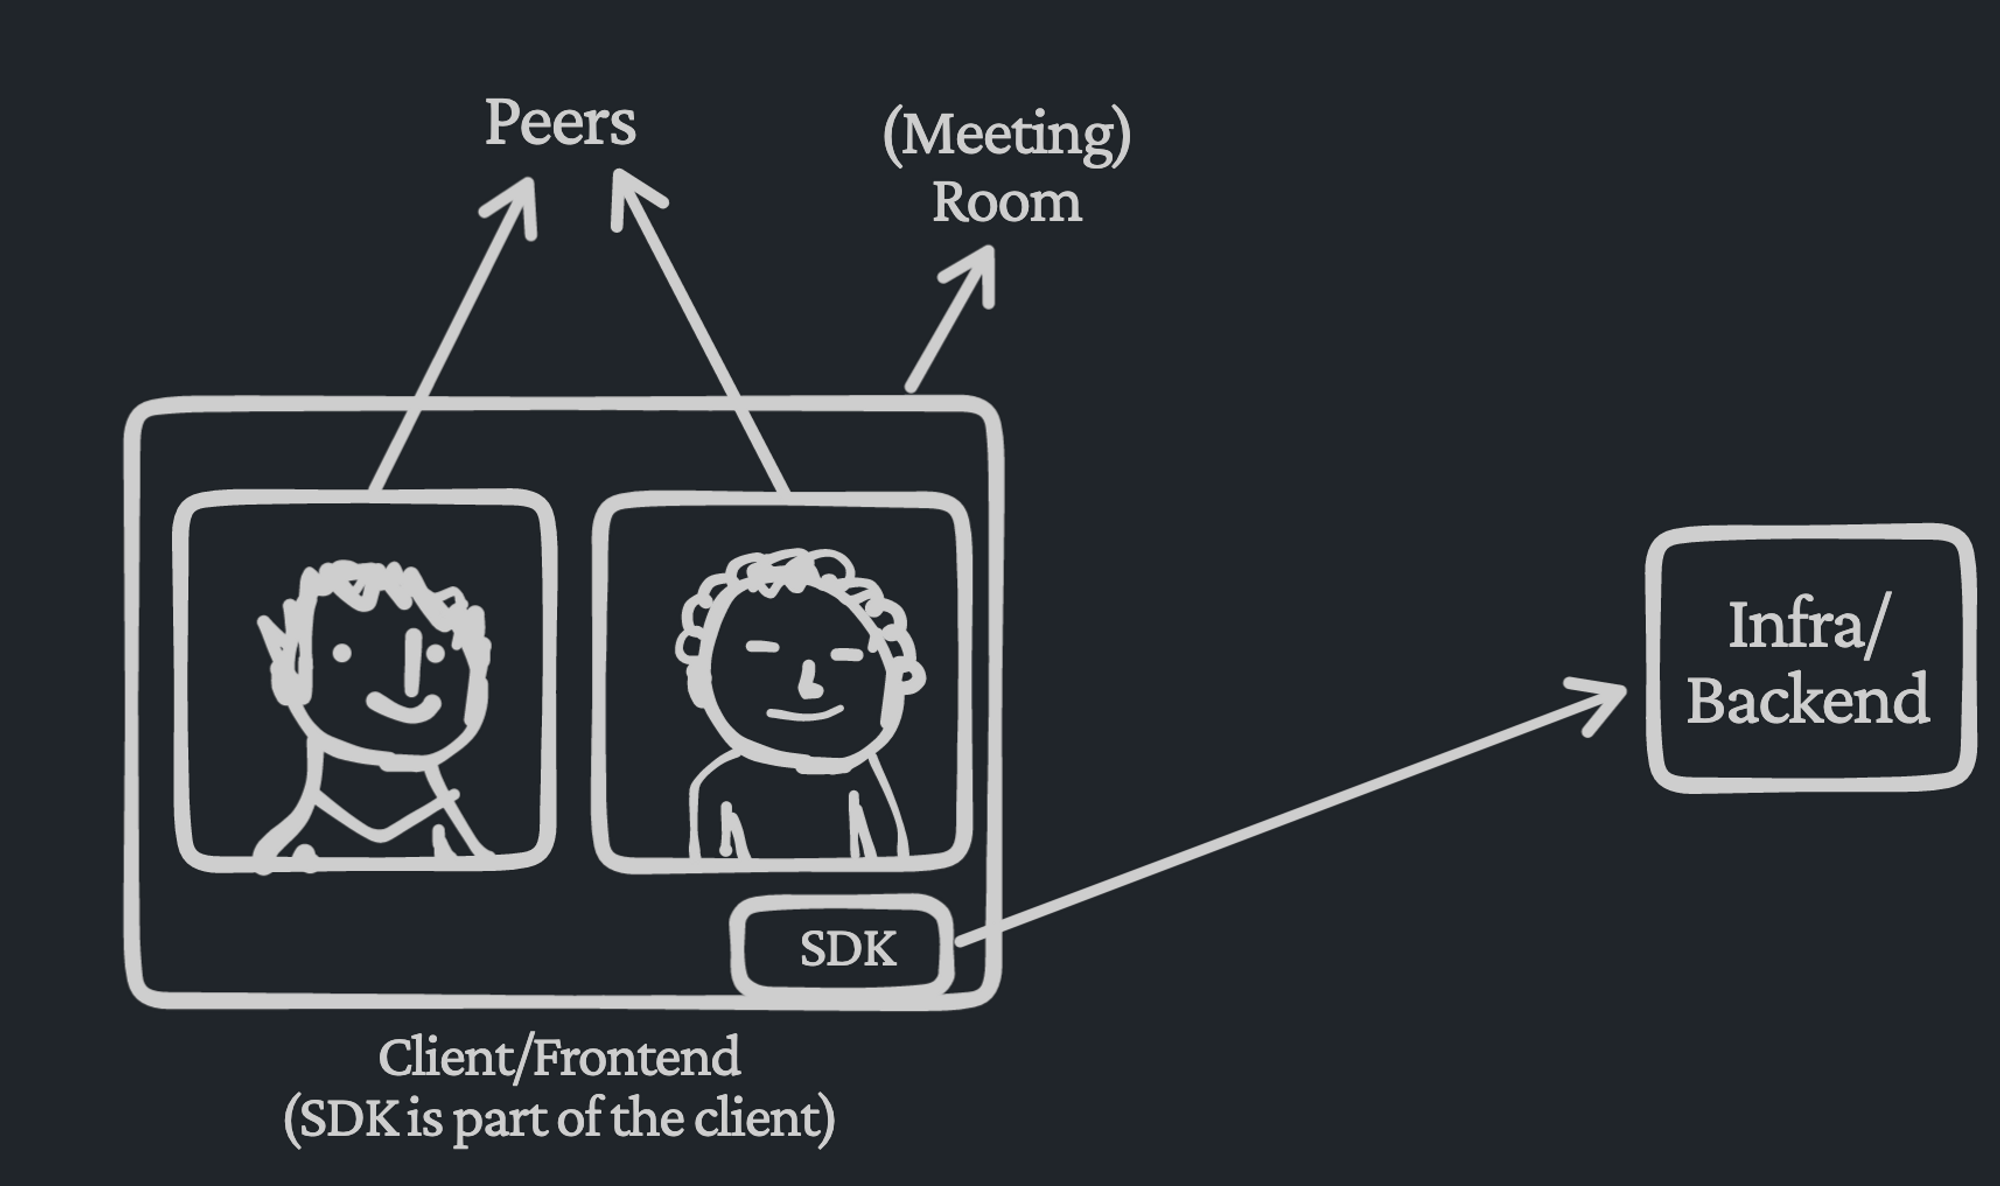
Room - A virtual space where a live call takes place.
-
Peer - A participant in the aforementioned room.
-
Client/Frontend - The user-facing application, which can be a website or a desktop/mobile application.
-
Infra/Backend - The servers that power the client. The client interacts with the infra to build user-facing features on top. Infra stands for infrastructure.
-
SDK - A task/product-specific code layer that abstracts out client-side complexities and wraps interactions with infra. It's like a library which is part of the client.
The Need for an SDK
Not all infrastructure services require an explicit SDK to be installed. For example, an analytics service might just provide a few REST API calls to send events. These can be used with any standard HTTP module (or fetch in the JS world).
However, in our case, there is a lot that goes on the client side. For instance, in case of an audio call, we need to take care of acquiring permissions for the microphone, handling device changes, and dealing with network disconnections. Additionally, the interaction between the client and the backend is complex and requires real-time, bidirectional communication. Writing all this in the application layer code would be an unreasonable expectation, which is where the SDK comes in. It abstracts out the client-side complexity as well as acts as an indirection layer between the application and our servers.
Breaking down a Video Call - Actions and States
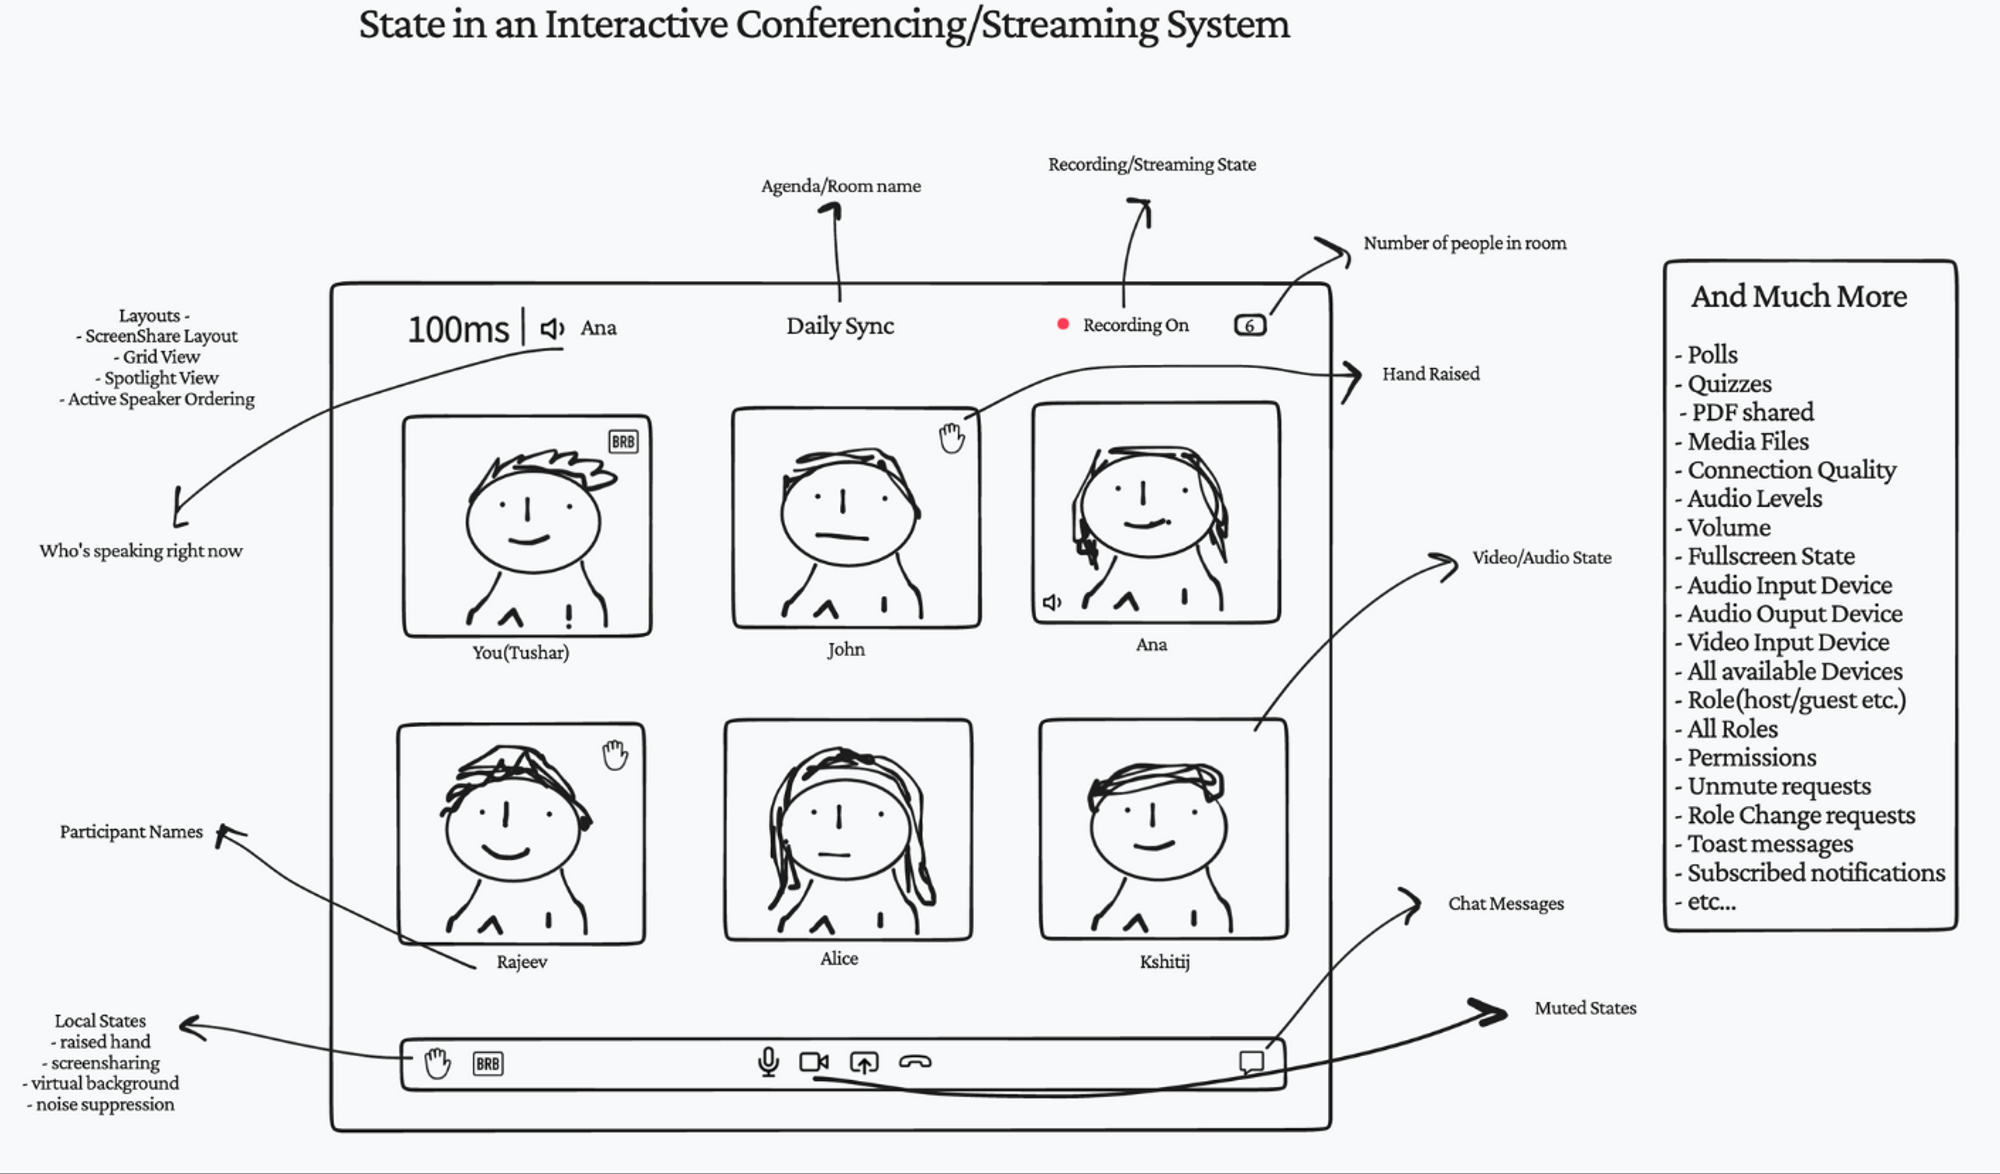
There is a lot that goes on in a typical video call. For the best user experience, we need to focus not only on individual features but also on how they work together. As more features are added, this can become complex and difficult to manage. Poor code architecture can lead to regressions and hard-to-debug state-related issues. A good way to design our codebase is by following the Flux architecture. To understand this better, let’s divide everything going on into two broad categories - things we see(State), and things we do(Actions). Some examples of both categories -
| Actions(Things we do) | State(Things we see) |
|---|---|
| join/leave the room | other people in the room |
| muting and unmuting yourself | audio and video state of everyone |
| starting and stopping recording | whether the recording is on |
| send a chat message | chat messages exchanged |
| share our screen | screen shared by others |
SDK Mental Model - hmsActions and hmsStore
Now that we’ve gone through what we do and what all happens in a typical video call let’s dive further into the Web SDK. Despite the underlying complexity and flexibility, the API surface of the SDK is pretty simple and intuitive. We’ll build a mental model for the core concepts which will help across any use case.
Note that the API design is different from conventional SDKs in both the live SDK world and beyond. It’s opinionated to some degree and simplifies the app layer code eliminating a whole class of errors. The general design will look familiar if you have used either Redux or Zustand. These libraries as well as our SDK are based on the Flux architecture.
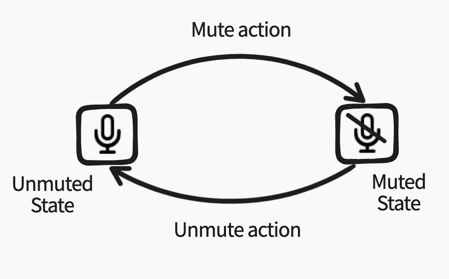
Let’s zoom in further into the previous categorization of action and state with the example of a mute button. There are two states the button can take, mute or unmute. You can choose to render the current button in a different way depending on this state. You can also toggle between the states by clicking on the button(”action”). The below image shows the two different UI states for mute and arrows showing a toggle between them.
At the surface, muting appears to be a simple thing. This is how a typical psuedo code for it might look like in Javascript. The function tracks the state and modifies it once the action is taken.
function MuteButton() {
    let muted = false;  // state
    const button = getButtonIcon("unmutedAudio");
    button.onClick = () => {  // handling action
        muted = !muted;  // toggle the state when clicked
        broadcastNewMuteState(muted);  // tell others in the room about the change
        // change the icon per the state
        button.setIcon(muted ? "mutedAudio" : "unmutedAudio");
    }
    return button;
}
This looks straightforward but what happens when other UI components are also interested in knowing the mute state? For example
Video Tile- seeing the muted state for every personVideo List- using the muted state for prioritizing unmuted peers on the first page of a paginated viewParticipant List- displaying muted state while showing a list of everyone in the roomAnalytics Service- sending the muted state to the server for tracking engagement
Further, the action doesn’t need to happen as a result of you clicking on the button. It may be possible for others in the room to mute you remotely. Or your wireless headset getting disconnected with no fallback for the microphone. If the link between the action and the state is not managed responsibly, this can lead to chaos. Every time an action happens, we’ll need to ensure that all the components which rely on the affected state have their state updated as well.
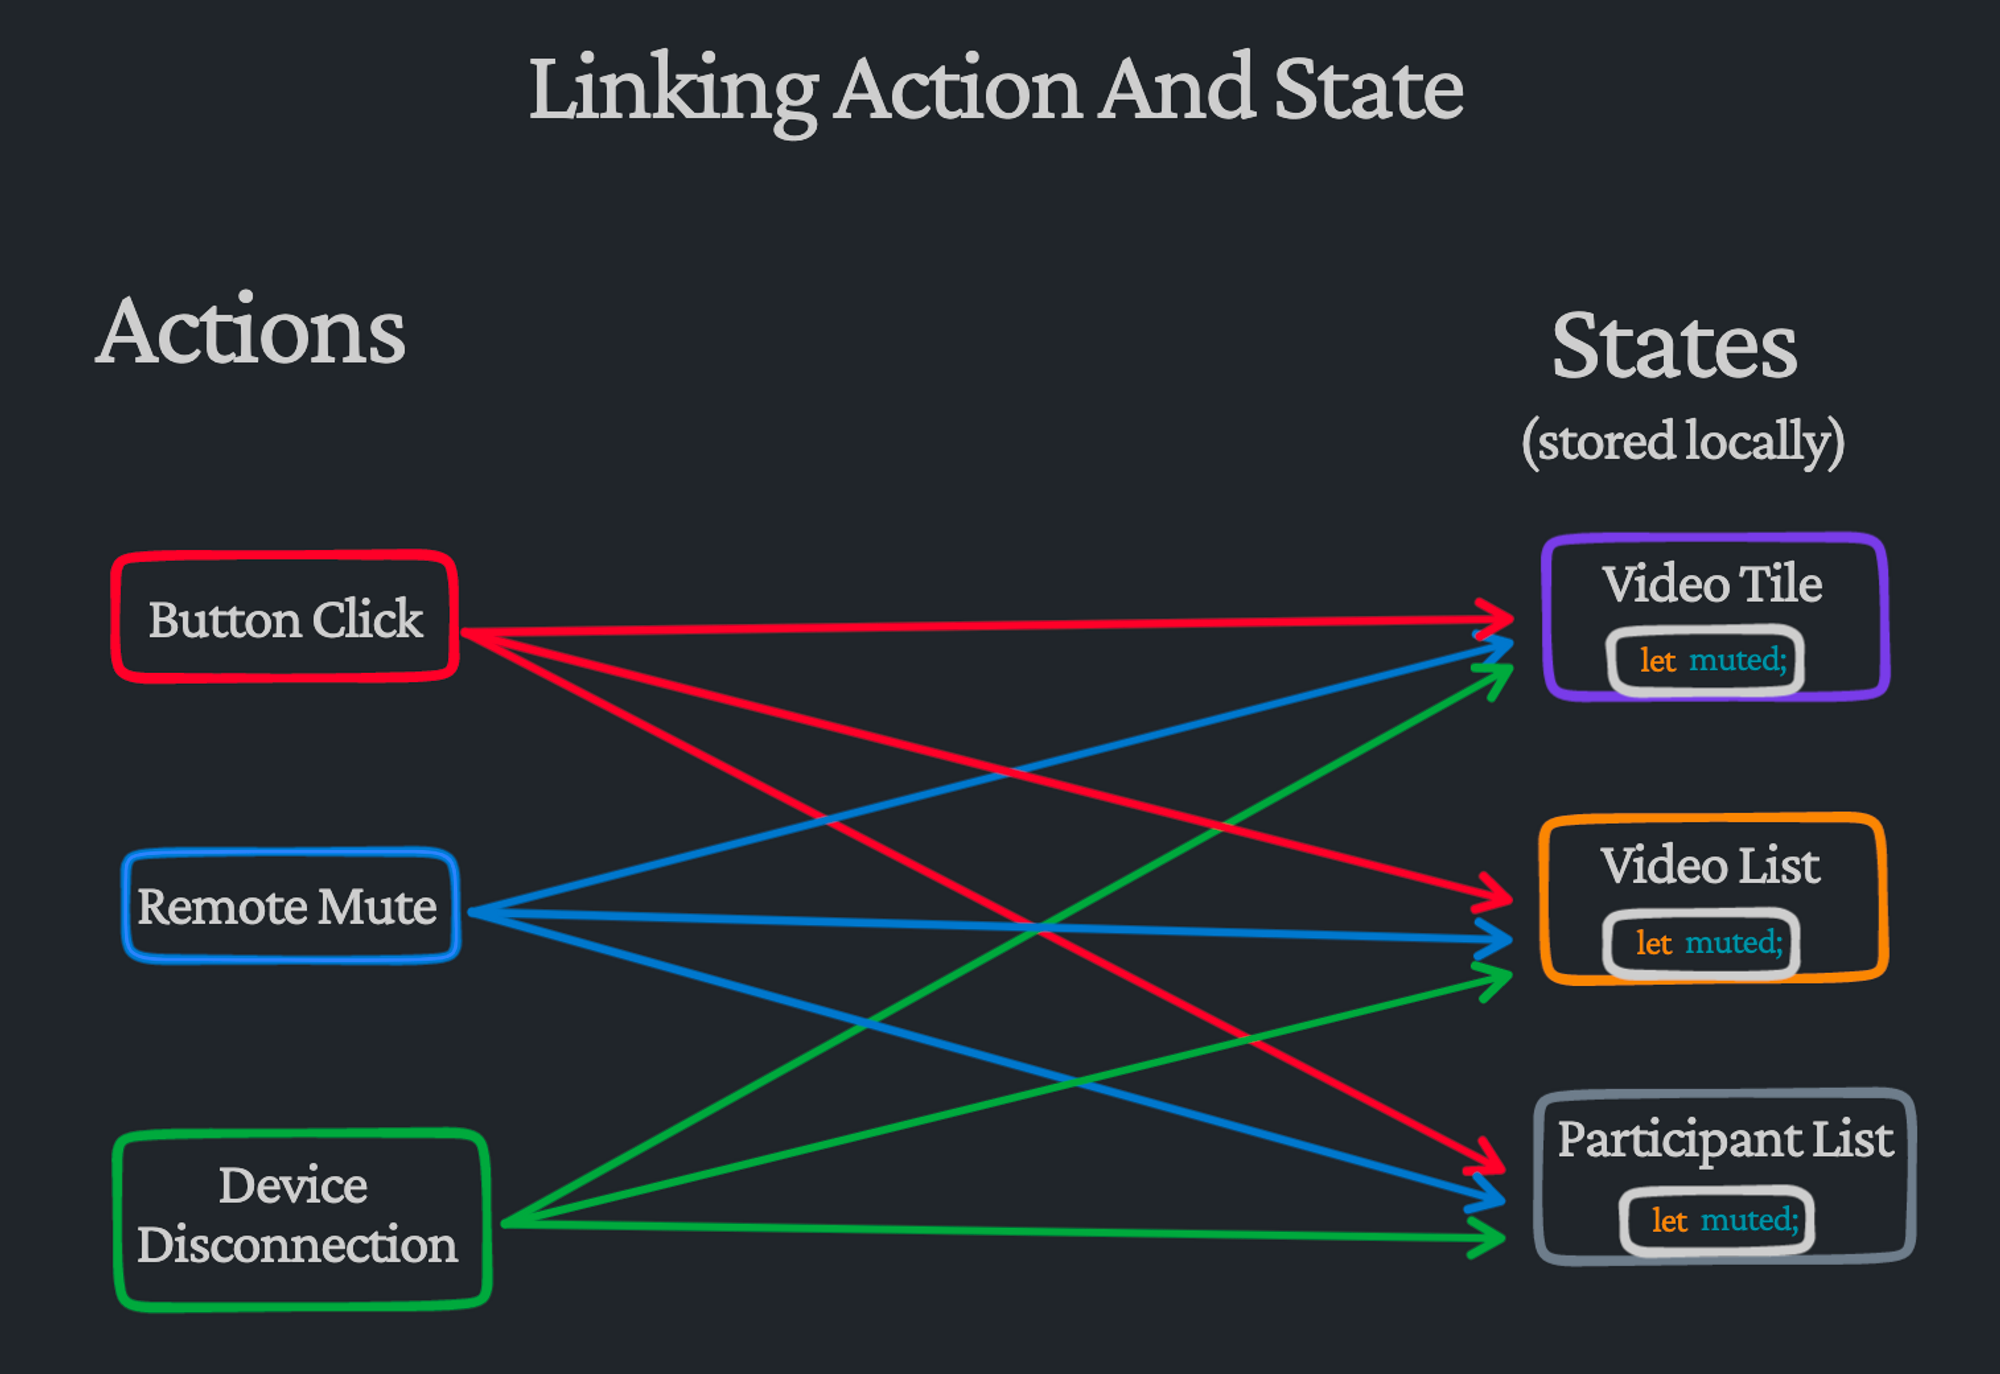
As the number of actions and states increases, doing this reliably becomes more difficult. Every time a new component needs the muted state, it must be tied to every action which can modify it. Similarly, whenever a new action affects the muted state, it must be connected to all parts of the codebase that rely on the state. With so much going on in a live call(peer join/leave, tracks getting muted/unmuted, chat messages, devices changing, fluctuating network connection, polls, whiteboard, etc.), the codebase will become tightly coupled and fragile.
Linking Actions and State
Another way to think about the relationship between action, state, and the UI is to think of it in terms of sources and destinations. There can be multiple sources for the action and multiple destinations interested in the state.
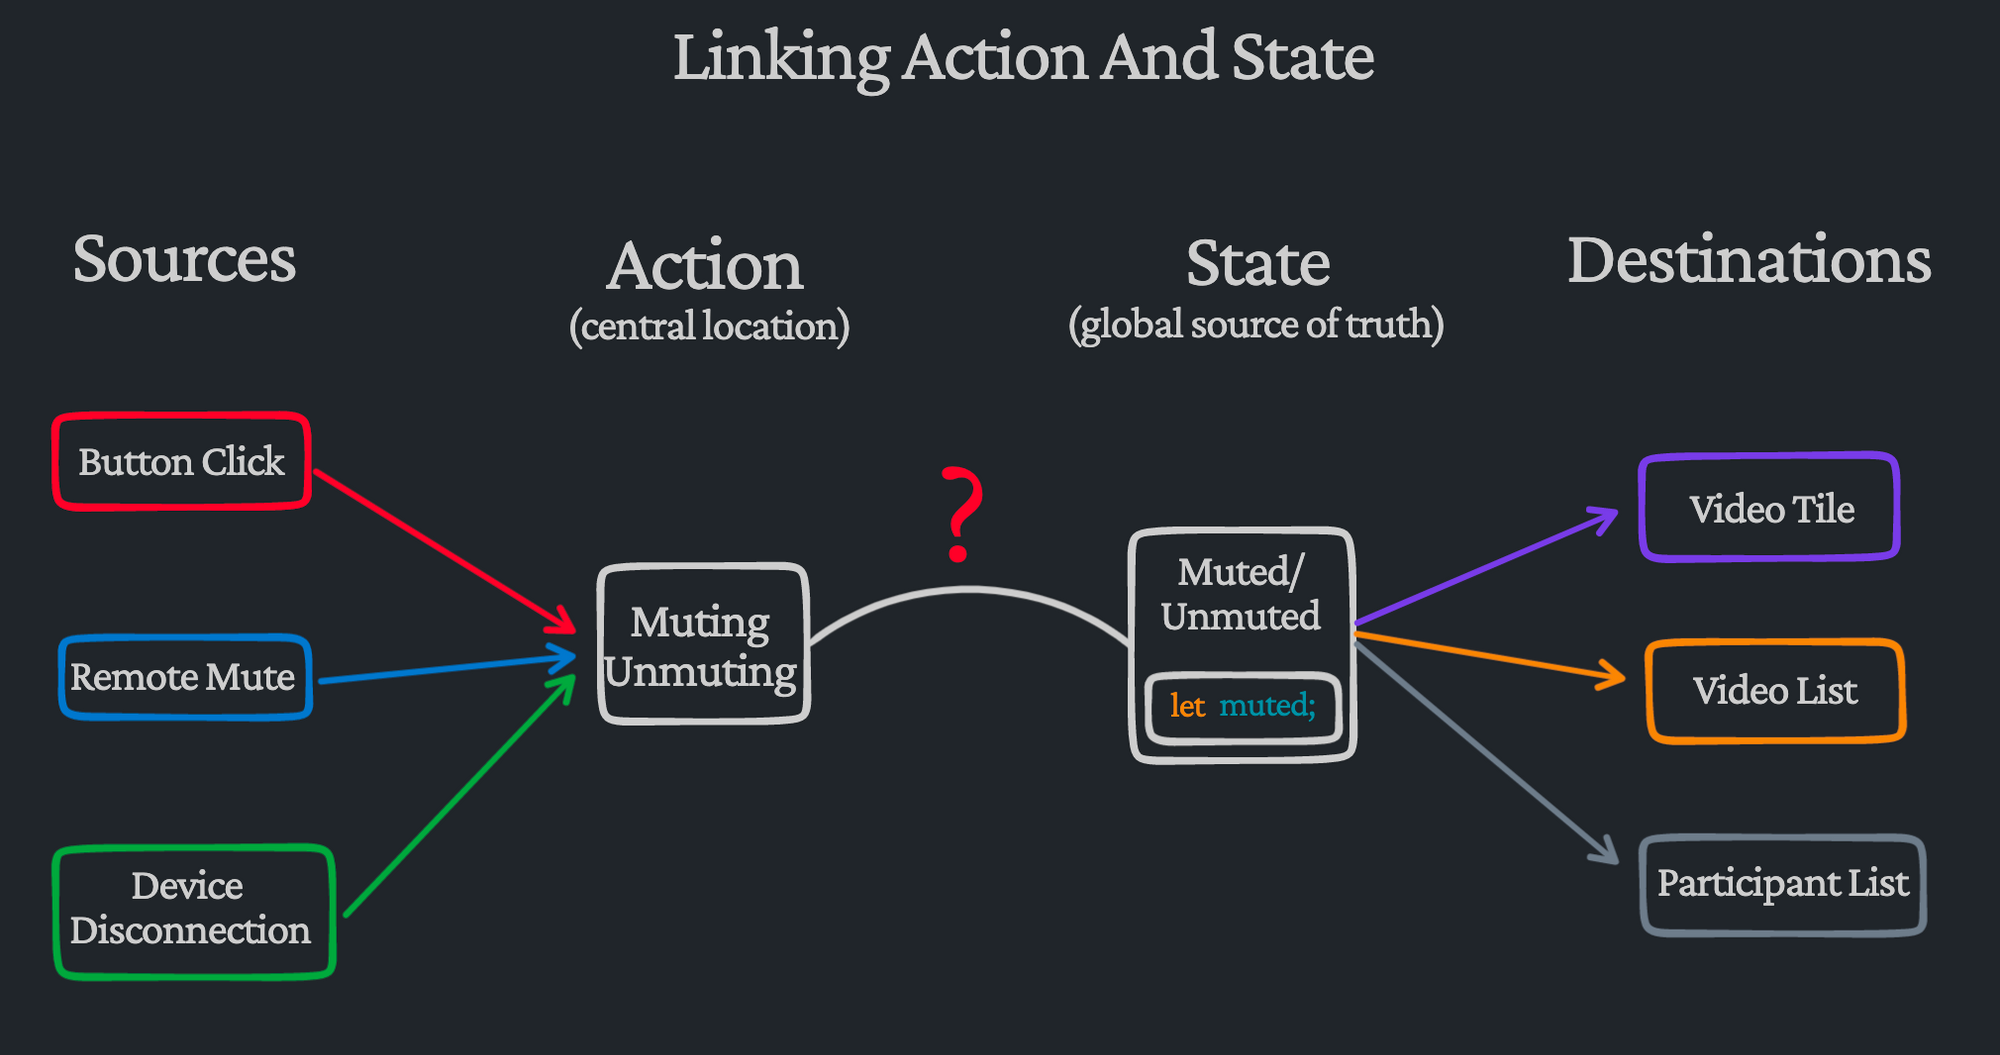
As we see in the image, this appears to bring order to the chaos. If we design our code such that actions and states are decoupled, it will make it easier to reason about the codebase. We can move all states to a global store that acts as a source of truth. All destinations then rely on the centrally stored state instead of maintaining their own copies. Similarly, all possible actions can be moved to a central location, and any source interested in triggering the action can reach out to that central location. This way, it doesn't matter which source triggered the action or which destinations rely on the state.
Rethinking our previous example, if we’re adding a new component that needs the muted state, it only needs to be tied to the global state. And if we want to add a new source that impacts the muted state, it only needs to be linked to the central entity holding all the actions.
The actions, global store, and the link between them are where our SDK comes in. It encapsulates both, providing two primary objects for its API surface - hmsActions and hmsStore(hms=hundredMs=100ms). hmsActions is the central location that holds all the possible actions and hmsStore is the global source of truth that contains states related to everything that is happening in the call.
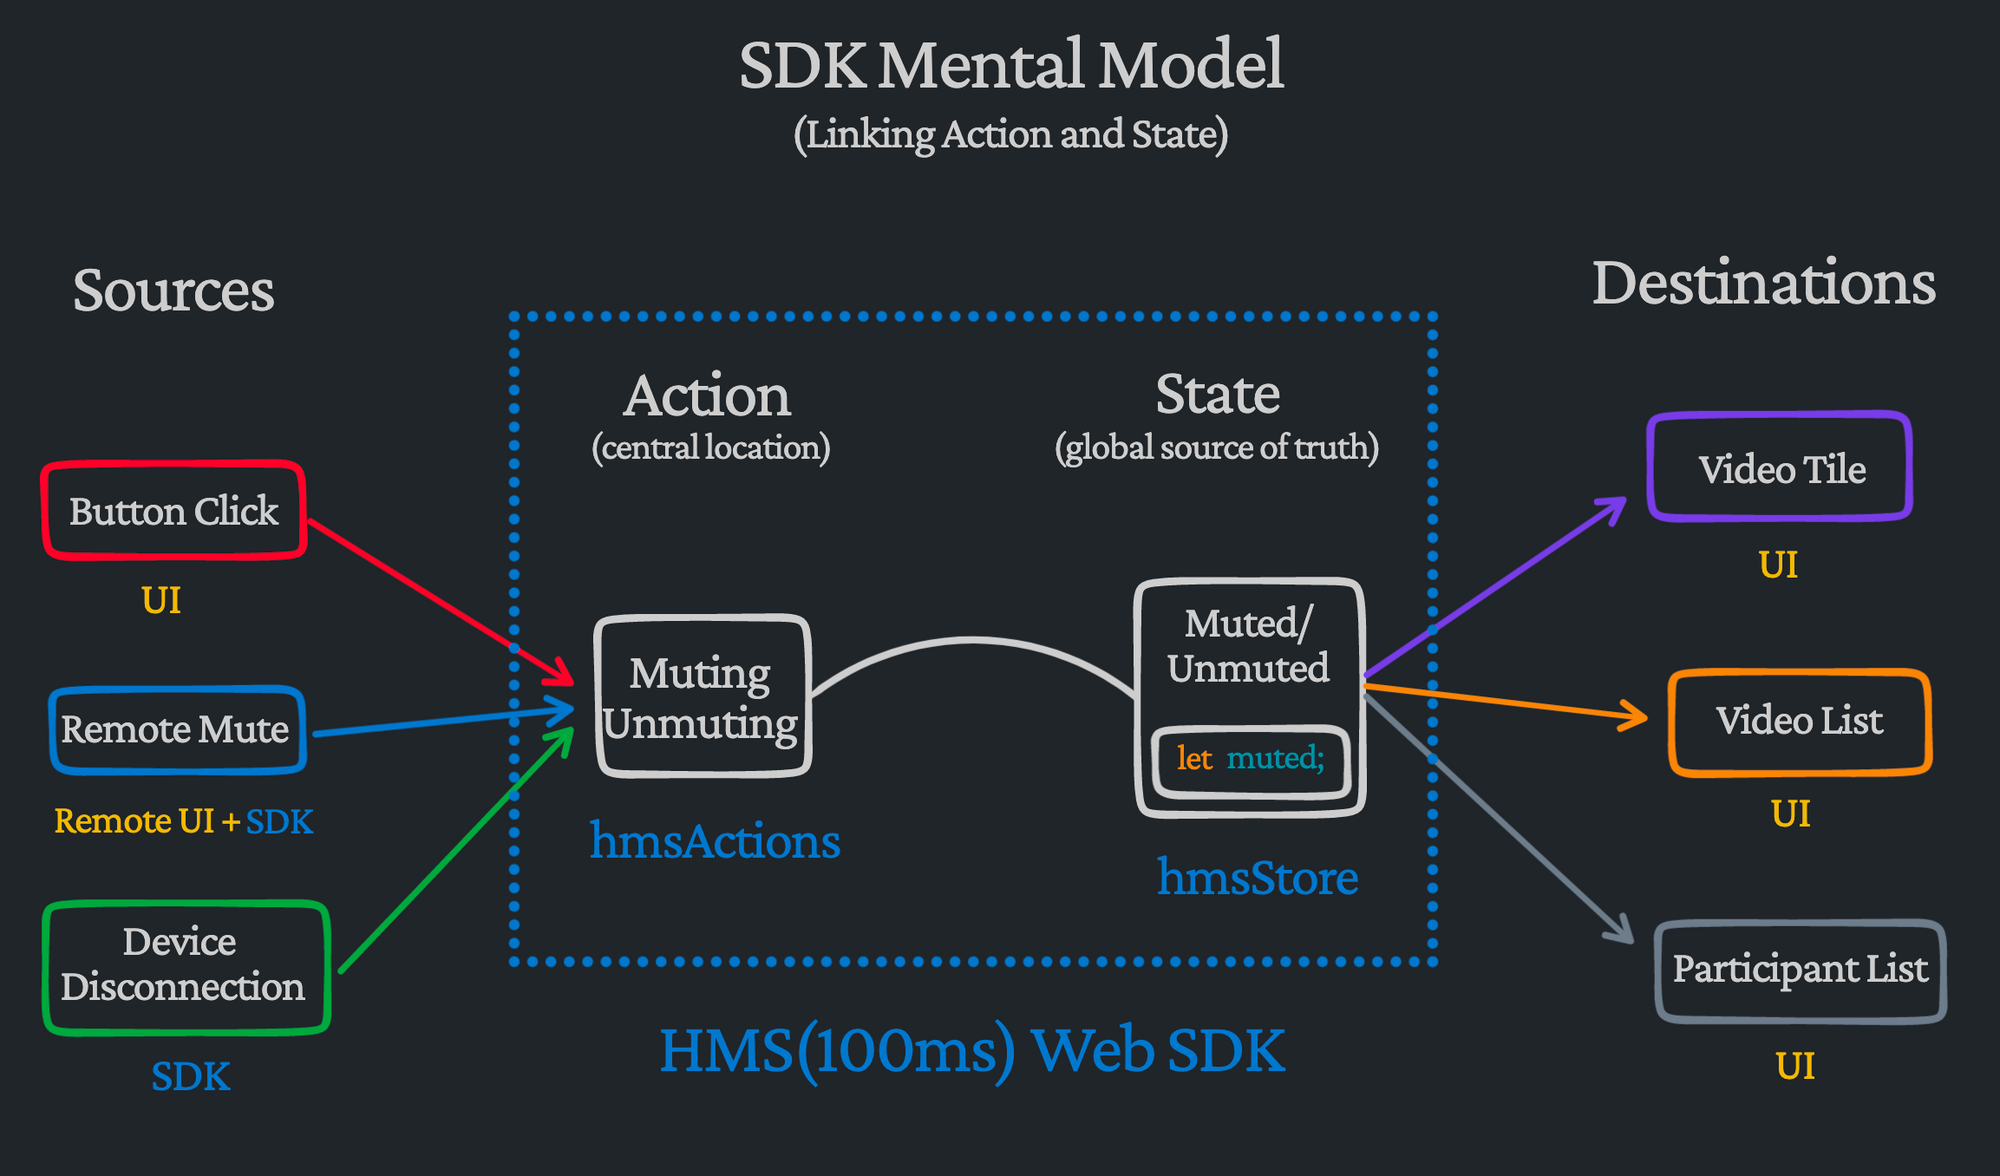
The above image is what we would like to be the main takeaway from this page. This design and abstraction level makes the application code much simpler to write and reason about. If you want to do something, you reach out to hmsActions, and if you want to get any state, you go for hmsStore. This is how our pseudo code above for the mute button would look like with these constructs -
import {
    hmsActions,
    hmsStore,
    selectAudioState,
} from "@100mslive/sdk";

function ToggleMuteButton() {
    const button = getButtonIcon("unmutedAudio");
    button.onClick = () => {
        hmsActions.toggleAudioState();
    }
    // subscribing to the global store
    hmsStore.subscribe((muted) => {
        button.setIcon(muted ? "mutedAudio" : "unmutedAudio");
    }, selectAudioState);  // selecting the state we want
    return button;
}
Note that there is no local state anymore, and the handling of the button click is decoupled from updating the button icon. Any part of the UI code can now call the toggle function and our button above will update without knowing the source. Further, we’re passing a function to hmsStore.subscribe, this is because our global store is reactive. We can subscribe to the state and have it call us back whenever the state changes so the UI layer can be updated reactively. Additionally, the second argument selectAudioState to subscribe is called a selector. It allows a UI component to ask for a specific chunk of data from the SDK’s global store containing everything related to the call.
Fitting in the JS World
While the SDK can be used as-is in a vanilla JS web app, it's more likely that you plan to use it in a project built with a UI framework. Since all major JS frameworks use some kind of reactive model, wrapping the SDK's store with the corresponding framework's approach to reactivity can make the codebase consistent and even more elegant.
For example, we give a React wrapper over the vanilla SDK(npm) to expose both the constructs from easy-to-use hooks useHMSStore and useHMSActions. Here is a code sample based on the mute/unmute doc page for creating a toggle mute button -
import {
    useHMSActions,
    useHMSStore,
    selectIsLocalAudioEnabled,
} from "@100mlive/react-sdk";

function ToggleMuteButton() {
    const audioEnabled = useHMSStore(selectIsLocalAudioEnabled);

    const actions = useHMSActions();
    const toggleAudio = () => actions.setLocalAudioEnabled(!audioEnabled);

    const icon = audioEnabled ? "unmutedAudio" : "mutedAudio";
    return <Button icon={icon} onClick={toggleAudio}/>
}
That's it. We let the state decide the icon for the button, and we use actions to change the state. In Angular, we can wrap the state with RxJS Observables to make it easier to inject into the UI components and use in the template files. Both VueJS and Svelte have inbuilt support for global stores which can be utilized to build similar natively integrated components. Here is a code sample based on the Svelte Quickstart for the toggle mute button -
<script>
    import { audioEnabled } from "./hmsStores";
    import { hmsActions } from './hms';

    $: icon = $audioEnabled ? "unmutedAudio" : "mutedAudio";

    function toggleAudio() {
        hmsActions.setLocalAudioEnabled(!$audioEnabled);
    }
</script>

<Button icon={icon} on:click={toggleAudio}>
As we see, using this decoupled state-driven approach, we can write concise and declarative code that fits seamlessly into our existing framework’s paradigm. As a developer, it’s always best when we don’t have to fight against our tools. Our SDK should fit naturally into place, making even complex interactions feel intuitive.
What Next?
Equipped with the above mental model, you’ll find it quite easy to navigate through our docs. Whether you’re skimming to get a sense of what is possible or trying to implement something in your own code, it all comes down to actions and states. The best place to start would be with one of the Quickstarts linked in the sidebar.