Background Handling
While a user has joined a 100ms Room they can put the app in Background Mode & usually expect a certain subset of app functionality continues to work.
Background Mode implies that the application is not currently visible to the user, not responding to user input, and running in the Background.
Background state in React Native apps is represented by AppState.currentState === 'background' as described here.
Android & iOS have different mechanisms of handling app behaviour which includes limiting access to Camera & Microphone, time allowed to keep running before getting completely stopped, Aggressive Battery Optimisations on Android OEMs, etc.
There are 2 prominent behaviours that are mainly affected when apps transition to Background State - Publishing Audio/Video, and Playing incoming Audio/Video.
Let's breakdown how your apps can implement efficient handling of Background states on iOS & Android Platforms.
iOS Background Handling
When your app goes into the background, by default it can no longer access camera or microphone and publish it to other peers in the room. Also, you cannot hear audio of other participants in the call if your app is in the background without enabling Background Modes.
This is the default iOS platform behaviour whereby it limits access to Microphone & Camera for capturing Audio & Video. By default, iOS also stops playing audio of the Room when your app is in Background.
By Enabling Background Modes you can ensure that your iOS app has access to Microphone & can play incoming Audio from the Room.
Following steps show how to add Background Modes in iOS:
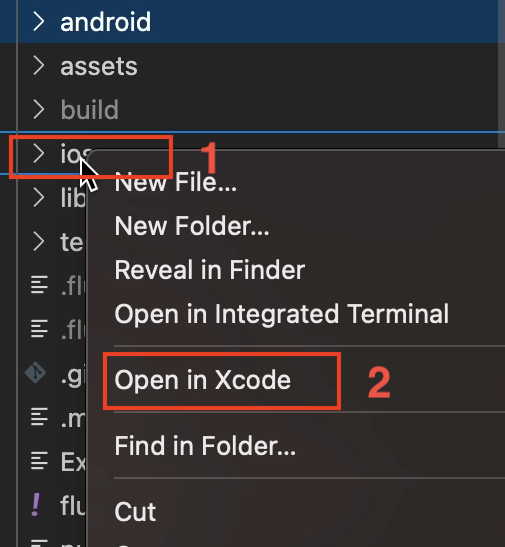
Open project in Xcode
Open project in Xcode by right clicking on ios folder in project and select Open in Xcode as shown in image below.
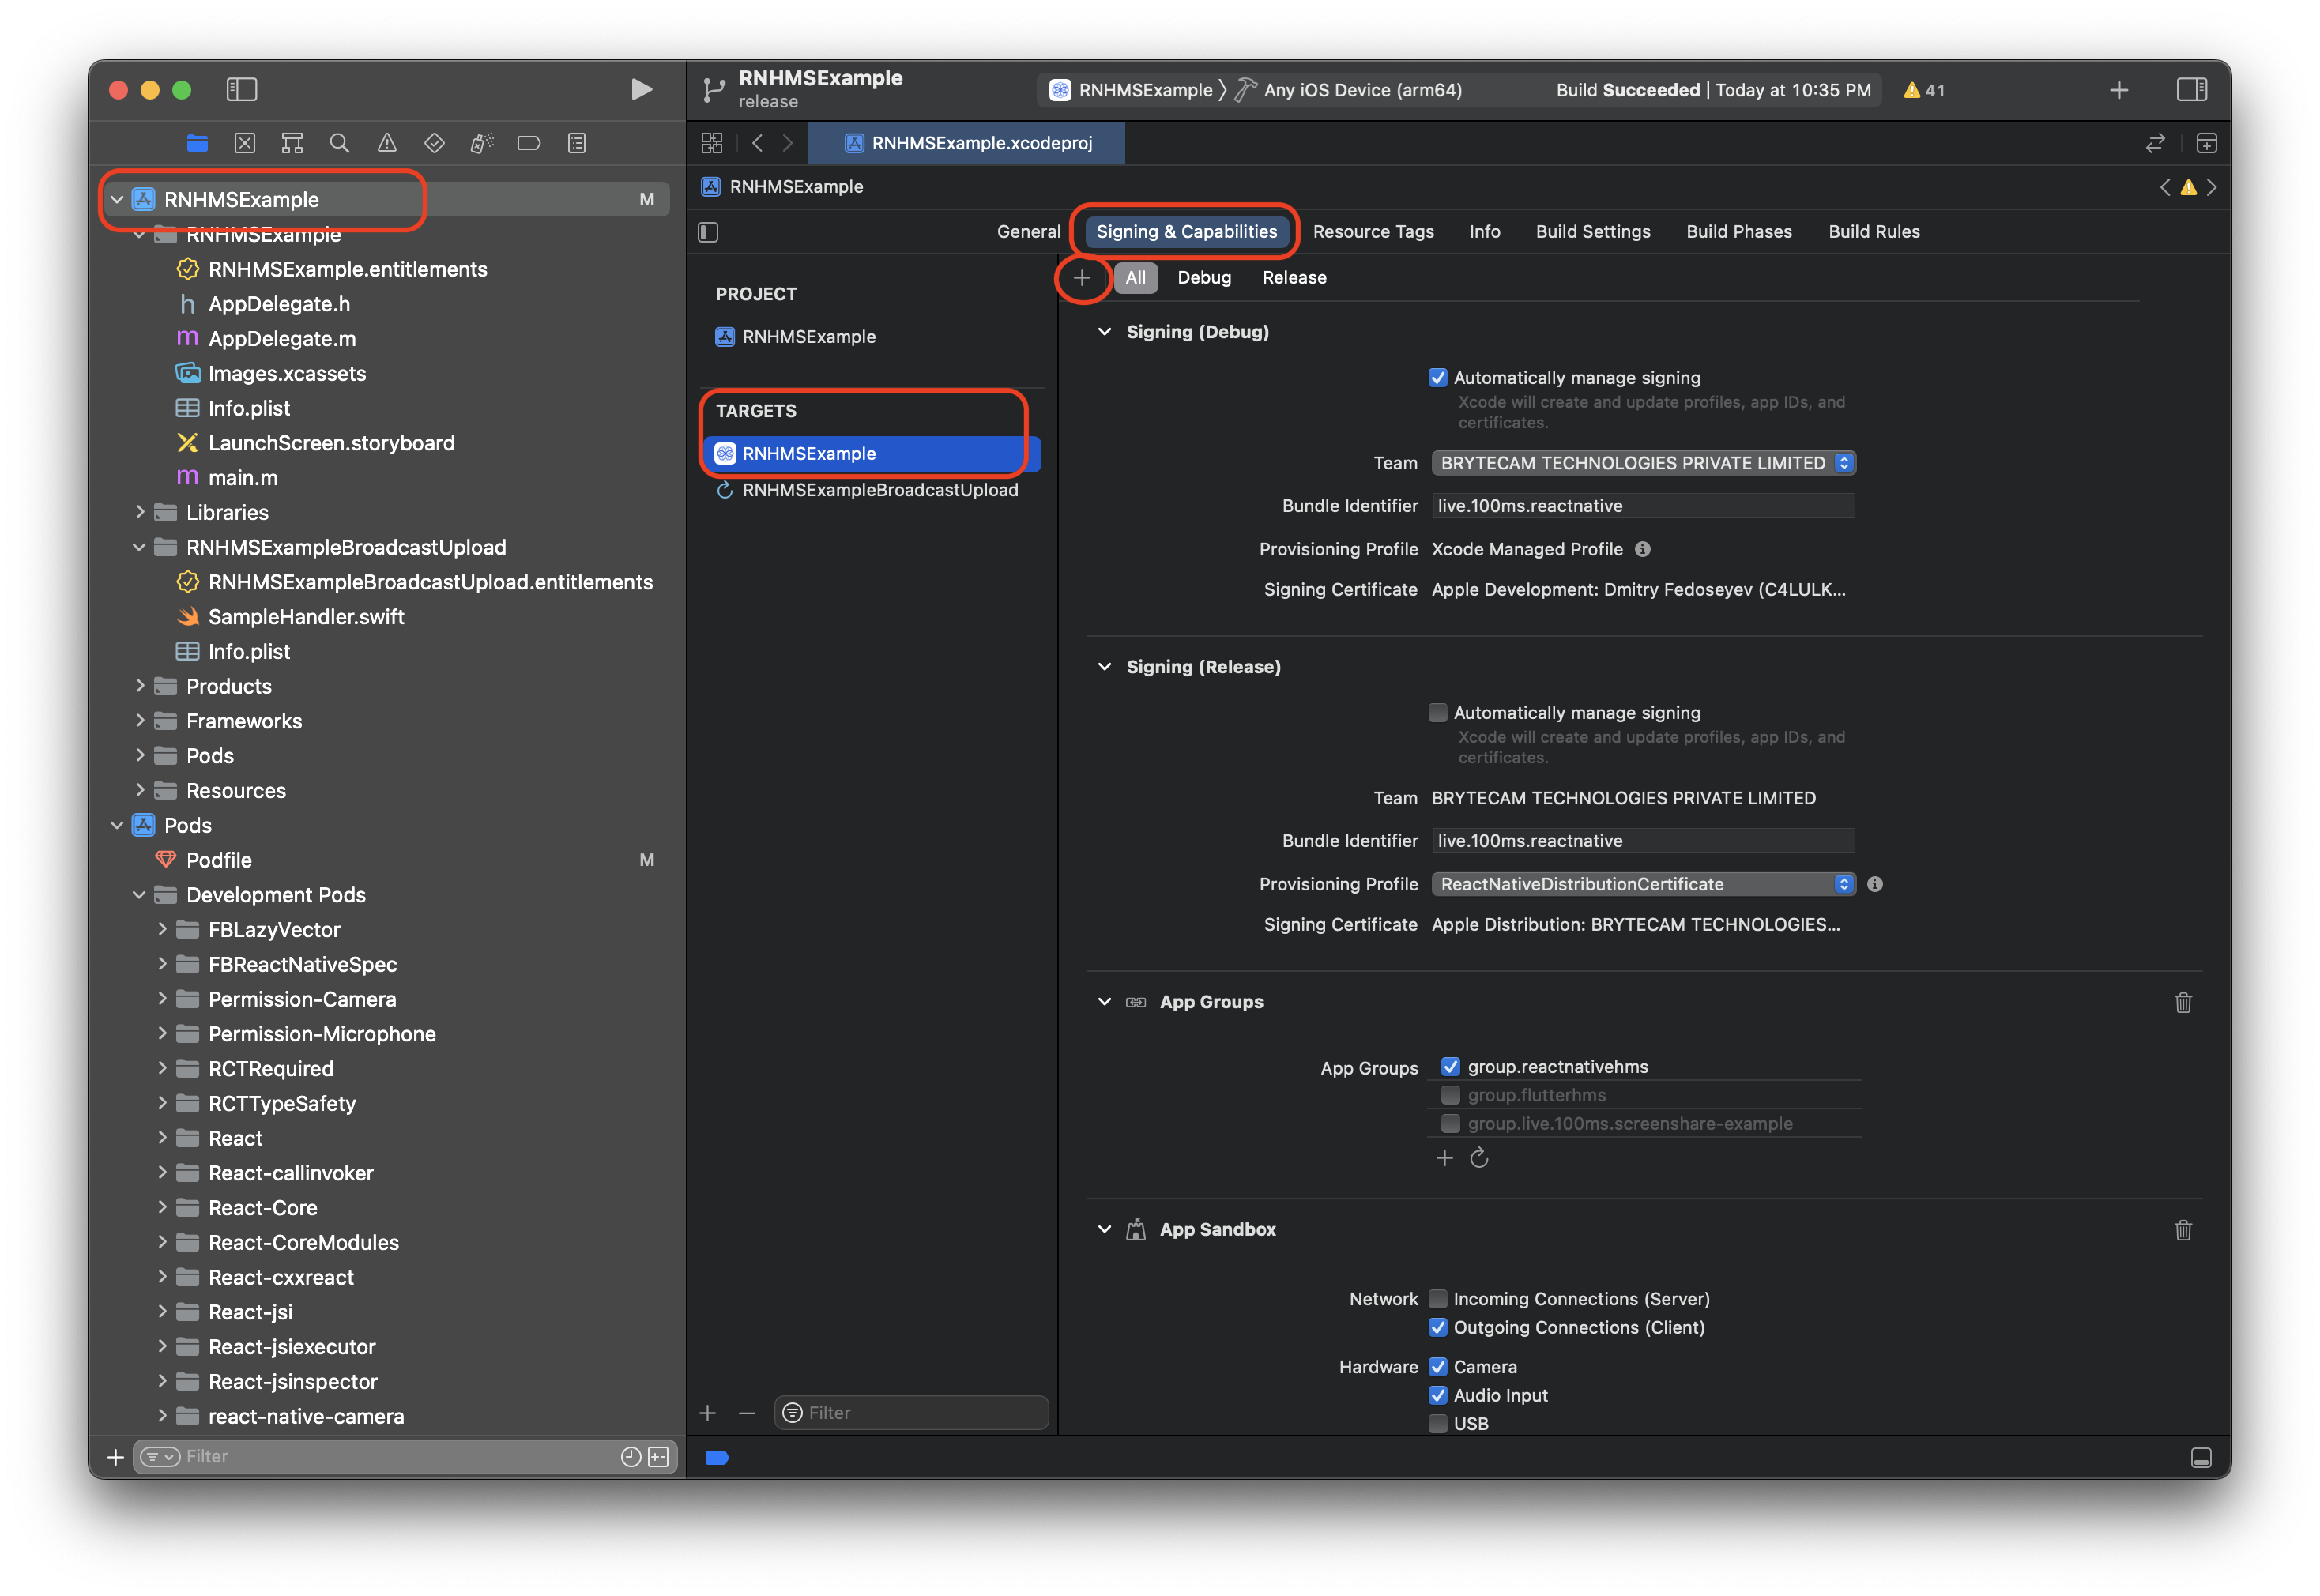
Add Capability
Click on your Main App Project in Xcode Navigator then select TARGETS and click on Signing & Capabilities and add Capability. In the Example below, the Main App Target is RNHMSExample
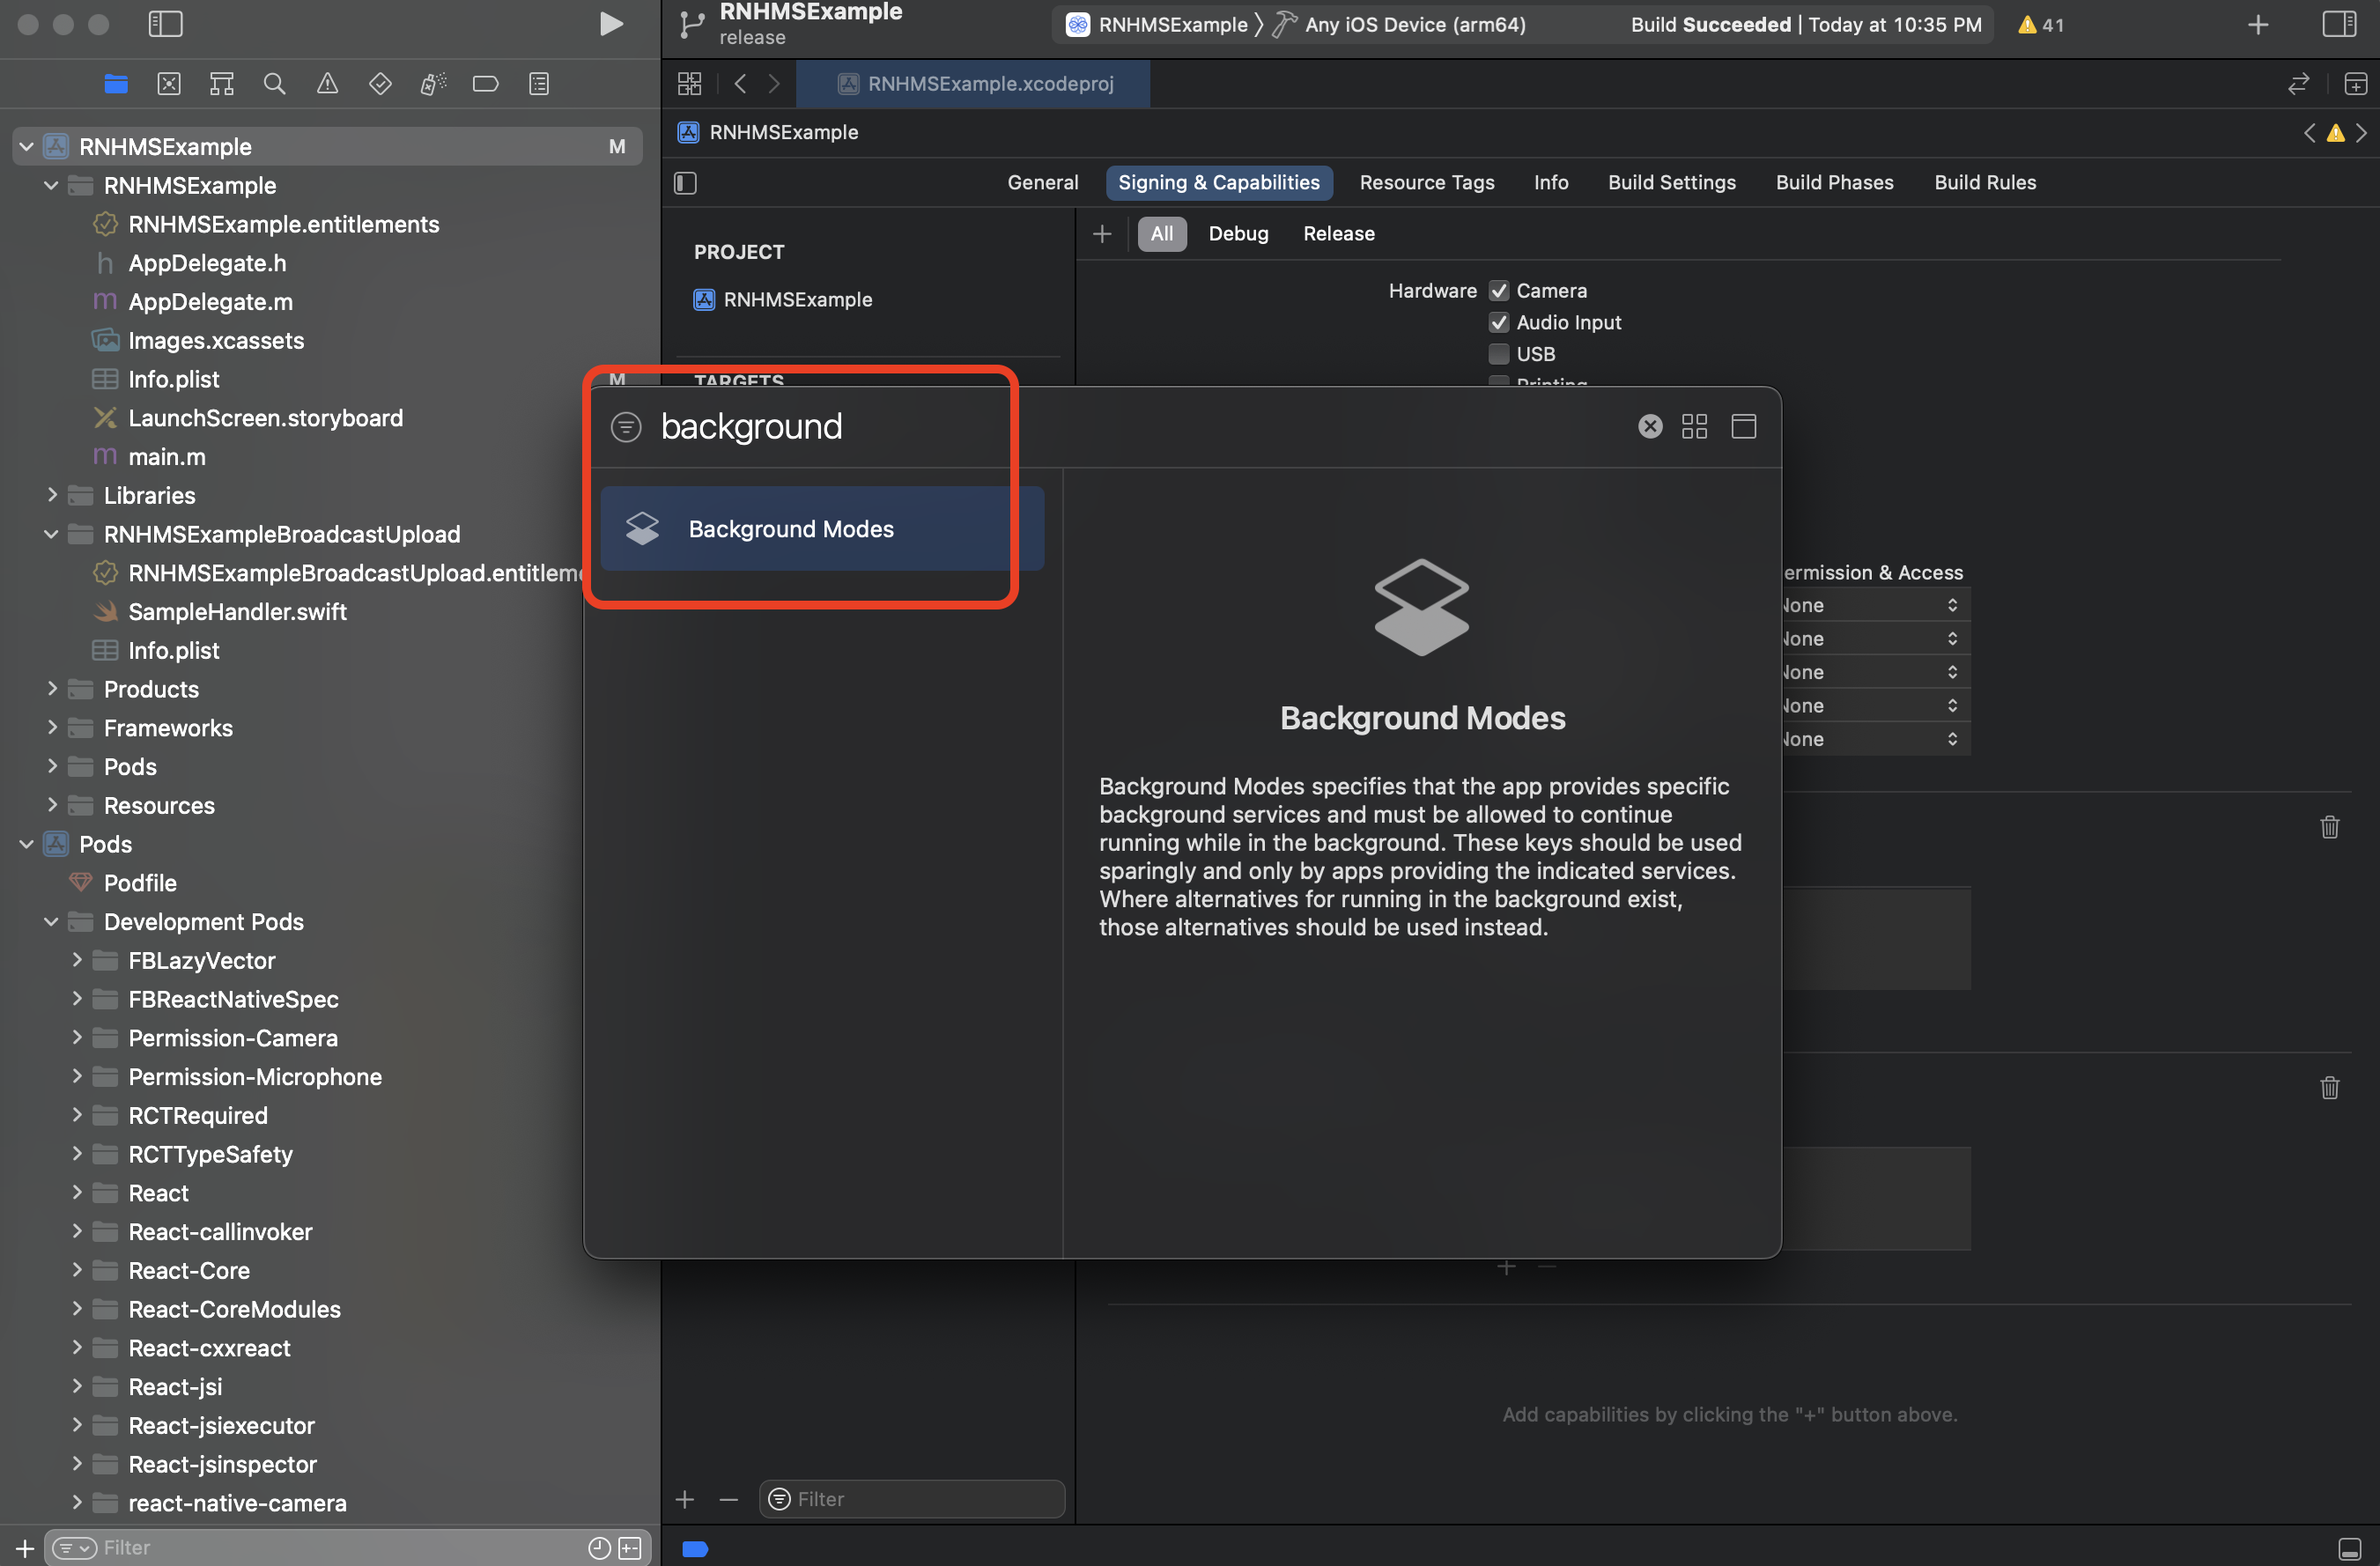
Background Mode
Search Background Mode and add it to Project by clicking on it.
Enable Background Mode
Enable the checkbox under Background Modes named Audio, AirPlay, and Picture in Picture.

Let's look at different scenarios on iOS with & without Enabling Background Modes.
Without Background Modes Enabled (Default iOS Behaviour)
The table lists down iOS app behaviours when the app transitions to background when a 100ms Room is ongoing without enabling background processing.
The "Scenario" on the left of the Table below implies the activity which is ongoing in the App when user has joined a 100ms Room.
The "Behaviours" on the right of the Table shows what happens when the App transitions to Background.
| Scenario | Behaviours |
|---|---|
| Mic is Unmuted | Mic will get Muted |
| Camera is unmuted | Camera will get Muted |
| Remote Peers are publishing audio | Incoming Audio from Room Stops Playing |
Background Modes Enabled (Recommended)
The table lists down iOS app behaviours when the app transitions to background when a 100ms Room is ongoing with Background Modes Enabled.
The "Scenario" on the left of the Table below implies the activity which is ongoing in the App when user has joined a 100ms Room.
The "Behaviours" on the right of the Table shows what happens when the App transitions to Background.
| Scenario | Behaviours |
|---|---|
| Mic is unmuted | Mic will remain Unmuted and the user will able to publish audio without any restriction |
| Camera is unmuted | Camera will get Muted |
| Remote Peers are publishing audio | Incoming Audio from Room Continues to Play |
Android Background Handling
On Android devices, by default Capturing Video & Audio from Camera & Microphone is allowed for sometime - usually 60 seconds. This time limit depends on different Android OEMs, Battery Optimisations Mode (Aggressive/Doze), etc. This leads to inconsistent behaviours of your apps in Background Mode on different Android devices.
As per your use-case, apps can choose to implement an Android Foreground Service to ensure consistent behaviour. With a Foreground Service, you can continuously access Microphone & Camera & publish the captured Audio & Video to other peers in the Room.
Foreground Services show a status bar notification, so that users are actively aware that your app is performing a task and is consuming system resources.
Note: Playing Audio continuously while app is in Background is allowed by default on Android devices.
Without Android Foreground Service (Default Android Behaviour)
The table below lists down Android app behaviours when the app transitions to background when a 100ms Room is ongoing without using any Android Foreground Service.
The "Scenario" on the left of the Table below implies the activity which is ongoing in the App when user has joined a 100ms Room.
The "Behaviours" on the right of the Table shows what happens when the App transitions to Background.
| Scenario | Behaviours |
|---|---|
| Mic is unmuted | Mic will remain Unmuted and the user will able to publish audio for a limited period (time depending on OEMs) |
| Camera is Unmuted | Camera will remain Unmuted and the user will able to publish video for a limited period (time depending on OS) |
| Remote Peers are publishing audio | Able to play incoming audio from the Room |
With Android Foreground Service
When your app implements a Foreground Service it continues access to capturing Audio & Video even when the app is in Background Mode.
| Scenario | Behaviours |
|---|---|
| Mic is unmuted | Mic will remain unmuted and the user will able to publish audio without any restriction |
| Camera is unmuted | Camera will remain unmuted and the user will able to publish video without any restriction |
| Remote Peers are publishing audio | Able to play incoming audio from the Room |
For implementing a Foreground Service, we recommend using the @voximplant/react-native-foreground-service package which allows the app to run in the background with a Persistent Status Bar Notification.
Below are the steps to implement Android Foreground Service using @voximplant/react-native-foreground-service in your React Native App
Install the package
npm i git+https://github.com/ygit/react-native-foreground-service
Update AndroidManifest.xml
- Add the FOREGROUND_SERVICE permission to the application's
AndroidManifest.xml:
<uses-permission android:name="android.permission.FOREGROUND_SERVICE"/>
- Add VIForegroundService as a service to the application's
AndroidManifest.xml:
<application> ... <activity> ... </activity> // Set Service Type to capture Audio or Video as per your use-case. In most cases, only `microphone` access would be required. Then do not pass the `camera`. If stopWithTask set to true then it will stop the notification if app is force killed.<service android:name="com.voximplant.foregroundservice.VIForegroundService" android:foregroundServiceType="camera|microphone" android:stopWithTask="true" /></application>
-
If you have targetSdkVersion Android API >= 31 then perform the following step:
Add
android:exported="true"to the application'sAndroidManifest.xmlactivity section
<activity
    android:name=".MainActivity"
    android:label="@string/app_name"
    android:configChanges="keyboard|keyboardHidden|orientation|screenSize"
    android:windowSoftInputMode="adjustResize"
    android:exported="true">        <===== Add this line
Usage of the package
- Import the module
import VIForegroundService from '@voximplant/react-native-foreground-service';
- Create Notification Channel
const androidForegroundServiceChannelConfig = {
    id: 'MyAppChannelID',
    name: 'My App Channel name',
    enableVibration: true,
    importance: 5,
};

VIForegroundService.getInstance().createNotificationChannel(
    androidForegroundServiceChannelConfig
).then((r: any) => console.log('Created Android Foreground Service channel', r));
- Start Foreground Service
const startAndroidForegroundService = async () => {
    const notificationConfig = {
        channelId: 'MyAppChannelID',
        id: 1000,
        title: 'Foreground Service', // modify your notification title here!
        text: 'Starting Android Foreground Service now', // modify your notification text here!
        icon: '../assets/my-app-logo.png', // add your app's icon here
        priority: 2,
    };
    try {
        VIForegroundService.getInstance().startService(notificationConfig);
    } catch (e) {
        console.error(e);
    }
};
- Stop Foreground Service
When the user leaves the Room or Room is ended, always stop the Foreground Service by calling the
stopServicemethod.
// a sample callback function invoked when user leaves the Room const handleMeetingLeave = useCallback(() => {VIForegroundService.getInstance().stopService().then((result: any) => { // stop the Foreground Serviceconsole.log('Stopped Android Foreground service: ', result); navigation.navigate('MyAppHomeScreen'); // navigate to app's Home Screen or any other appropriate screen }); }, []);
That's it
You have successfully implemented Android Foreground Service in your React Native App.
You can refer the sample implementation in 100ms Example app here.
Here's a sample screenshot of the Foreground Service Notification on Android.