Home
/ Blog /
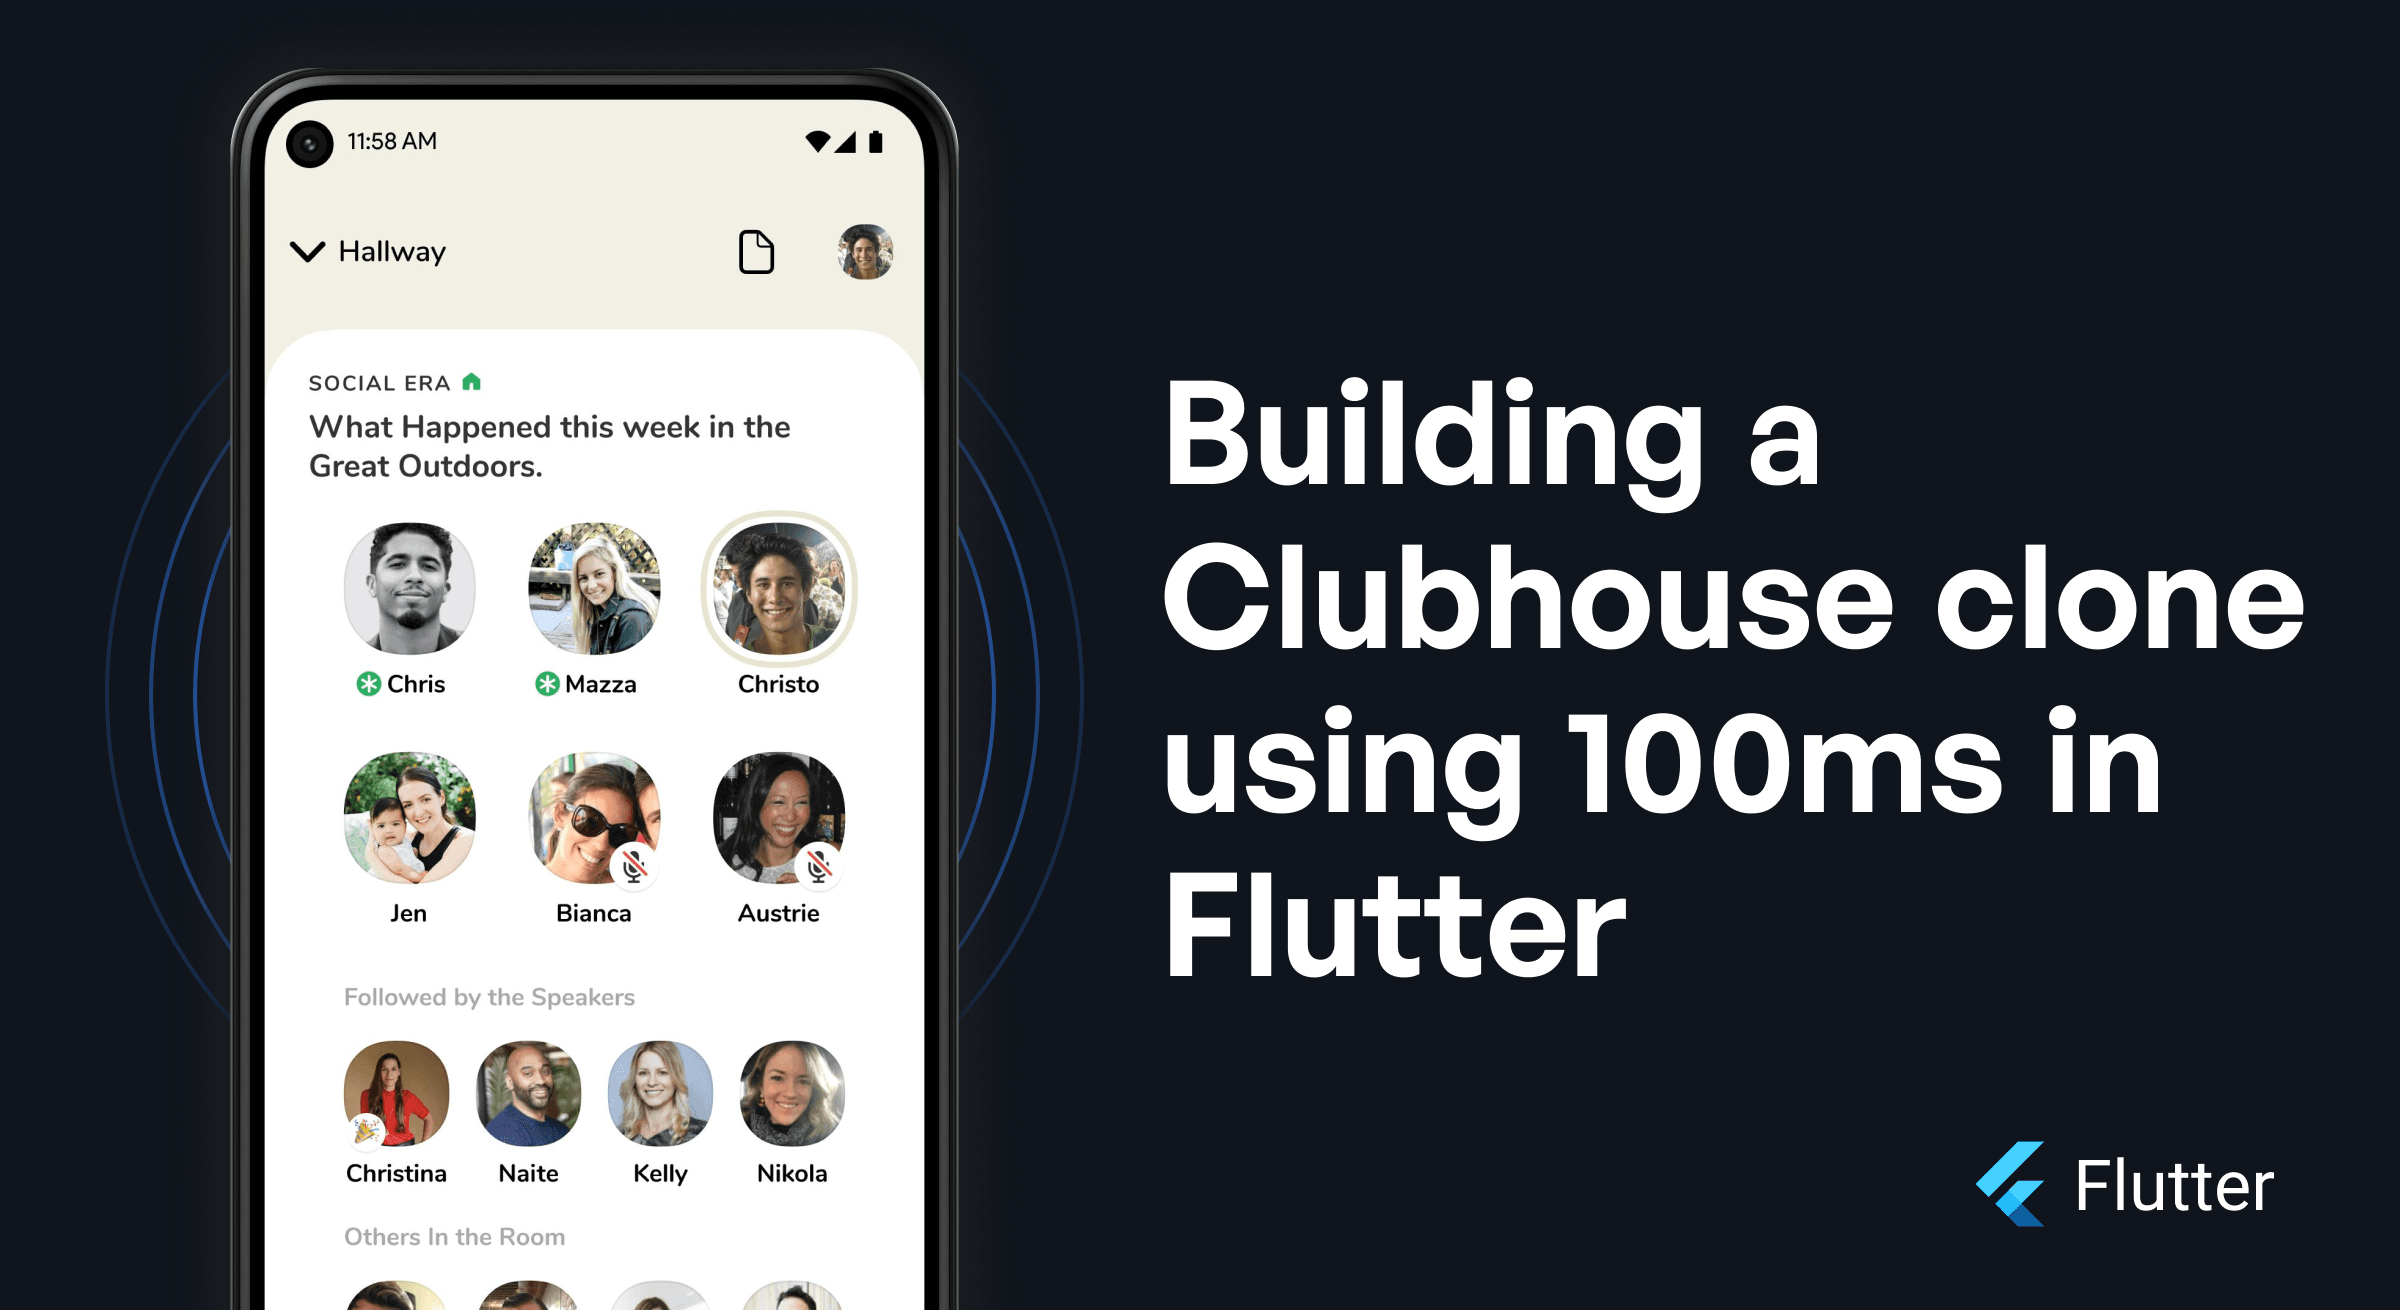
Building a Clubhouse Clone in Flutter using 100msBuilding a Clubhouse Clone in Flutter using 100ms
October 21, 202217 min read


Share


Clubhouse and audio rooms are all the rage now.
This post will take you through a step-by-step guide on how to build a basic Clubhouse-like app using Flutter and 100ms' live audio video SDK in the following way -
- Add 100ms to a Flutter app
- Join a room
- Leave a room
- Mute/Unmute
- Chat in a room
You can also build a video conferencing app like Zoom with 100ms Flutter SDK.
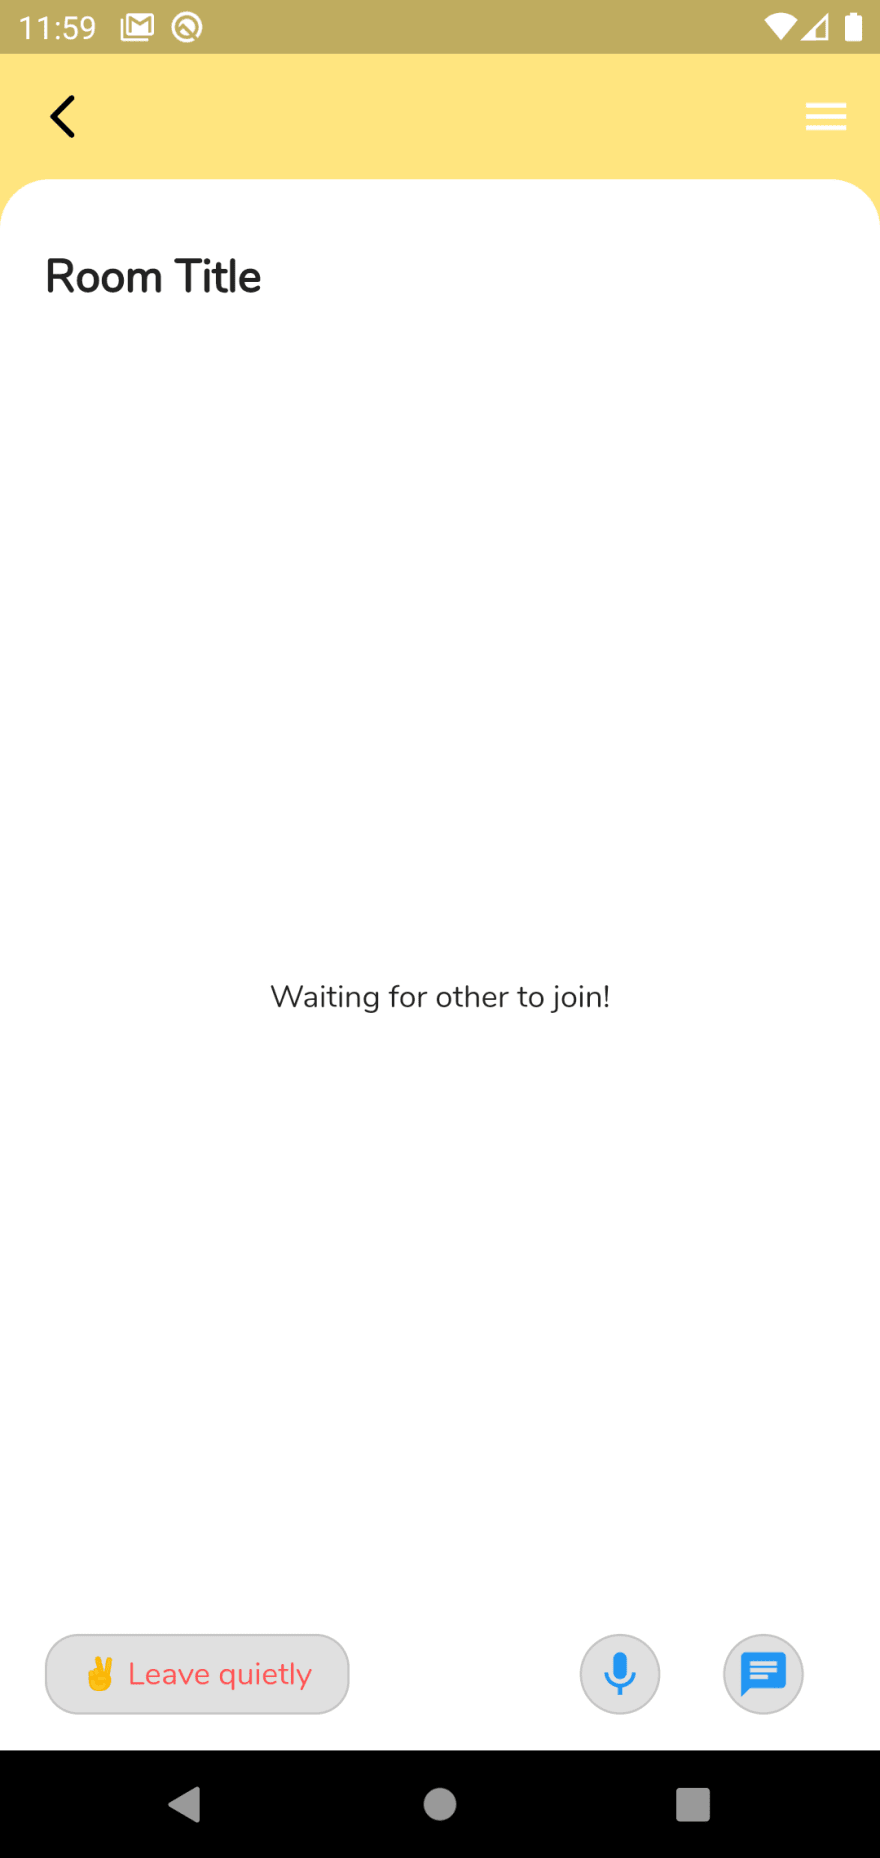
By the end of this blog, this is how your app will look & feel:

However, before proceeding, make sure that you have the following requirements:
- Flutter v2.0.0 or later (stable)
- 100ms Account (Create 100ms Account)
Checkout our comprehensive guide on Flutter WebRTC
This tutorial assumes you have some prior knowledge of Flutter.
100ms is a real-time audio-video conferencing platform that provides you to build a fully customizable audio-video engagement experience quickly. It is quick to integrate with native/cross-mobile and web SDKs.
It provides you with the following features:
- Production-ready pre-built templates to use.
- Ability to build large rooms with a capacity of 100 participants with audio & video on.
- Support for dynamic roles, disconnection handling, and bandwidth management.
If you love Android then here are some interesting reads:
Getting started
Download the starter app containing all the prebuilt UI from here. Open it in your editor, build and run the app:


The file structure of the starter project looks like this:
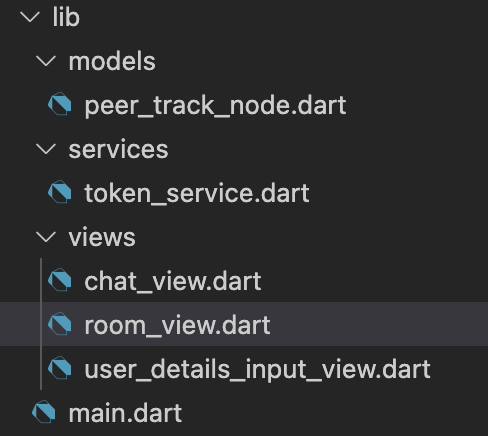
-
main.dart: The entry point of the app. -
user_details_input_value.dart: The screen to get user details before joining the meeting. -
chat_view.dart: The chat screen to send messages to everyone in the room. -
room_view.dart: The main screen where we can see all the peers in room. -
token_service.dart: A helper service class to fetch the token to join a meeting. -
peer_track_node.dart: A data model class for peer Track details:class PeerTrackNode { HMSPeer peer; String name; bool isRaiseHand; @observable HMSVideoTrack? track; HMSTrack? audioTrack; PeerTracKNode( {required this.peer, this.track, this.name = "", this.audioTrack, this.isRaiseHand = false});
In the next step, you’ll start setting up your project and initialize 100ms in it.
Setting up project
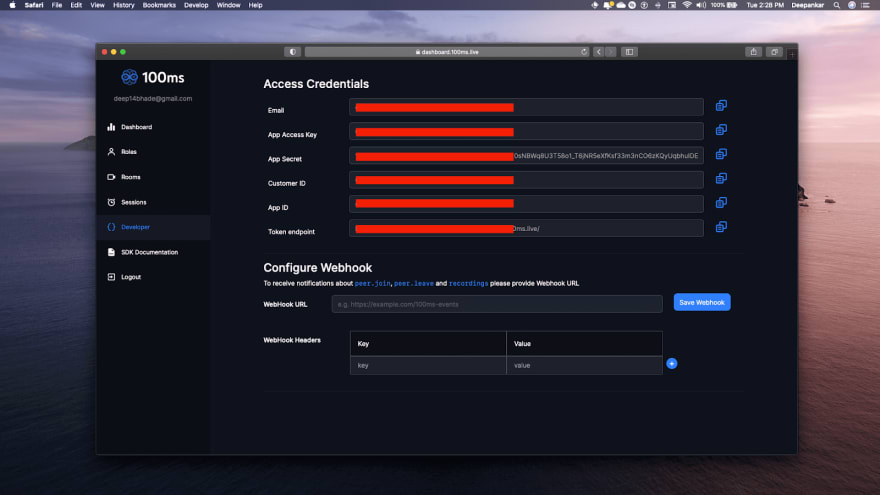
Get the Access Credentials
You’ll need the Token endpoint and App id, so get these credentials from the Developer Section:
Create New App
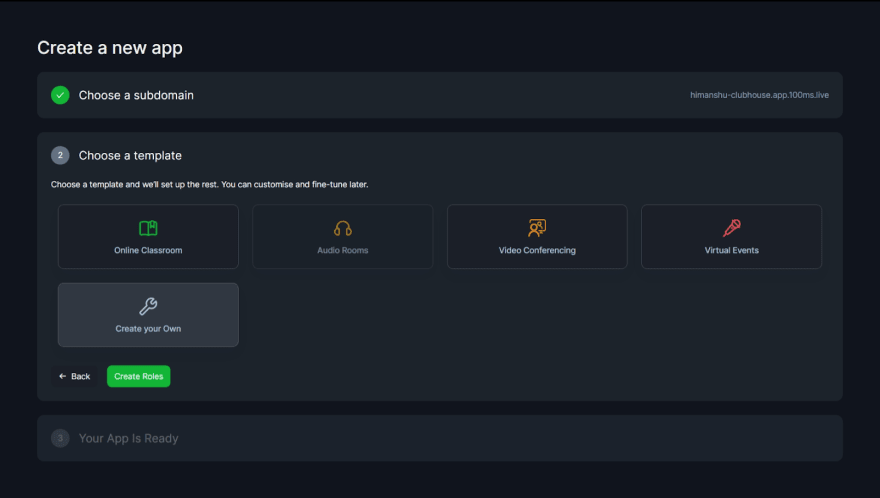
Before creating a room, you need to create a new app:

Next, choose the Create your Own template and click on Create Roles:
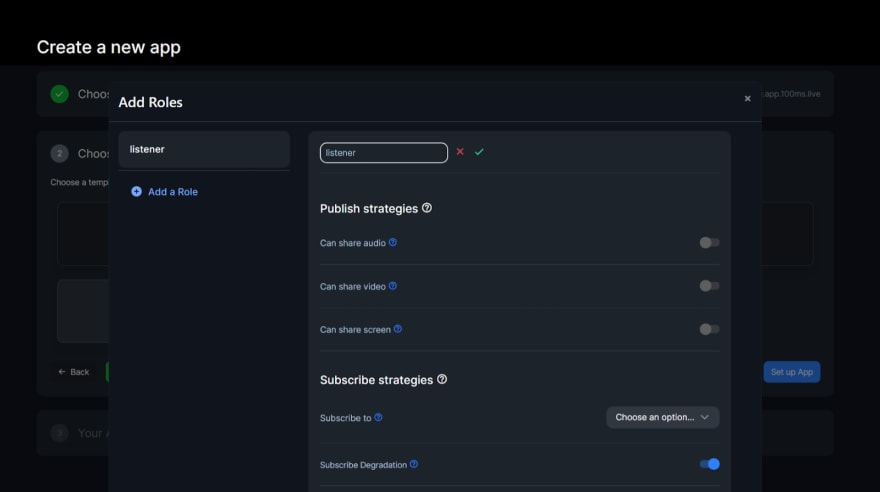
You might be wondering why to create your own roles. Because as we are creating a clubhouse clone there’ll be three kinds of peers joining a room or meeting, listeners, speakers, and moderators.
Create Roles
A role defines who can a peer see/hear, the quality at which they publish their video, and whether they have permission to publish video/screen share, mute someone, or change someone's role.
Clicking on Create Roles will open a pop-up with a default role:

For the clubhouse clone, you’ll have 3 roles in your app:
- listener - only able to listen to others and can't unmute
- speaker- able to listen and speak (unmute/mute)
- moderator- everything that the speaker can do plus the ability to change others’ roles and mute them.
Edit this role by clicking on the edit icon, changing the role name to the listener, and unchecking the publish strategies.
Add the speaker role by clicking on Add a Role, and uncheck the Can share video & Can share screen however keep the Can share audio checked in the Publish strategies.
Similarly, do it for the moderator role along with the Permissions update by keeping the Can change any participant's role & Can mute any participant checked.
After role creation, click on Set up App and your app is created:

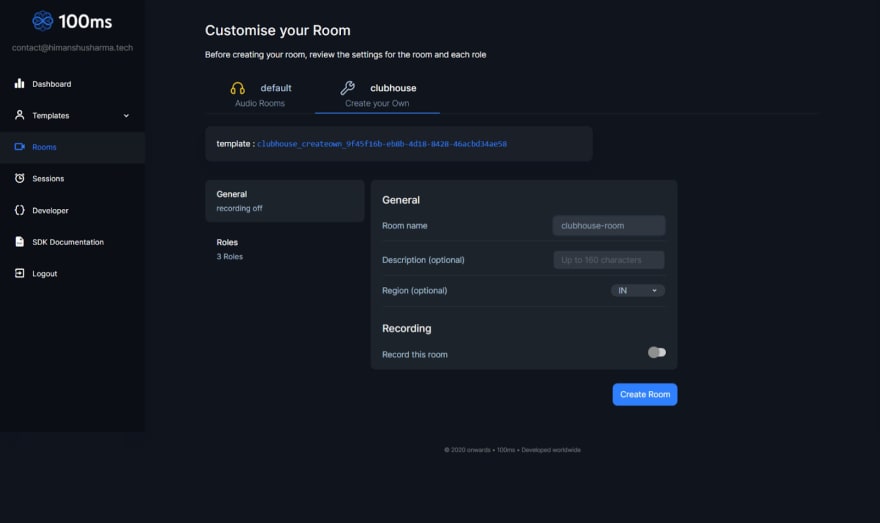
Create Room
Finally, go to Rooms in the dashboard and click on Create Room under your new custom app. Fill up the form and create the room:
 Your room is created now ✨ :
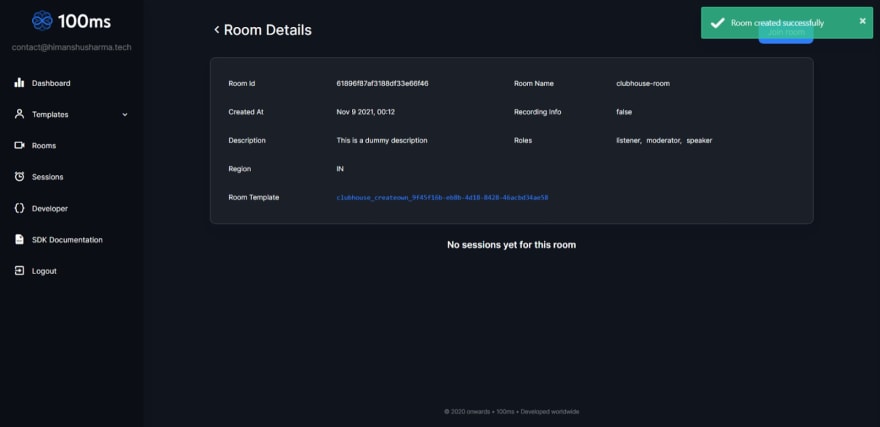
N.B., Grab the Room Id to use it later to join the room.
Add 100ms to your Flutter app
Add the 100ms plugins in the pubspec dependencies as follows:
hmssdk_flutter: 0.7.0
Note: You might need to update your Android Kotlin version to the latest in your project-level build.gradle file:
ext.kotlin_version = '1.6.10'
Either get it using your IDE to install the plugins or use the below command for that:
flutter pub get
Update target Android version
Update the Android SDK version to 21 or later and compile SDK version to 32 by navigating to the android/app directory and updating the build.gradle:
android{
    compileSdkVersion 32
    ...
    defaultConfig{
        minSdkVersion 21
        ...
    }
}
Add Permissions
You will require Recording Audio and Internet permission in this project as you are focused on the audio track in this tutorial.
A track represents either the audio or video that a peer is publishing
Android Permissions
Add the permissions outside your application tag in your AndroidManifest file available at android/app/src/main/AndroidManifest.xml:
<uses-permission android:name="android.permission.RECORD_AUDIO"/>
<uses-permission android:name="android.permission.CHANGE_NETWORK_STATE"/>
<uses-permission android:name="android.permission.MODIFY_AUDIO_SETTINGS"/>
<uses-permission android:name="android.permission.INTERNET"/>
<uses-permission android:name="android.permission.ACCESS_NETWORK_STATE"/>
<uses-permission android:name="android.permission.FOREGROUND_SERVICE" />
<uses-permission android:name="android.permission.BLUETOOTH" android:maxSdkVersion="30" />
<uses-permission android:name="android.permission.BLUETOOTH_CONNECT" />
iOS Permissions
Add the permissions to your Info.plist file:
<key>NSMicrophoneUsageDescription</key>
<string>{YourAppName} wants to use your microphone</string>

<key>NSCameraUsageDescription</key>
<string>{YourAppName} wants to use your camera</string>

<key>NSLocalNetworkUsageDescription</key>
<string>{YourAppName} App wants to use your local network</string>
Now you are ready to join a room ✨.
Implement Update Listeners
You have to implement a listener class over the current SDK, this will help you interact with the SDK easily. So start by adding the following files in the meeting subfolder in lib:
The above class provides you with a lot of methods over the HMS SDK which will be later used here.
meeting/hms_sdk_interactor.dart
The above contains an abstract class providing several methods to build a more advanced app. It uses the help of the meeting_store.dart to interact with the HMS SDK.
Note Make sure to generate the class using build_runner and mobx_codegen.
flutter packages pub run build_runner build --delete-conflicting-outputs
Join Room
A room is a basic object that 100ms SDKs return on a successful connection. This contains references to peers, tracks, and everything you need to render a live a/v app. To join a room, you require an HMSConfig object, that’ll have the following fields:
- userName: A name displayed to other peers in a room.
- authToken: A token generated after user authentication from the client side.
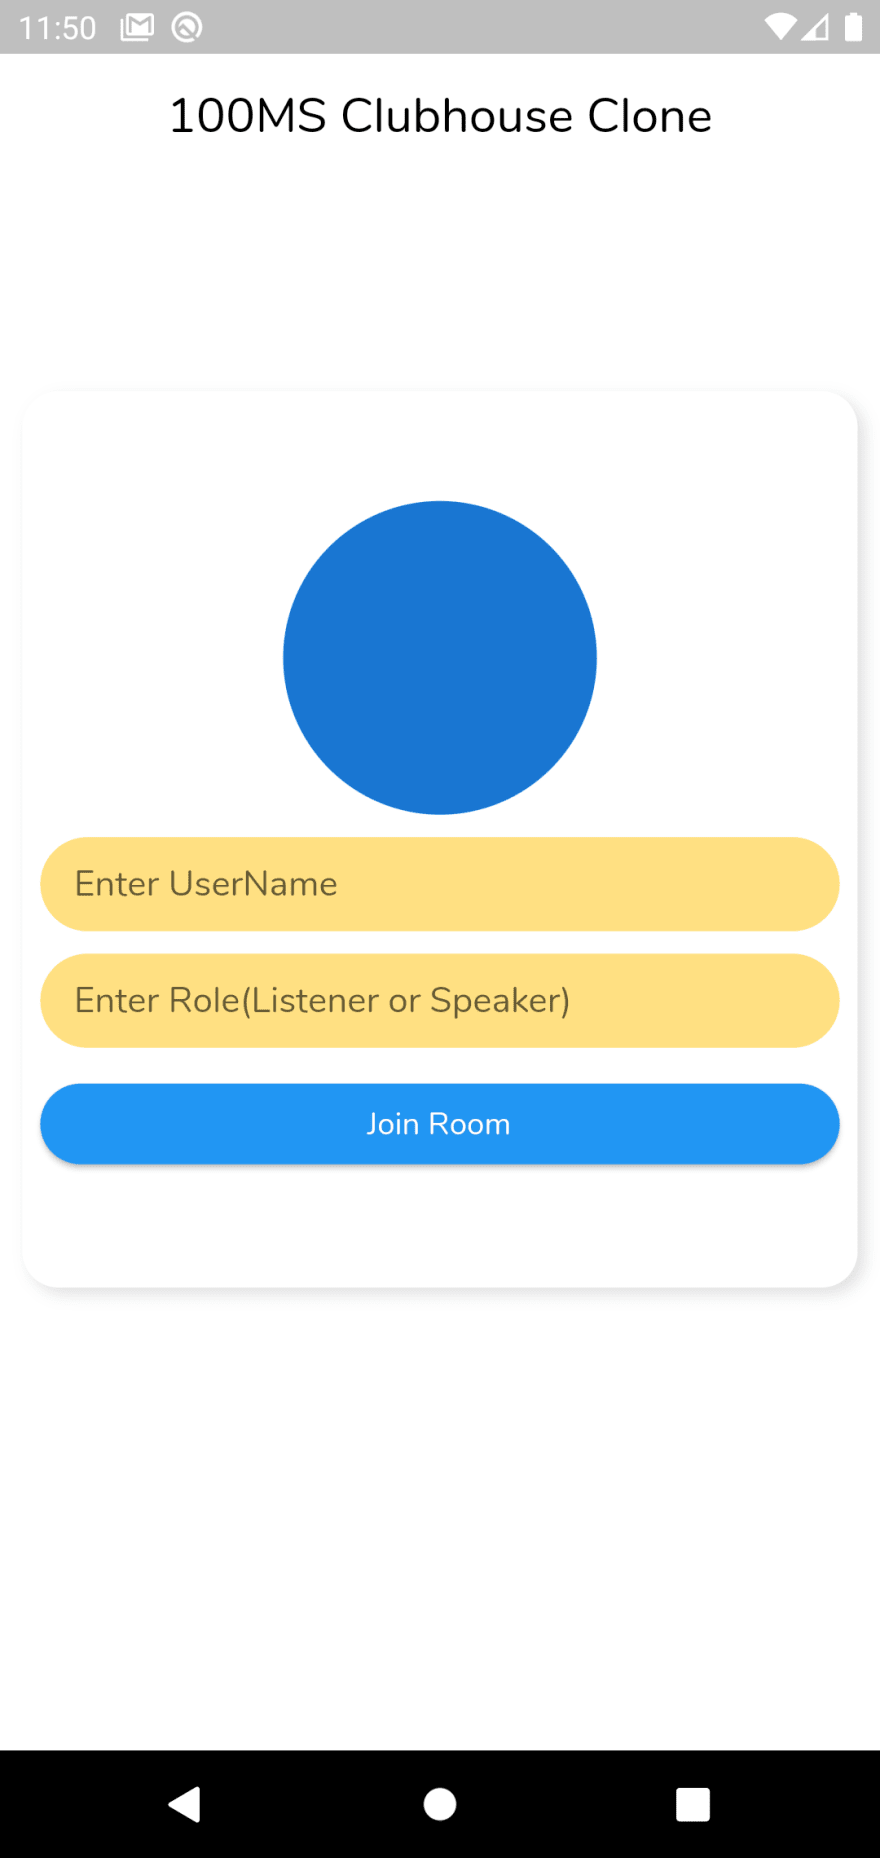
First, you can cover up the requirements of the userName and userId fields, by using the UserDetailsInputView widget to get the userName and role information using the usernameTextEditingController and userRoleTextEditingController TextEditingController :
Now, you need the roomUrl to join a room, that you grabbed earlier
You can join a meeting now as you have all the required fields for the config object. So go to your UserDetailsInputView and update the Join Room button’s onPressed event like below:
String roomId = userRoleTextEditingController.text.
                        trim().toLowerCase() == "speaker" ? 'https://zoomdemo.app.100ms.live/meeting/ayj-zgp-qcn'
                                  : 'https://zoomdemo.app.100ms.live/meeting/bjw-tji-aqc';

Navigator.push(
    context,
    MaterialPageRoute(
        builder: (_) => RoomView(
            roomTitle: 'Room Title',
            roomLink: roomId,
            username: usernameTextEditingController.text),
));
This will navigate you to a new screen where you are passing your user name and room url.
Next, in your RoomView widget, add the following code in your _RoomViewState:
class _RoomViewState extends State<RoomView> with WidgetsBindingObserver{
    //1
    late MeetingStore _meetingStore;

    @override
    void initState() {
        super.initState();
        WidgetsBinding.instance!.addObserver(this);

        //2
        _meetingStore = MeetingStore();

        //3
        initMeeting();
    }

    //4
    void initMeeting() async {
        bool ans = await _meetingStore.join(widget.name, widget.roomLink);
        if (!ans) {
            const SnackBar(content: Text("Unable to Join"));
            Navigator.of(context).pop();
        }
        _meetingStore.addUpdateListener();
    }
    ...
}
In the above code:
- Created a late instance of MeetingStore that will get initialised in initState.
- Initialize the MeetingStore instance for observing the changes.
- Calling joinMeeting method from the initState to join the meeting
- initMeeting: You are using the _meetingStore object to join the meeting. If joined successfully, then you are starting to listen to the changes in the meeting.
Build and run your app. Now, you have joined the meeting/room ✨

This will trigger the onJoin event, and your app will be provided an update from the 100ms SDK.
✅ If successful, the fun onJoin(room: HMSRoom) method of HMSUpdateListener will be invoked with information about the room encapsulated in the HMSRoom object.
❌ If failure, the fun onError(error: HMSException) method will be invoked with the exact failure reason.
Render the Peers
A peer is an object returned by 100ms SDKs that contains all information about a user - name, role, track, etc. And now, you need to display your peers.
So, update the build method of your RoomView by wrapping it by Observer to rebuild the method on any changes, like below:
Expanded(
  // child: Center(child: const Text('Waiting for other to join!'))
  child: Observer(builder: (context) {

    // 1
    if (!_meetingStore.isMeetingStarted) return const SizedBox();

    // 2
    if (_meetingStore.peers.isEmpty) {
      return const Center(
          child: Text('Waiting for other to join!'));
    }

    // 3
    final filteredList = _meetingStore.peers;
    return GridView.builder(
        itemCount: filteredList.length,
        itemBuilder: (context, index) {
          return GestureDetector(
            onLongPress: () {
              _meetingStore.removePeer(filteredList[index]);
            },
            child: Padding(
              padding: const EdgeInsets.all(4.0),
              child: CircleAvatar(
                radius: 25,
                child: Column(
                  mainAxisAlignment: MainAxisAlignment.center,
                  children: [
                    Text(
                      filteredList[index].name,
                      style: const TextStyle(fontSize: 20),
                    ),
                    Text(
                      filteredList[index].role.name,
                      style: const TextStyle(fontSize: 14),
                    ),
                  ],
                ),
              ),
            ),
          );
        },
        gridDelegate:
            const SliverGridDelegateWithFixedCrossAxisCount(
                crossAxisCount: 3));
  }),
),
In the above code, you did the following:
- Checked whether the meeting has started or not, if not, you are displaying an empty box.
- If the meeting has started and there are no peers in the room, display a text.
- Here, you are rendering your peers in a GridView using the observable peers list.
- Here you are displaying the peer who joined the meeting.
Build and run your app to see the peers:


Audio Status
To display the Audio Status add another text below the peer name text as follows:
Text(
  filteredList[index].name,
  style: const TextStyle(fontSize: 20),
),
Text(
  filteredList[index].role.name,
  style: const TextStyle(fontSize: 14),
),
Here you used displayed the role name using the peer object.
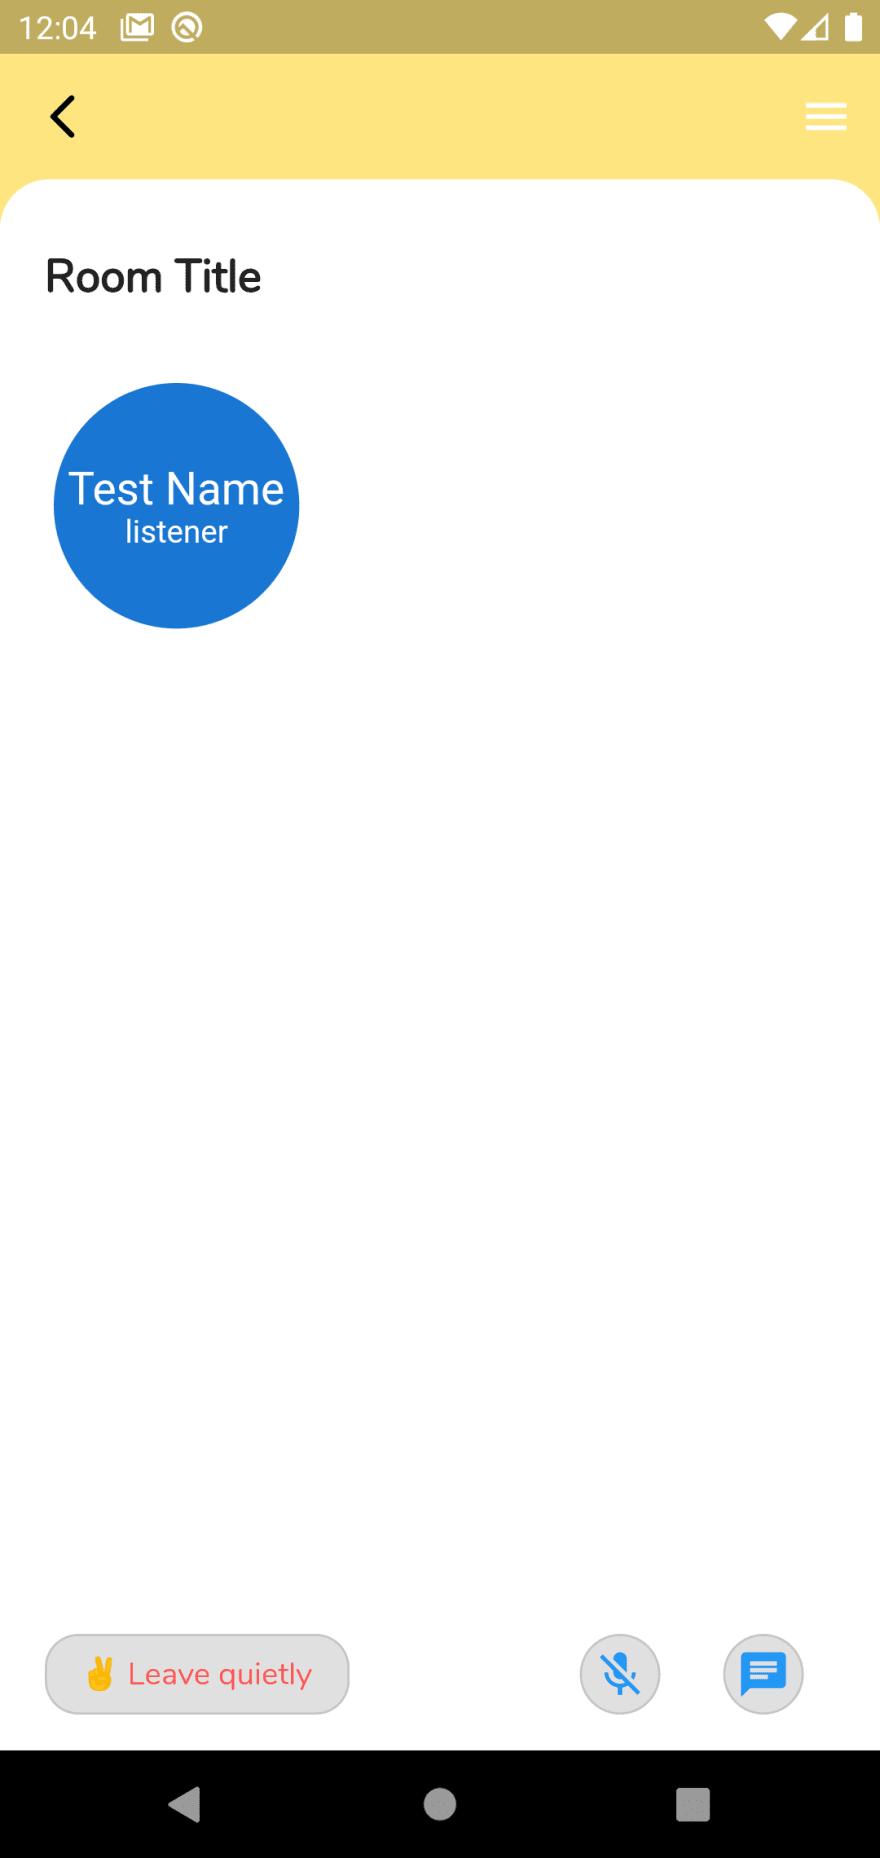
Mute/ Unmute
To mute or unmute your mic, update your mic button as follows:
// 1
Observer(builder: (context) {
  return OutlinedButton(
      style: OutlinedButton.styleFrom(
          backgroundColor: Colors.grey.shade300,
          padding: EdgeInsets.zero,
          shape: const CircleBorder()),
      onPressed: () {
        // 2
        _meetingStore.switchAudio();
      },

      // 3
      child: Icon(
          _meetingStore.isMicOn ? Icons.mic : Icons.mic_off));
}),
Here you updated the button as follows:
- Wrapped the button with the Observer to listen to the changes and rebuild the icon as per the mic status.
- Updated the
onPressedevent to toggle the mic using the_meetingStore. - Used the
isMicOnboolean method to check and update the IconData accordingly.
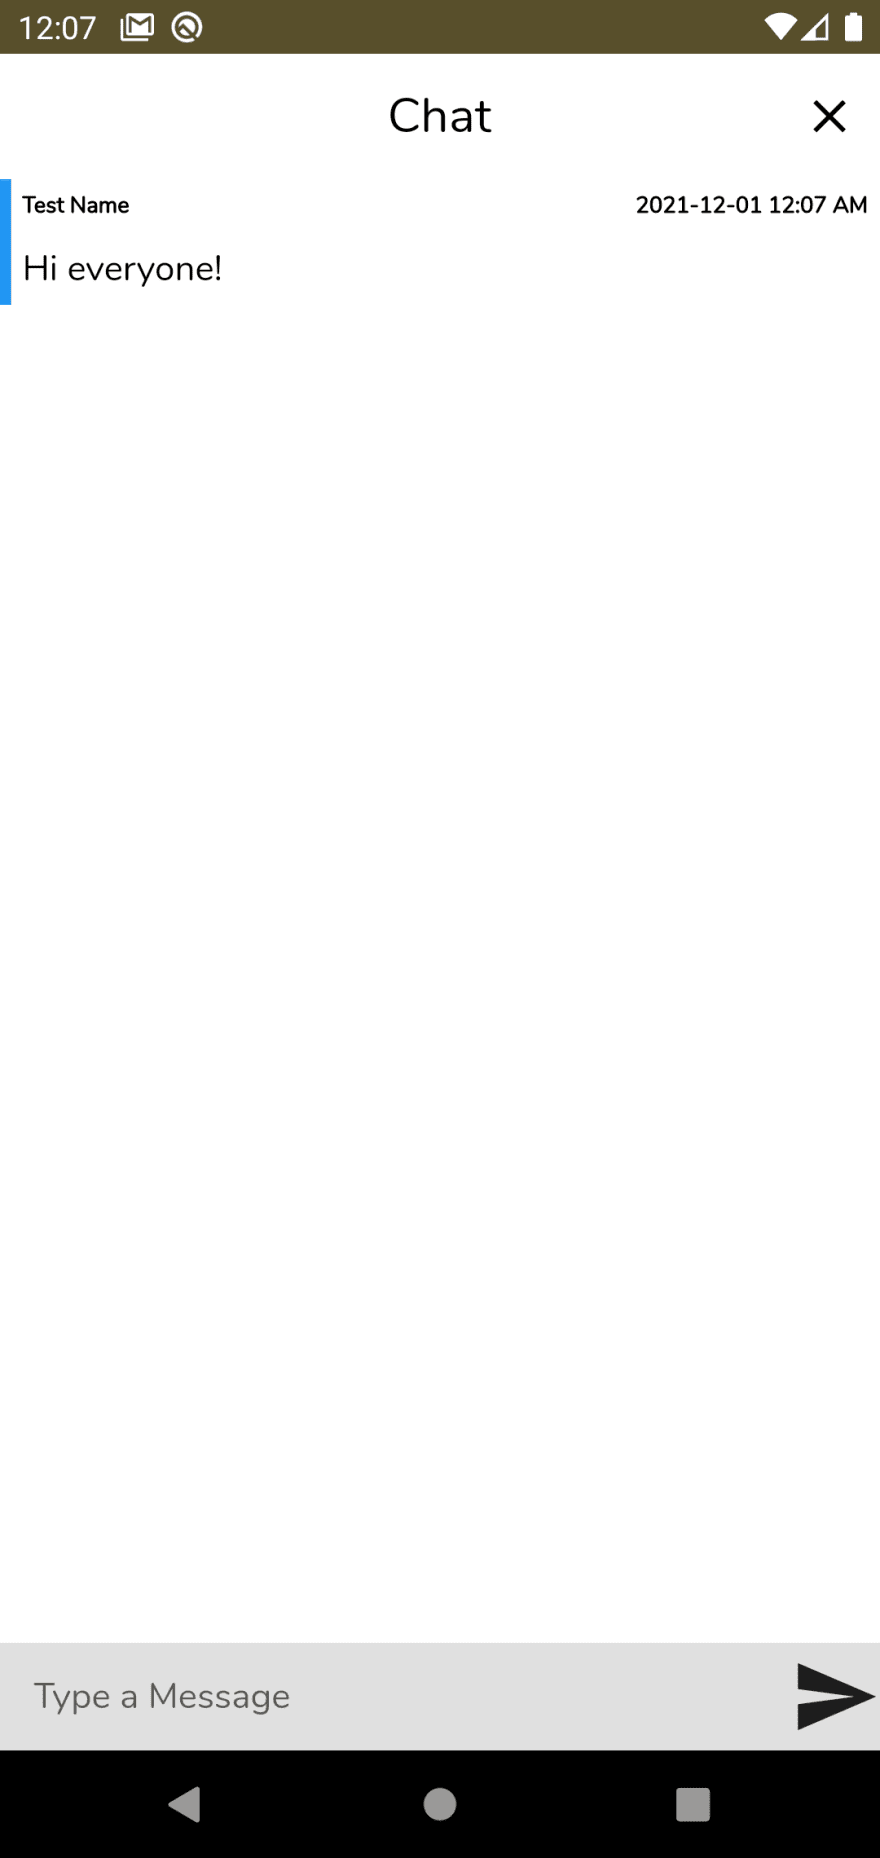
Chat
To add the ability to chat with everyone in a current meeting you need to update your ChatView widget.
First, accept the MeetingStore object in your ChatView constructor from the RoomView as below:
final MeetingStore meetingStore;

const ChatView({required this.meetingStore, Key? key}) : super(key: key);


// Next, store this object inside your _ChatViewState as below:

late MeetingStore _meetingStore;

@override
void initState() {
    super.initState();
    _meetingStore = widget.meetingStore;
}
Next, update the body to render the messages as below:
Expanded(
  // child: const Text('No messages')
  // 1
  child: Observer(
    builder: (_) {

      // 2
      if (!_meetingStore.isMeetingStarted) {
        return const SizedBox();
      }

      // 3
      if (_meetingStore.messages.isEmpty) {
        return const Text('No messages');
      }

      // 4
      return ListView(
        children: List.generate(
          _meetingStore.messages.length,
          (index) => Container(
            padding: const EdgeInsets.all(5.0),
            child: Column(
              crossAxisAlignment: CrossAxisAlignment.start,
              mainAxisSize: MainAxisSize.min,
              children: [
                Row(
                  children: [
                    Expanded(
                      child: Text(

                        // 5
                        _meetingStore
                                .messages[index].sender?.name ??
                            "",
                        style: const TextStyle(
                            fontSize: 10.0,
                            color: Colors.black,
                            fontWeight: FontWeight.w900),
                      ),
                    ),
                    Text(

                      // 6
                      formatter.format(
                          _meetingStore.messages[index].time),
                      style: const TextStyle(
                          fontSize: 10.0,
                          color: Colors.black,
                          fontWeight: FontWeight.w900),
                    )
                  ],
                ),
                const SizedBox(
                  height: 10.0,
                ),

                // 7
                Text(
                  _meetingStore.messages[index].message
                      .toString(),
                  style: const TextStyle(
                      fontSize: 16.0,
                      color: Colors.black,
                      fontWeight: FontWeight.w300),
                ),
              ],
            ),
            decoration: const BoxDecoration(
                border: Border(
              left: BorderSide(
                color: Colors.blue,
                width: 5,
              ),
            )),
          ),
        ),
      );
    },
  ),
),
In the above code:
- As done previously you used Observer to display the changes.
- Displaying the empty box if the meeting hasn’t started.
- Displaying a text if there are no messages.
- Rendering the messages as a List.
- Displaying the sender’s name.
- Here, displaying the DateTime of the message.
- The message is displayed here.
After this, you are ready to render the incoming messages, however, this willl not display anything as we are not allowing the peer to send a message yet.
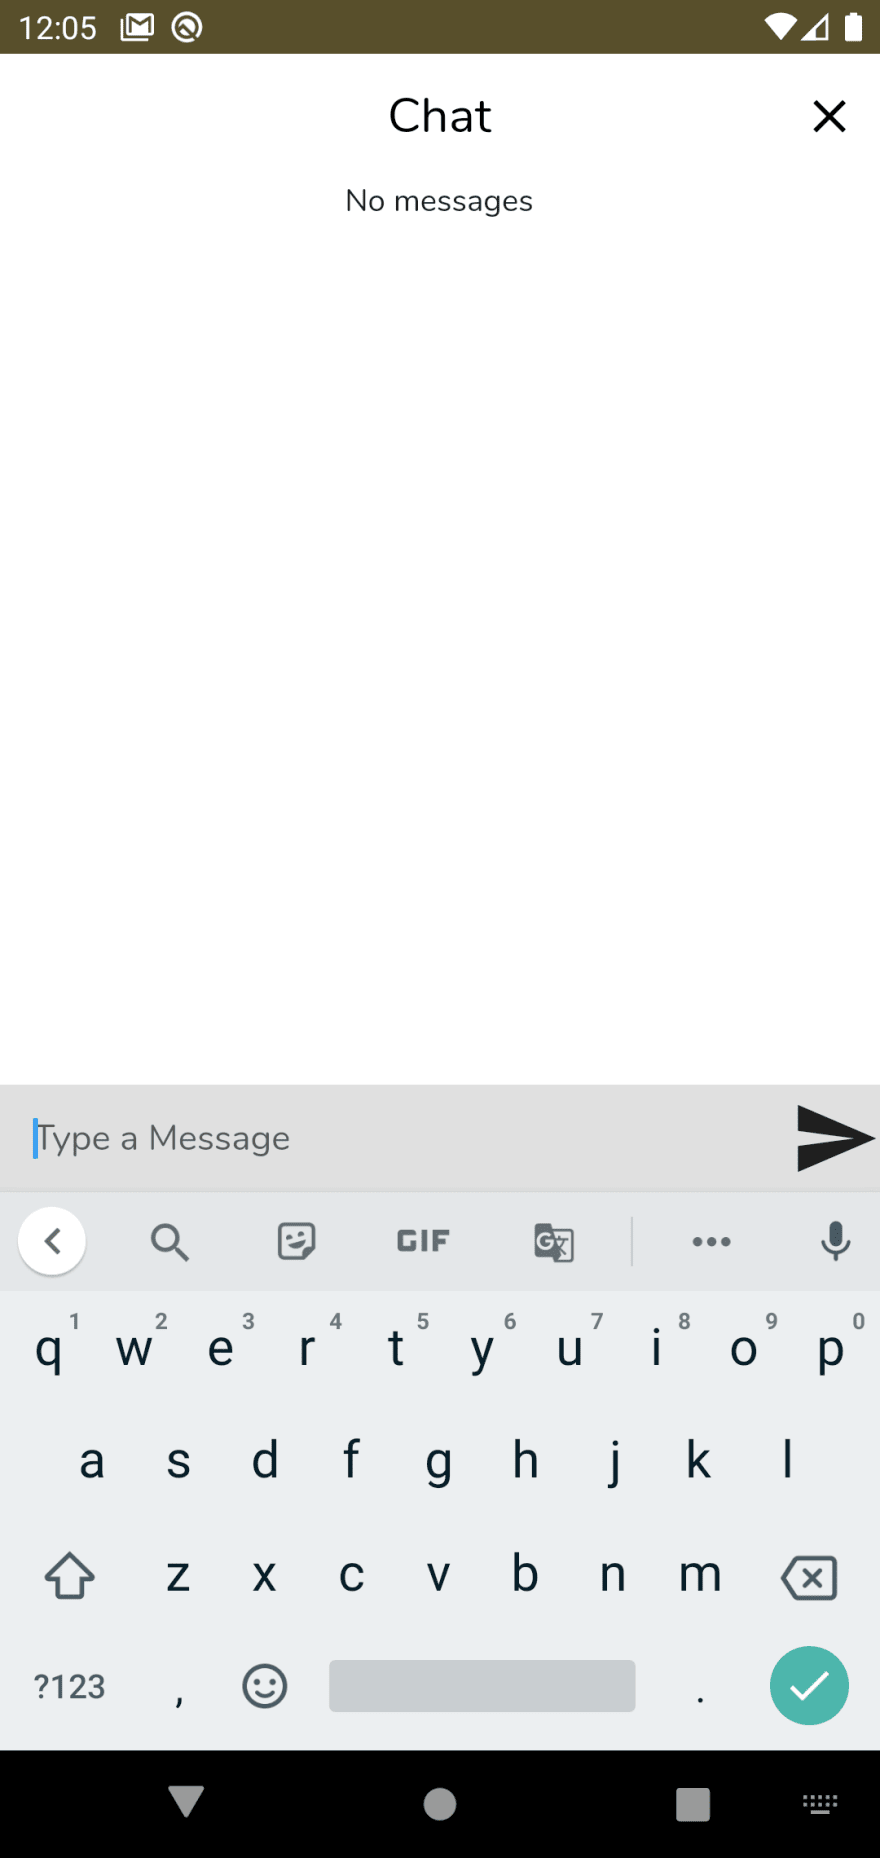
So update the onTap event of the Send icon button of the ChatView as below:
// 1
String message = messageTextController.text;
if (message.isEmpty) return;

if (valueChoose == "Everyone") {
    // 2
    _meetingStore.sendMessage(message);
}
messageTextController.clear();
Here you did the following:
- Saved the message front the
messageTextControllerTextEditingController. - Used the
sendMessageof the_meetingStoreobject to Send the Broadcast messages.
Build and run your app. Now, you can interact with everyone in the meeting ✨
Remove Peer
If you want to remove some peers from the meeting, you can just use the removePeer method.
Go back to the RoomView widget and update your onLongPress event as below:
onLongPress: () {
    _meetingStore.removePeer(filteredList[index]);
}
Note: You can’t just remove others from a meeting. That’s why you created the custom roles at the beginning of this tutorial.

Leave Room
To leave the room, go back to RoomView and update the onPressed method of Leave Quietly button as below:
onPressed: () {
    _meetingStore.meetingController.leaveMeeting();
    Navigator.pop(context);
}
Here, you are using the MeetingStore object to use the meetingController to leave the room.

Finally, you have covered the basic functionality and are ready to use these skills in your own projects.
Conclusion
You can find the starter and final project here. In this tutorial, you learned about 100ms and how you can easily use 100ms to build an audio room Application. However, this is only the beginning, you can learn more about changing roles, changing tracks, adding peers, direct chatting with another peer, and much more from here.
We hope you enjoyed this tutorial. Feel free to reach out to us if you have any queries. Thank you!
Engineering
Share
Related articles
See all articles