Home
/ Blog /
Meet all new 100ms RoomKit SDK on iOSMeet all new 100ms RoomKit SDK on iOS
September 29, 202313 min read


Share


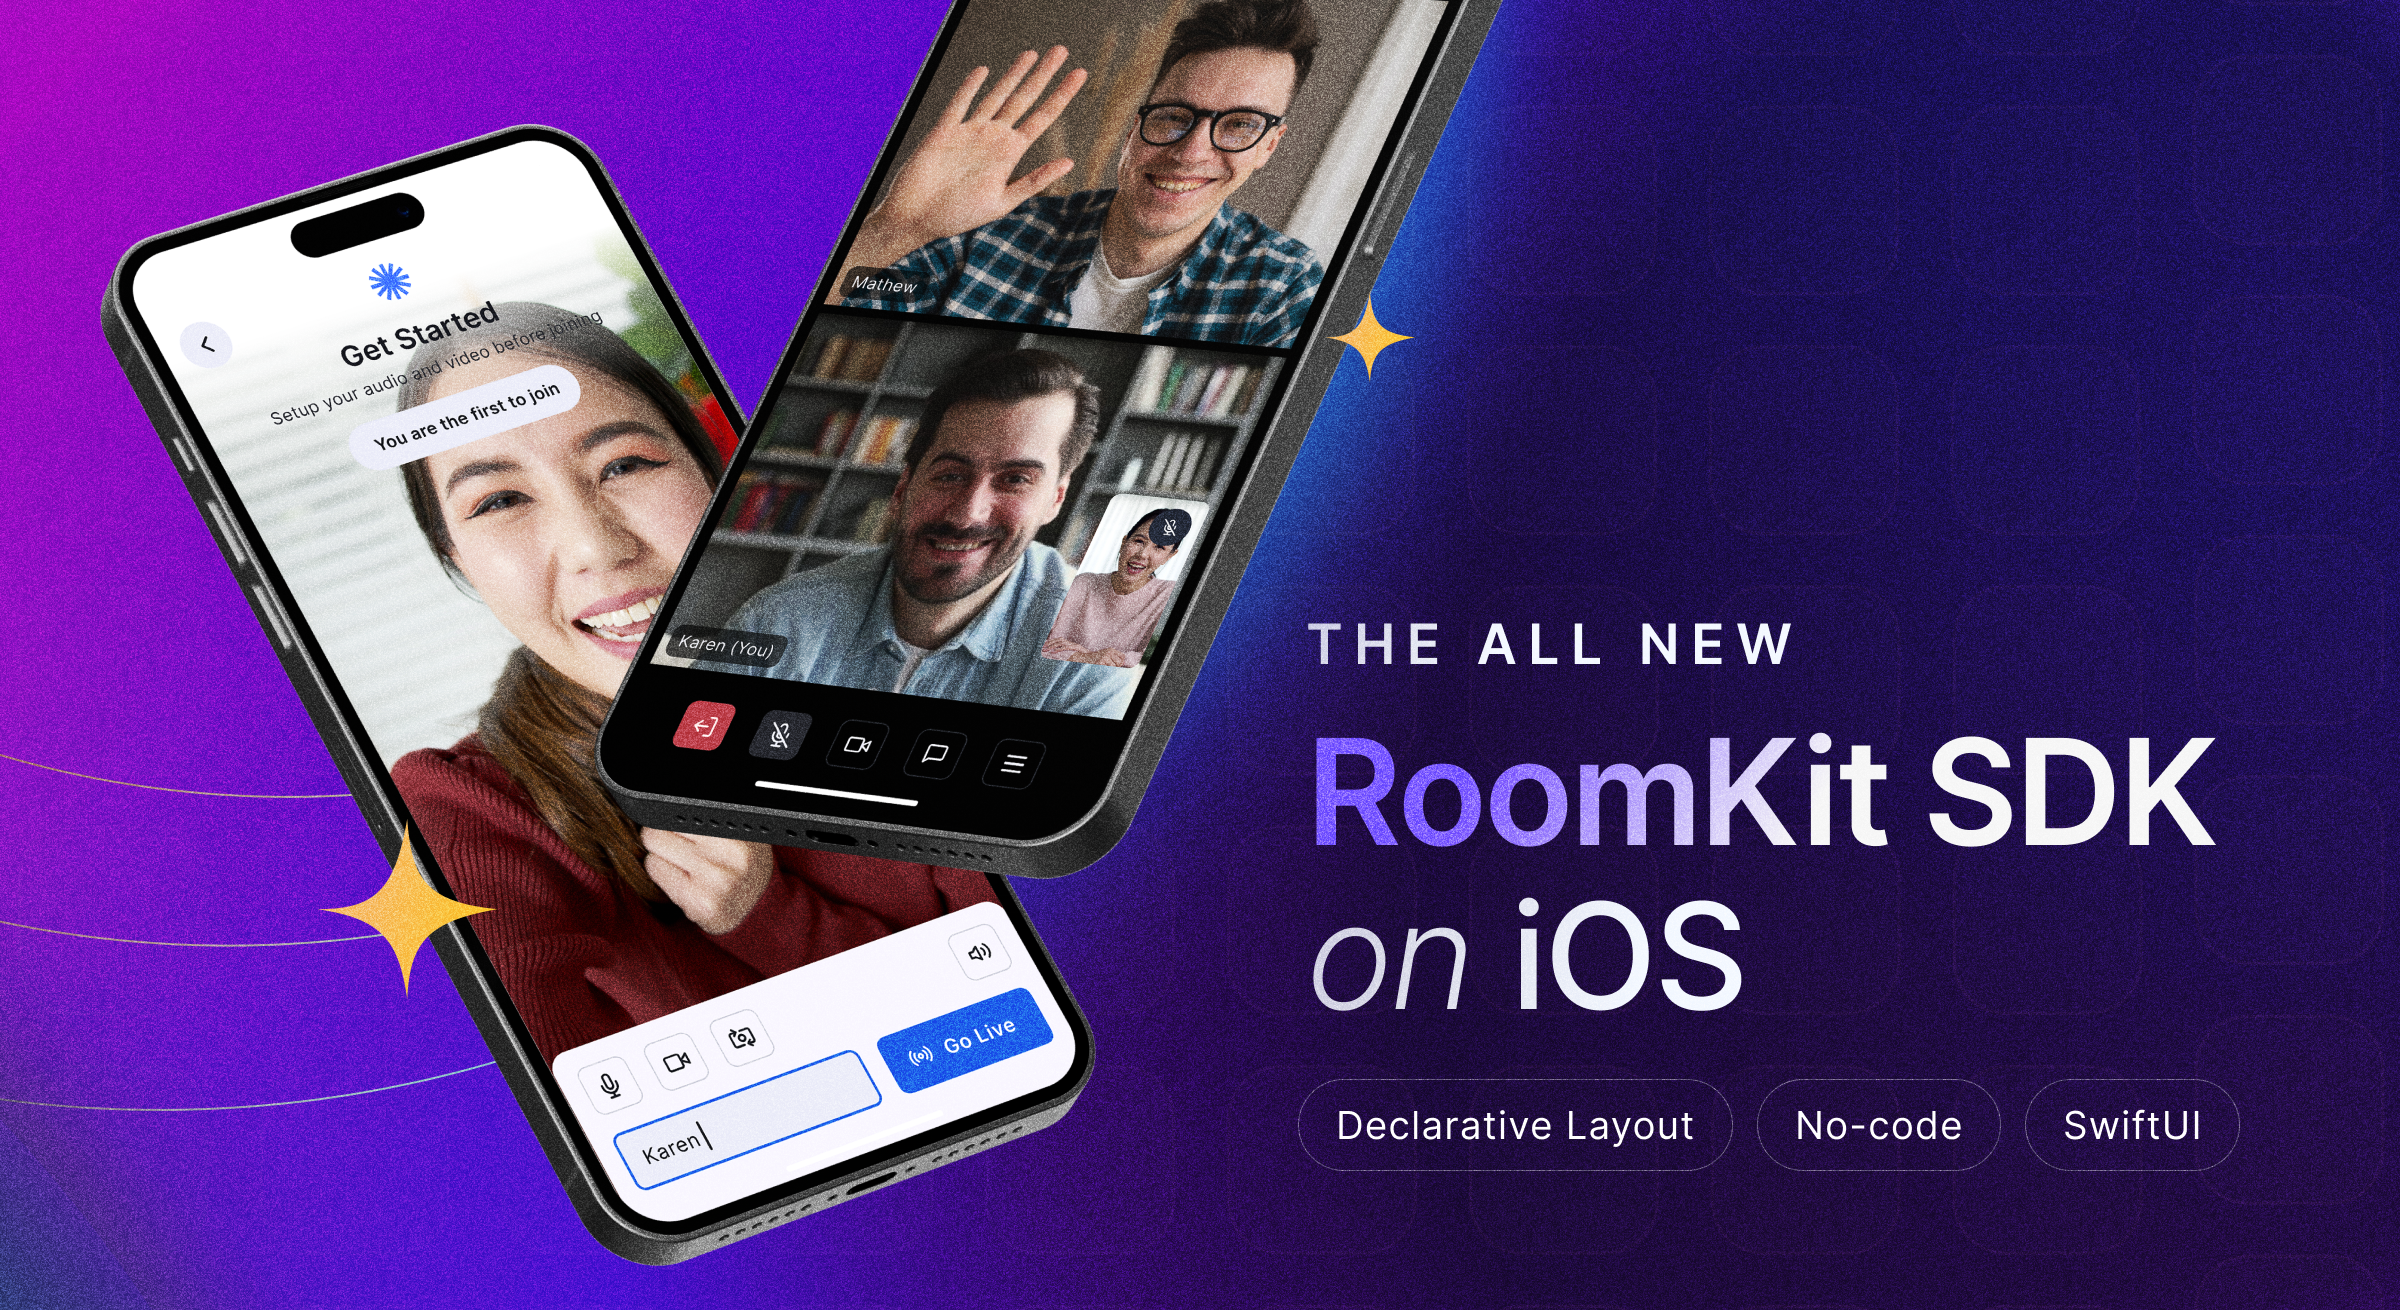
Building a video-conferencing or streaming app from scratch is no small feat. From aligning audio and video streams to designing user-friendly interfaces, it can be a challenging task with many factors to consider. That's where HMSRoomKit comes in - it is designed to make this process easier for you by providing prebuilt conferencing and live-streaming components that are ready to use.
Why HMSRoomKit?
At its core, HMSRoomKit is inspired by the simplicity and clarity of SwiftUI's declarative approach. By aligning itself with these principles, it transforms the often daunting task of creating video-conferencing and live-streaming interfaces into an intuitive experience. For a glimpse of how the code has become more intuitive, let’s see how you’ll build a simple conferencing screen with RoomKit. In the example below, we construct a conference screen with tiles for call participants and controls for the microphone, camera, and exit functions:
import HMSRoomKit
import HMSRoomModels

struct MeetingView: View {

    @ObservedObject var conferenceRoom = HMSRoomModel(roomCode: "qfw-mit-seb")

    var body: some View {

        VStack {

            HMSPeerLayout()

            HStack(spacing: 30) {
                Spacer()
                Image(systemName: conferenceRoom.isMicMute ? "mic.slash" : "mic")
                    .onTapGesture { conferenceRoom.toggleMic() }
                Image(systemName: conferenceRoom.isCameraMute ? "video.slash" : "video")
                    .onTapGesture { conferenceRoom.toggleCamera() }
                Image(systemName: "phone.down.fill")
                    .onTapGesture {
                        Task { try await conferenceRoom.leave() }
                    }
                Spacer()
            }
            .padding()
        }
        .environmentObject(conferenceRoom)
        .environmentObject(HMSUITheme())
    }
}
With the provided code, you can achieve a fully-functional conference screen as shown below:

A Glimpse into how HMSRoomKit’s Prebuilt View simplifies video app development
At its core, HMSRoomKit offers a suite of prebuilt components designed to streamline the creation of video-conferencing or live-streaming apps. The best manifestation of this simplicity shines through the HMSPrebuiltView offered by the SDK. This is great for developers keen on speedy implementation.
HMSPrebuiltViewis not just any component - it encapsulates the complete video-conferencing and live-streaming experience within a singular SwiftUI view. Imagine having a video conference interface up and running in mere minutes. WithHMSPrebuiltView, that's entirely possible.
import HMSRoomKit

struct ContentView: View {
    var body: some View {
        HMSPrebuiltView(roomCode: /*pass room code as string here*/)
    }
}
And it's done! HMSPrebuiltView is not only easy to use but also empowering. For many applications, this might be the only component you'll need. Moreover, it's supported by a comprehensive, no-code web interface. This allows you to customize the look and feel of your meeting application according to your brand or preference, without needing to delve into complex coding.
You can use HMSPrebuiltView right away with 1.0.0 released version of our open source SDK. To help you integrate RoomKit into your apps, we have mentioned all the steps you need in the readme file.
Exploring HMSRoomKit: Using SwiftUI in Real-World Apps
At 100ms, we have embraced the future by using SwiftUI to power our iOS RoomKit SDK. This is a significant step forward, as not many companies are currently using SwiftUI in production. Netflix is one of the few companies that have successfully implemented SwiftUI in their production environment. Before we delve into RoomKit, let's first understand what SwiftUI is.
SwiftUI: The Shift from Programmatic to Declarative
Let's understand the fundamental shift in UI development - from programmatic to declarative. We can understand the concepts of programmatic (imperative) and declarative programming by examining how we would describe placing a glass of water on a table using each approach.
-
Imperative (Programmatic) Style: You explain every step of how to put the glass on the table.
let table = Table() let glassOfWater = GlassOfWater() table.pickUp(glassOfWater) table.moveAboveSpot(desiredSpot) table.lowerGlass(glassOfWater) table.releaseGrip() -
Declarative Style (SwiftUI): You simply state that you want the glass on the table, and the framework figures out how to achieve it.
  struct TableView: View {
      var body: some View {
          Table {
              GlassOfWater()
          }
      }
}
Pros and Cons
The advantage of Imperative approach is explicit control meaning developers have granular control over the flow of the program.
The advantages of Declarative approach include less boilerplate code, potentially fewer bugs, and easier readability. In real-world coding, especially in UI development with SwiftUI, this distinction means you focus more on defining the desired state of your UI, and less on the sequence of operations to achieve it.
As you can see, the pro for one approach is a con for the other.
Harnessing the Power of SwiftUI in HMSRoomKit
At its core, HMSRoomKit offers a suite of prebuilt components designed to streamline the creation of video-conferencing apps. But what truly sets it apart is its deep integration with SwiftUI's declarative approach. Rather than tediously assembling UI pieces and manually updating them with data changes, developers can now rely on reactive models and environment objects to automatically drive the UI. HMSRoomKit is not just a collection of components; it's a testament to the power of declarative design. With prebuilt components and deep integration with SwiftUI, it promises a seamless experience for developers.
Just as SwiftUI has simplified general UI development, HMSRoomKit looks poised to simplify the complexities involved in crafting video conferencing interfaces. For instance, consider the following simplified example of a virtual meeting view:
import HMSRoomKit

struct MeetingView: View {

    var body: some View {

        VStack {

            HMSPeerLayoutView()

            HStack {
                MicAndCameraToggleView()
            }
        }
    }
}
Here, HMSPeerLayoutView and MicAndCameraToggleView effortlessly lay out the necessary components for a conference room on your screen. But, to truly imbue these components with life and functionality, we have to tie them to a real conference room. Let’s look at how to achieve that.
import HMSRoomKit
import HMSRoomModels

struct MeetingView: View {

    let conferenceRoom = HMSRoomModel(roomCode: "qdf-mik-seb")

    var body: some View {
        VStack {

            // HMSPeerLayoutView utilizes conferenceRoom present in the environment to drive it's UI
            HMSPeerLayoutView()

            HStack {
                // MicAndCameraToggleView shows how you can write your own views that react to conferenceRoom present in the environment
                MicAndCameraToggleView()
            }
        }
        .environmentObject(conferenceRoom)
    }
}


// Definition of MicAndCameraToggleView
struct MicAndCameraToggleView: View {

    // conferenceRoom can be accessed in your own view like this
    @EnvironmentObject var conferenceRoom: HMSRoomModel

    var body: some View {

        Image(systemName: conferenceRoom.isMicMute ? "mic.slash" : "mic")
            .onTapGesture { conferenceRoom.toggleMic() }
        Image(systemName: conferenceRoom.isCameraMute ? "video.slash" : "video")
            .onTapGesture { conferenceRoom.toggleCamera() }
    }
}
Here we create an instance of conferenceRoom and inject it into the environment. The conferenceRoom object is now accessible to every view in the VStack. By doing this, views like HMSPeerLayoutView and others know what context they are running under and can adapt their behaviour accordingly. For instance, as a participant joins the conference, they automatically appear in the HMSPeerLayoutView. Similarly, MicAndCameraToggleView toggles the mic/camera of local user in the conferenceRoom.
The following diagram shows anatomy of the above MeetingView where HMSPeerLayoutView is an HMSRoomKit view while MicAndCameraToggleView is a custom view written by the client. Notice how both of these views can access conferenceRoom (HMSRoomModel) object from the SwiftUI environment and react to the updates.

Observable Models: Breathing Life into Real-time Interactions
Delve into the essence of HMSRoomKit, and you'll notice it's not merely about data structures. Models like HMSRoomModel and HMSPeerModel are dynamic entities that vibrate with changes in real time. Thanks to the @Published property wrapper, they automatically notify SwiftUI views about any alterations, establishing a seamless flow of data.
For instance, consider this representation:
public class HMSPeerModel: ObservableObject {
    ...
    @Published public var isVideoDegraded: Bool
    ...
}
In the context above, the HMSPeerModel isn’t merely acting as a placeholder for data. It's an active observer, alerting the system of any pertinent changes.
Delving further into the dynamics of these models, one can admire their reactive essence. Take a look at isVideoDegraded property of HMSPeerModel:
@Published public var isVideoDegraded: Bool
Imagine a situation where a participant's video quality diminishes. The isVideoDegraded property in HMSPeerModel instantly responds. Instead of entangling your code with intricate delegate methods or callbacks, SwiftUI views organically respond to this change. The outcome is not just streamlined code, but also an enriched user experience that effortlessly corresponds to real-world changes.
SwiftUI Environments and Environment Objects: The Glue of Consistency
One of the ingenious integrations in HMSRoomKit is its adept utilization of SwiftUI’s environment objects. These global resources, be it HMSRoomModel or HMSUITheme, become readily accessible to numerous views, underpinning consistent data and behavior throughout.
Consider the scenario where you adjust the UI theme or modify certain room details. With environment objects in place, these transitions effortlessly permeate across the entire app, without the usual chaos of data passing or reliance on singletons.
Think of environment objects in SwiftUI as reservoirs of shared information that underpin coherence across the interface.
For instance, consider the following example. Here we want to show all peers in a room. Notice how HMSPeerLayout view is shown in an environment containing conferenceRoom it should use and UI theme it should adapt.
let uiTheme = HMSUITheme()
let conferenceRoom = HMSRoomModel(roomCode: "qfw-mit-seb")

var body: some View {
    VStack {
        HMSPeerLayout()
    }
    .environmentObject(uiTheme)
    .environmentObject(conferenceRoom)
}
Here, any modifications to the UI theme – be it colors, typography, or branded insignia – manifest uniformly across all views, encapsulating a cohesive user interface. Similarly, any changes in the conferenceRoom will be propagated to every view in the VStack, so if a new peer joins the room they will be shown in the peer layout grid.
Simplicity & Customizability: The HMSRoomKit Experience
HMSRoomKit's design philosophy revolves around two core tenets: simplicity and customizability. Whether you're a developer looking to quickly set up a video-conferencing feature or one aiming for a bespoke conferencing experience tailored to specific requirements, RoomKit has got you covered.
Zero to Conference/Live-streaming in Seconds - Released
For developers aiming for rapid deployment of a video-conferencing feature, RoomKit offers the HMSPrebuiltView. This component encapsulates the entire** video-conferencing and live-streaming experience** in a single view.
import HMSRoomKit

struct ContentView: View {
    var body: some View {
        HMSPrebuiltView(roomCode: /*pass room code as string here*/)
    }
}
With just a few lines of code, you have a fully functional video-conferencing or live-streaming setup. No hassle, no complex configurations.
The following video shows the UI of the app using HMSPrebuiltView:
You can use HMSPrebuiltView right away with 1.0.0 released version of our open source SDK.
The next two examples will be part of future releases, but if you are keen, you can try them out with the main branch of 100ms-roomkit-ios
Tailored Conference Experiences - Future release
While the prebuilt view is powerful, RoomKit recognizes that one size doesn't fit all. For developers seeking a more tailored experience, the SDK offers granular components, allowing you to craft custom views based on the state of the room.
This example showcases the ability to switch between different screens based on the room's state so that you can have your own leave screen, offering a dynamic user experience where you can mix and match prebuilt components with your own views.
import HMSRoomKit
import HMSRoomModels

struct ContentView: View {
    @ObservedObject var conferenceRoom = HMSRoomModel(roomCode: "qfw-mit-seb")

    var body: some View {
        Group {
            switch conferenceRoom.roomState {
            case .none:
                HMSPreviewScreen()
            case .meeting:
                HMSConferenceScreen()
            case .leave:
                // code for your own leave screen
            }
        }
        .environmentObject(conferenceRoom)
        .environmentObject(HMSUITheme())
    }
}
Ultimate Customizability - Future release
Taking customization a step further, RoomKit allows developers to not only switch views based on room states but also to intricately design the UI components within those views.
In this example, we see a custom layout for the meeting state, where the developer has designed a control bar for mute, video toggle, and leave actions while still using the peer layout grid from RoomKit. This level of customizability ensures that developers have complete control over the user experience.
import HMSRoomKit
import HMSRoomModels

struct ContentView: View {
    @ObservedObject var conferenceRoom = HMSRoomModel(roomCode: "qfw-mit-seb")

    var body: some View {
        Group {
            switch conferenceRoom.roomState {
            case .none:
                HMSPreviewScreen()
            case .meeting:
                VStack {
                    HMSPeerLayout()
                    HStack(spacing: 30) {
                        Spacer()
                        Image(systemName: conferenceRoom.isMicMute ? "mic.slash" : "mic")
                            .onTapGesture { conferenceRoom.toggleMic() }
                        Image(systemName: conferenceRoom.isCameraMute ? "video.slash" : "video")
                            .onTapGesture { conferenceRoom.toggleCamera() }
                        Image(systemName: "phone.down.fill")
                            .onTapGesture {
                                Task { try await conferenceRoom.leave() }
                            }
                        Spacer()
                    }
                    .padding()
                }
            case .leave:
                HMSEndCallScreen()
            }
        }
        .environmentObject(conferenceRoom)
        .environmentObject(HMSUITheme())
    }
}
The following video shows the UI of the app using the code above:
Conclusion
HMSRoomKit's blend of simplicity and customizability ensures that developers, regardless of their requirements, can craft video-conferencing experiences with ease and precision. Whether it's a quick setup or a tailored design, RoomKit delivers, leveraging the power of SwiftUI's declarative paradigm.
Our Prebuilt roadmap is brimming with exciting plans ahead. If you're enthusiastic about joining this adventure and making valuable contributions, we invite you to our #Prebuilt discord channel.
Until next time 👋🏻
Engineering
Share
Related articles
See all articles