Home
/ Blog /
Comparing the Code: Migrating from Twilio to 100ms [Web Edition]Comparing the Code: Migrating from Twilio to 100ms [Web Edition]
September 3, 202215 min read


Share


Trying to migrate your tech stack from Twilio Video to 100ms?
In this guide, we will look at the basic differences between the Web SDKs— Twilio Video JS SDK and 100ms JS SDK, from a technical perspective. We will also have a code comparison between the SDKs, to help you scope code changes for your migration.
Understanding the Differences in SDKs
First, let’s explore some basic conceptual differences between the 100ms SDK and the Twilio Video SDK from an implementation POV.
| Twilio | 100ms | |
|---|---|---|
| Rooms and Authentication | The rooms are identified by their “Room Name”, which should be maintained as unique within an account. Clients are authenticated to use Twilio API for creating/joining rooms, with an access token issued by their server. |
The rooms are identified by a “Room Id” that is generated automatically. Clients are authenticated only to join the room requested with the room id and configuration, using the auth token issued by their server. This offers more control over client apps. |
| Peers | Every peer in the room has a corresponding Participant object.To access the local device methods LocalParticipant object is used. For every other participant in the room, RemoteParticipant object is used. |
Every peer corresponds to a Peer object including the local device. The methods related to the local device are associated with HMSActions that directly connect to the 100ms backend. |
| Media | Every Participant can create a set of Tracks on their own and publish them.Objects of type AudioTrack, VideoTrack, and DataTrack are used for sending/managing audio, video, and data streams.UI can be rendered by listening to every individual track with callback functions. |
No complex concept like “tracks” for handling media. Straightforward methods available on HMSActions to enable/disable camera, microphone, screen-share.Easy to render UI with appropriate Selectors and callback functions. |
| Permissions and Pub/Sub | Permission and Pub/Sub rights for a peer have to be handled manually. | Roles can be used to define permissions for a peer, including Pub/Sub permissions, permission to mute/unmute another peer in the same room & more. |
| Persistent Peer State | There is no way for a peer to hold a persistent state. | Peer Metadata can be used to set data that can be updated anytime and is persisted while other peers join and leave a room. |
| Room Configuration | Rooms have to be individually configured every time they are created. | A Template consists of all configurations for a room, along with the possible Roles to define peer behaviour. When a room is created dynamically, it can be configured with a pre-defined or a custom Template by referring to its ID or name.Easy to create your own Templates from the Dashboard. |
| Events/Notifications | Can be listened to with callback functions. For different events, the app must take care of state management which gets complicated. | Can subscribe to a reactive flux store for any piece of data in addition to callbacks. There is no need to maintain app-side state. |
| Webhooks | The StatusCallback (Twilio’s name for Webhook) is used to update room events to the Webhook URL. |
The Webhook is used to update room events to the given Webhook URL, similar to Twilio. |
Now that we’ve discussed differences in these SDKs, let’s explore the actual process of migrating your app to 100ms. For this article, let’s walk through the steps on migrating to 100ms JS SDK (Web) with some sample code comparison from the Twilio Video JS SDK (Web).
Creating your Project
This 100ms product walkthrough takes you through create a project from the 100ms dashboard. Create the project yourself by following the steps:
- Go to 100ms Dashboard and sign up for an account, if you haven’t already.
- Now, click on the Create New button. You can either choose from one of the starter kits or create your own custom app. If you’re creating a custom app, create the roles and choose a subdomain to get started.
Now that you’ve created an app, let’s implement some real features with 100ms. While doing so, we’ll compare our code with that of Twilio side-by-side.
Joining the Room
<form id="join">
    <h2>Join Room</h2>

    // Room name (required only for Twilio)
    <div class="input-container">
        <input id="rname" type="text" name="roomname" placeholder="Room name" />
    </div>

		// Username (required only for 100ms)
    <div class="input-container">
        <input id="uname" type="text" name="username" placeholder="Your name" />
    </div>

		// Auth token (required for both Twilio and 100ms)
    <div class="input-container">
        <input id="token" type="text" name="token" placeholder="Auth token" />
    </div>
    <button type="button" class="btn-primary" id="join-btn">Join</button>
</form>
Twilio
// Room variable to be used throughout the call
let room;

// Join room on button click
document.getElementById("join-btn").onclick = () => {
    connect(document.getElementById("token").value, {
        name: document.getElementById("rname").value,
				...otherConfig
    }).then((connectedRoom) => {
						room = connectedRoom;
				}
		);
};
100ms
The 100ms SDK gives you access to abstracted objects like hmsStore and hmsActions to easily manage the state of your room. We’ll see how they are used in the upcoming code comparisons.
// Initialize HMS Store
const hmsManager = new HMSReactiveStore();
hmsManager.triggerOnSubscribe();
const hmsStore = hmsManager.getStore();
const hmsActions = hmsManager.getHMSActions();

// Join room on button click
document.getElementById("join-btn").onclick = () => {
    hmsActions.join({
        userName: document.getElementById("uname").value,
        authToken: document.getElementById("token").value,
				...otherConfig
    });
};
Authentication
We can use the dashboard to create a temporary token that will automatically expire in 24hrs. You can follow this guide to generate tokens on your server.
Auth tokens are generally issued by the server upon request from the client application.
- In your Dashboard, go to the Rooms section. Now, click on the RoomId of the room you want to generate a token for.

- Click on the Join room button.

- Now, by clicking the key icon, you can generate and copy the token for your room based on the role.
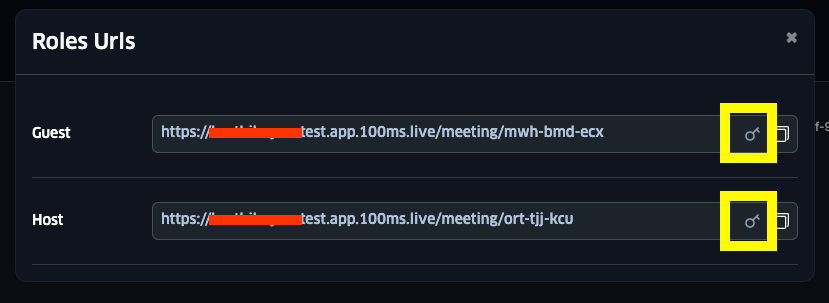
- Once this token has expired (after 24hrs), you can generate another token by following the same method.
Rendering Audio/Video
<div id="conference" class="conference-section">
    <h2>Conference</h2>

    <div id="peers-container"></div>
</div>
Twilio
// Render local and existing remote participants
participantConnected(room.localParticipant);
room.participants.forEach(participantConnected);

// Callbacks for participant connection and disconnection
room.on('participantConnected', participantConnected);
room.on('participantDisconnected', participantDisconnected);
room.once('disconnected', (room, error) => {
		room.participants.forEach(participantDisconnected);
		participantDisconnected(room.localParticipant);
);

// Handle participant render on connection
function participantConnected(participant) {
    const peertile = document.createElement('div');
		peertile.className = 'peer-tile';
    peertile.id = participant.sid;
    peertile.innerText = participant.identity;

    const videoElement = document.createElement('video');
		videoElement.className = 'peer-video';
    videoElement.autoplay = true;
    videoElement.muted = true;
    videoElement.playsinline = true;

    participant.on('trackSubscribed', (track) => trackSubscribed(videoElement, track));
    participant.tracks.forEach((track) => trackSubscribed(videoElement, track));
    participant.on('trackUnsubscribed', trackUnsubscribed);

		peertile.append(videoElement);
    document.getElementById("peers-container").append(peertile);
}

// Handle participant disconnection
function participantDisconnected(participant) {
    participant.tracks.forEach(trackUnsubscribed);
    document.getElementById(participant.sid).remove();
}

// Handle new track subscription
function trackSubscribed(videoElement, track) {
    track.attach(videoElement);
}

// Handle track unsubscription
function trackUnsubscribed(track) {
    track.detach().forEach((element) => element.remove());
}
100ms
In 100ms, the concept of tracks is abstracted to provide the best developer experience and avoid mistakes when handling them explicitly. The function passed to hmsStore.subscribe is automatically called on every peer join/leave event. This means that you don’t have to worry about every single case involving some peer joining and leaving the room.
// Callback for handling peer rendering - called on peer join/leave events
hmsStore.subscribe(renderPeers, selectPeers);

// Display a tile for each peer in the peer list
function renderPeers(peers) {
    document.getElementById("peers-container").innerHTML = "";

    peers.forEach((peer) => {
        if (peer.videoTrack) {
            document.getElementById("peers-container").append(renderPeer(peer));
        }
    });
}

// Render a single peer
function renderPeer(peer) {
		const peertile = document.createElement('peer-tile');
    peertile.id = peer.id;
    peertile.innerText = peer.name;

    const videoElement = document.createElement('peer-video');
		videoElement.className = 'video';
    videoElement.autoplay = true;
    videoElement.muted = true;
    videoElement.playsinline = true;

    hmsActions.attachVideo(peer.videoTrack, videoElement);

    peerTileDiv.append(videoElement);
    return peerTile;
}
Mute and Unmute Audio/Video
<div id="controls" class="control-bar">
    <button id="mute-aud" class="btn-control">Mute</button>
    <button id="mute-vid" class="btn-control">Hide</button>
		...
</div>
Twilio
// Global mute states
let audioEnabled = true;
let videoEnabled = true;

// Mute and unmute audio
document.getElementById("mute-aud").onclick = () => {
    room.localParticipant.audioTracks.forEach((track) => {
        audioEnabled ? track.disable() : track.enable();
    });
		audioEnabled = !audioEnabled;
    document.getElementById("mute-aud").textContent = audioEnabled ? "Mute" : "Unmute";
};

// Mute and unmute video
document.getElementById("mute-vid").onclick = () => {
    room.localParticipant.videoTracks.forEach((track) => {
        videoEnabled ? track.disable() : track.enable();
    });
		videoEnabled = !videoEnabled;
    document.getElementById("mute-vid").textContent = videoEnabled ? "Hide" : "Unhide";
};
100ms
100ms offers simple yet consistent methods for performing very common operations like muting/unmuting audio and video.
// Mute and unmute audio
document.getElementById("mute-aud").onclick = () => {
    const audioEnabled = !hmsStore.getState(selectIsLocalAudioEnabled);
    hmsActions.setLocalAudioEnabled(audioEnabled);
    document.getElementById("mute-aud").textContent = audioEnabled ? "Mute" : "Unmute";
};

// Mute and unmute video
document.getElementById("mute-vid").onclick = () => {
    const videoEnabled = !hmsStore.getState(selectIsLocalVideoEnabled);
    hmsActions.setLocalVideoEnabled(videoEnabled);
    document.getElementById("mute-vid").textContent = videoEnabled ? "Hide" : "Unhide";
};
Leaving the room
<div id="controls" class="control-bar">
		...
    <button id="leave-btn" class="btn-control">Leave</button>
</div>
Twilio
// Leaving the room
function leaveRoom() {
    room.disconnect().then(() => console.log("User left the room"));
		room = null;
}

document.getElementById("leave-btn").onclick = leaveRoom;
100ms
Similar to Twilio, a peer can leave the room with the use of a single method hmsActions.leave in 100ms.
// Leaving the room
function leaveRoom() {
    hmsActions.leave().then(() => console.log("User left the room"));
}

document.getElementById("leave-btn").onclick = leaveRoom;
Text Chat in the Room
To implement a reliable text chat in a Twilio Video room, you’d have to use the Twilio Conversations API and configure your server to support it by following this guide.
As the chat is integrated as a first class API in our SDK, you can remove all that code while migrating. The code below shows what sending and showing messages will look like with the 100ms SDK.
<div id="chatbox" class="chat-section">
    <input type="text" id="message" name="msg">
    <button id="send-btn" class="btn-control">Send Message</button>
</div>
This is how you can send/receive messages within a room in 100ms.
// Send a broadcast message to the room
function sendMessage(){
    const message = document.getElementById('message').value;
    hmsActions.sendBroadcastMessage(message);
}

// Render messages
function renderMessages(messages) {
    console.log('messages - ', messages);
    // Logic to render the message in UI
}

hmsStore.subscribe(renderMessages, selectHMSMessages); // get all messages
document.getElementById("send-btn").onclick = sendMessage;
Demo
You can explore our Javascript Quickstart example below, implemented with a similar source code.
Next Steps
Simply, see it for yourself. Build a production-grade app from scratch with 100ms, and you can experience the ease of use and flexibility we provide, for yourself. If you’re interested, here are some resources that will help you get started:
Engineering
Share
Related articles
See all articles