Home
/ Blog /
Build your first WebRTC app with Python and ReactBuild your first WebRTC app with Python and React
May 24, 202222 min read


Share


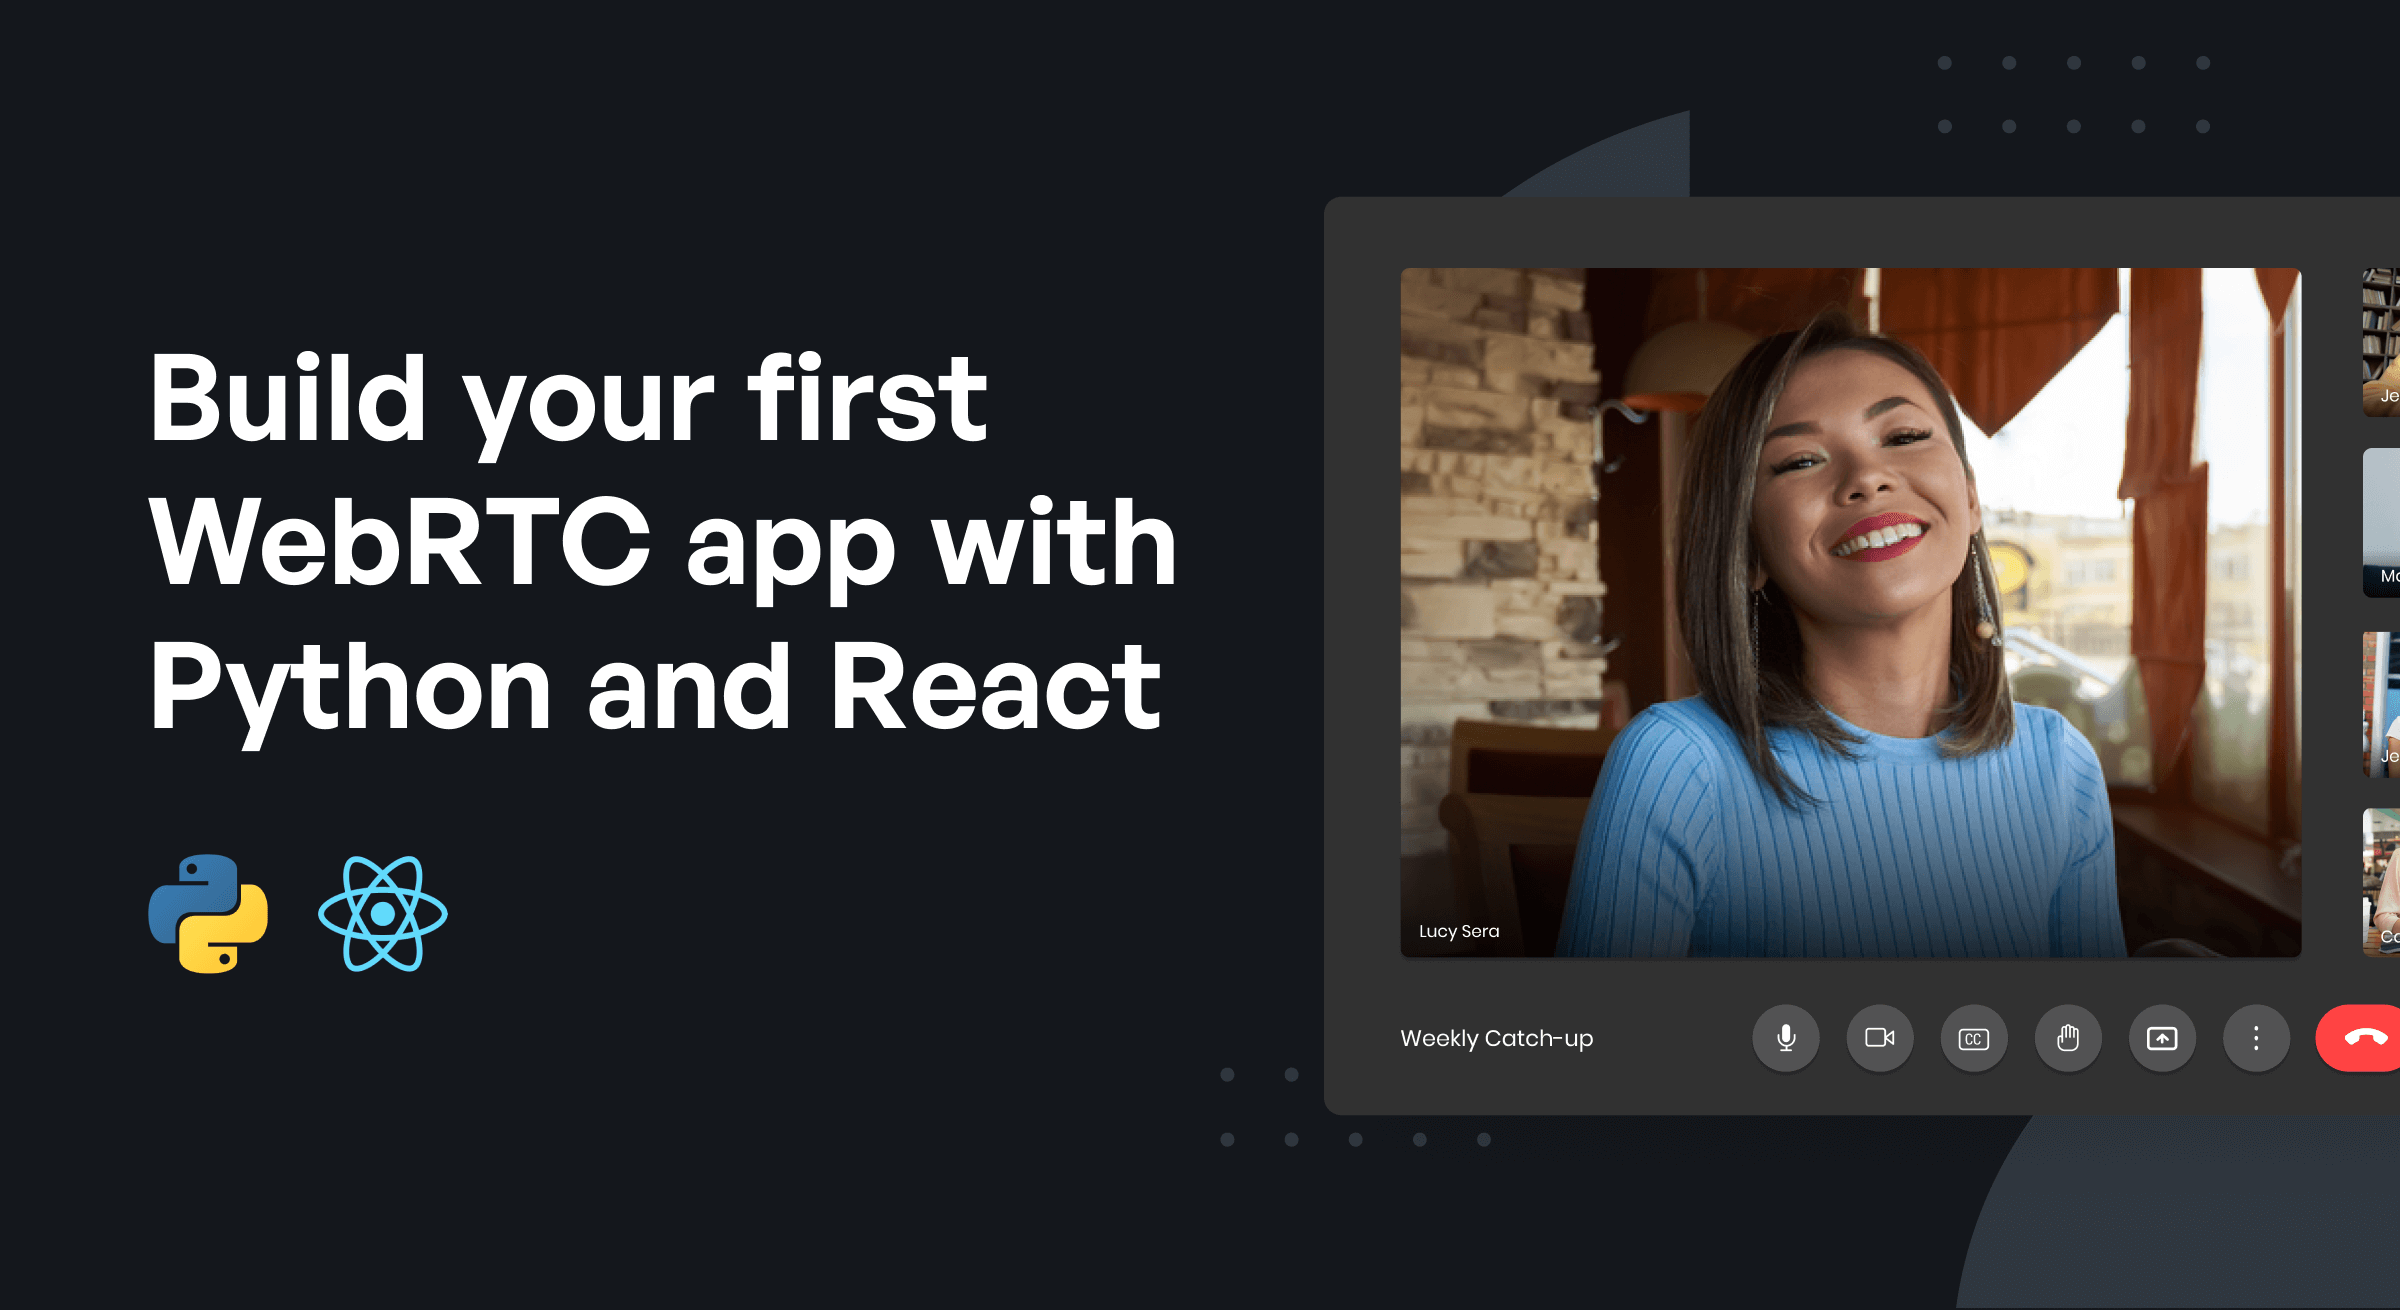
In this blog, we will discuss how to build a simple 1-to-1 video chat app with Python, React & WebRTC.
For anyone who might be new to the term, WebRTC is a technology used to add real-time media communications directly between browsers and devices. It is a collection of standards, protocols, and APIs that enables peer-to-peer audio, video, and data sharing between peers.
To build a basic video chat app, we have to work on a Python WebRTC signaling server and a Python WebRTC Client application. The signaling server is used only before establishing a connection and the client app is used by the peers for the actual video communication.
Let’s first try building a simple signaling server for the peers to communicate with, and then work on implementing the actual connection between peers.
Python WebRTC Signaling Server
Signaling is the process of exchanging information between 2 peers. It is essential for peers to get the requisite data about each other before they can establish a direct connection.
Signaling servers are often used to transfer the following data between peers:
- Session control messages : when to initialize, modify and close sessions in form of SDP.
- Network configurations : to understand where the other node is located on the internet, in the form of ICE Candidates.
- Media data and capabilities : in the form of SDP.
“ … You can use anything you like, from WebSocket to XMLHttpRequest to carrier pigeons to exchange the signaling information between the two peers.”
Since it’s difficult to find carrier pigeons these days, we’ll be using the next most obvious choice, a snake. We will build a simple signaling server with the help of Flask-SocketIO in Python.
Let’s dive in.
Building the Python WebRTC Signaling Server
We’ll start with a file named server.py and initialize a basic Flask-SocketIO server in it.
- First, create a
Flaskapp instance and set asecret_keyfor it. Then, create a SocketIO instance with this app and start the server on port 9000 from__main__withsocketio.runfunction.
from flask import Flask, request
from flask_socketio import SocketIO, emit, join_room

app = Flask(__name__)
app.secret_key = 'random secret key!'
socketio = SocketIO(app, cors_allowed_origins="*")

.
.
.

if __name__ == '__main__':
    socketio.run(app, host="0.0.0.0", port=9000)
💡 Note: Instead of looking for pre-built solutions, it is best to create your own signaling mechanism if you already have a user management system in place - one that you want to connect with WebRTC.
We’ll be performing room-based signaling between peers, which essentially means that two peers joining the same room will be connected.
- Define an event handler for the
joinevent and get theusernameandroomfrom the client’s argument. Add the client to that room withjoin_room. Now, send areadyevent to all other connected peers (only one in our case) usingemitwith the help ofskip_sid=request.sid.
@socketio.on('join')
def join(message):
    username = message['username']
    room = message['room']
    join_room(room)
    print('RoomEvent: {} has joined the room {}\n'.format(username, room))
    emit('ready', {username: username}, to=room, skip_sid=request.sid)
- Define an event handler for the
dataevent. This will be used to transfer the data part of the message from the sender to the other client(by excluding the sender’s sid withskip_sid).
@socketio.on('data')
def transfer_data(message):
    username = message['username']
    room = message['room']
    data = message['data']
    print('DataEvent: {} has sent the data:\n {}\n'.format(username, data))
    emit('data', data, to=room, skip_sid=request.sid)
- Our basic signaling server is almost ready now. All that’s left is to handle various errors and deploy it to production. Of course, don’t forget to stop the server on encountering any errors.
@socketio.on_error_default
def default_error_handler(e):
    print("Error: {}".format(e))
    socketio.stop()
- Finally, if you want to run the server in production-ready mode, just install a concurrent networking library like eventlet or gevent for the Flask-SocketIO to run in.
pip install gevent
- Once that’s done, you can run the server by calling
python server.py
You can find the source code for the signaling server here.
Python WebRTC Client Application
We have built a signaling server for peers to exchange information. Now, let’s build a client app with React.js for two peers to connect with - on a video chat.
To identify the best possible type of connection and connect peers effectively, WebRTC uses Interactive Connectivity Establishment (ICE).
Interactive Connectivity Establishment - ICE
ICE is a protocol for generating media traversal candidates by conducting connectivity checks. It uses a combination of methods including Session Traversal Utility for NAT(STUN) and Traversal Using Relay NAT(TURN) to establish said connectivity.
ICE candidates are repeatedly generated and sent to identify the most suitable path.
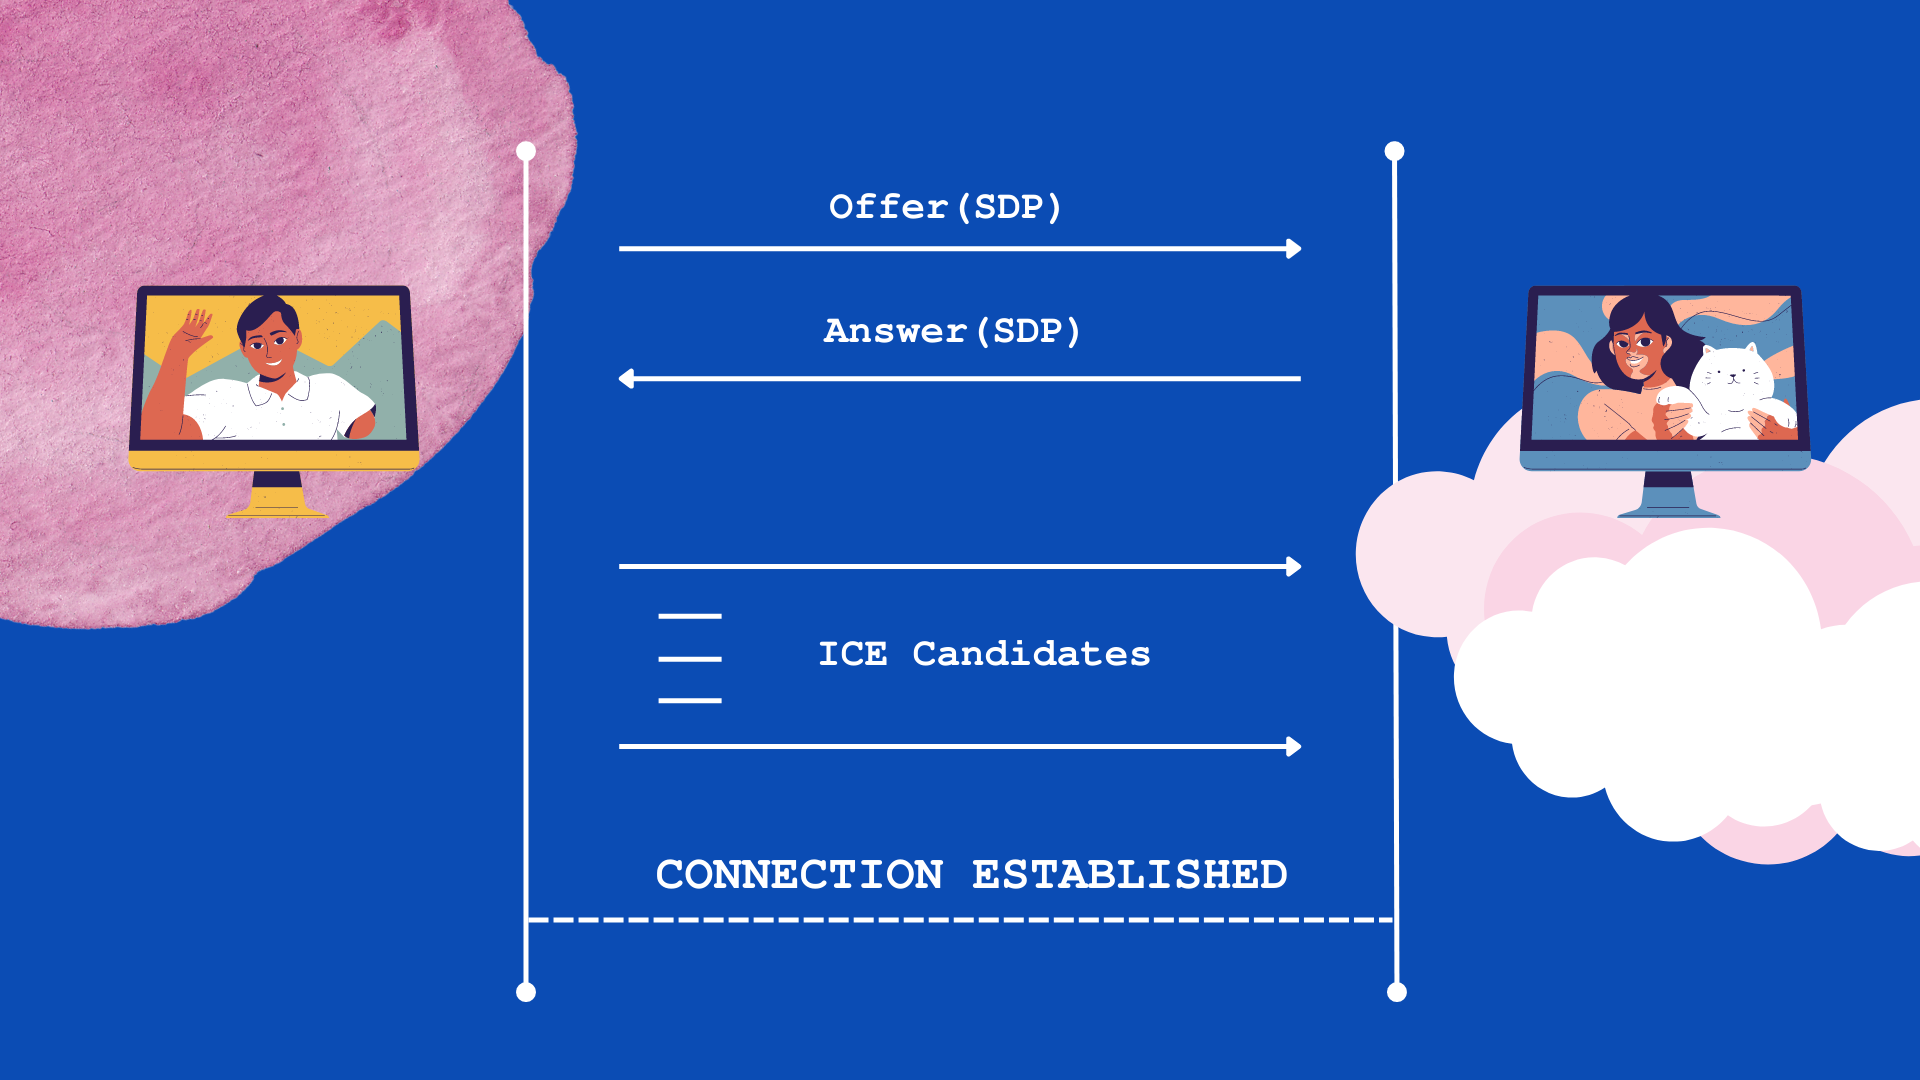
Before getting our hands dirty, let’s take a look at the basic flow of events that must occur for the connection to happen:
- Peer A creates a
RTCPeerConnectionobject for the connection. - Peer A creates an offer SDP message with
createOffer()and callssetLocalDescription()to set it as the local SDP description. - Peer A now sends this offer in a stringified form to Peer B via a signaling server.
- Peer B creates a
RTCPeerConnectionobject and callssetRemoteDescription()with Peer A’s offer to know about its setup. - Peer B creates an answer SDP message with
createAnswer()and callssetLocalDescription()to set it as the local SDP description. - Peer B now sends this answer in a stringified form to Peer A using a signaling server.
- Peer A calls
setRemoteDescription()with the answer received in order to know about Peer B’s setup. - Either of these peers can send ICE Candidates to the other on generation, with the help of the
onicecandidatecallback, and set the candidates received from the other usingaddIceCandidate(). - Connection is established by the end of this flow.
Building the React App
Now let’s start working on the client by creating a new React app.
npx create-react-app my-app
cd my-app
npm start
Add these dependencies that we will be using later in our app:
npm i react-router-dom socket.io-client
- Create a directory inside
srcnamedscreens. CreateHomeScreen.jsandCallScreen.jsfor the different routes(pages) we will be interacting with.
Now, let’s create a basic Component in both files.
import { useState } from "react";
import { Link } from "react-router-dom";
import "./HomeScreen.css";

function HomeScreen() {
  const [room, setRoom] = useState("");
  const [username, setUsername] = useState("");

  return (
    <form method="post" action="">
      <label for="username">Username</label>

      <input
        value={username}
        title="username"
        onInput={(e) => setUsername(e.target.value)}
      />

      <label for="room">Room</label>

      <input
        value={room}
        title="room"
        onInput={(e) => setRoom(e.target.value)}
      />
      <Link to={`/call/${username}/${room}`}>
        <input type="submit" name="submit" value="Join Room" />
      </Link>
    </form>
  );
}

export default HomeScreen;
import { useParams } from "react-router-dom";
import { useRef, useEffect } from "react";
import socketio from "socket.io-client";
import "./CallScreen.css";

function CallScreen() {
  const params = useParams();
  const localUsername = params.username;
  const roomName = params.room;
  const localVideoRef = useRef(null);
  const remoteVideoRef = useRef(null);

	return (
    <div>
      <label>{"Username: " + localUsername}</label>
      <label>{"Room Id: " + roomName}</label>
      <video autoPlay muted playsInline ref={localVideoRef} />
      <video autoPlay muted playsInline ref={remoteVideoRef} />
    </div>
  );
}

export default CallScreen;
- Add these components to
RouteList.js, associating with their respective routes usingreact-router-dom.
import { Routes, Route } from "react-router-dom";
import CallScreen from "./CallScreen";
import HomeScreen from "./HomeScreen";

function RouteList() {
  return (
    <Routes>
      <Route path="/" element={<HomeScreen />} />
      <Route path="/call/:username/:room" element={<CallScreen />} />
    </Routes>
  );
}

export default RouteList;
- Then, modify
App.jsto use thisRouteList.
import { BrowserRouter as Router } from "react-router-dom";
import RouteList from "./screens/RouteList";

function App() {
  return (
    <Router>
      <RouteList />
    </Router>
  );
}

export default App;
Now that the basic setup is done, you can switch from HomeScreen to CallScreen after entering a username and a room name. All the work related to WebRTC will be handled inside the CallScreen component.
- First, create a
socketioobject with the signaling server( “http://localhost:9000” in our case) and setautoConnectto false. We will be connecting to the server only when our local video stream is ready to be sent. - Declare a variable pc for the
RTCPeerConnectionobject to be stored. Additionally, create a small function for sending data to the server in order to reduce boilerplate code in the future.
const socket = socketio("https://signaling-server-flask.herokuapp.com/", {
    autoConnect: false,
  });

  let pc; // For RTCPeerConnection Object

  const sendData = (data) => {
    socket.emit("data", {
      username: localUsername,
      room: roomName,
      data: data,
    });
  };
- Now, write a function to start the connection. It gets the local video stream, following the configuration from devices like webcams with the help of
getUserMedia. - Upon getting the stream, set it to the
srcObjectof the local video element’s reference. Then, connect to the socket and send thejoinevent to join a room.
const startConnection = () => {
    navigator.mediaDevices
      .getUserMedia({
        audio: false,
        video: {
          height: 350,
          width: 350,
        },
      })
      .then((stream) => {
        console.log("Local Stream found");
        localVideoRef.current.srcObject = stream;
        socket.connect();
        socket.emit("join", { username: localUsername, room: roomName });
      })
      .catch((error) => {
        console.error("Stream not found: ", error);
      });
  };
Before creating a peer connection we must have 2 handlers - one to be called when new ICE Candidates are generated, and another when new remote tracks are received.
The former will send the candidates through the signaling server. The latter will set the srcObject of the remote video element’s reference to the first stream in the track.
- Next, write a function to create the peer connection. A new
RTCPeerConnectionobject is created and assigned to thepcvariable that is already declared. Then, theonicecandidateandontrackof the object are set. Finally, we take thelocalstreamfrom the video element’s reference and add all its tracks to thepcwithaddTrack.
const onIceCandidate = (event) => {
    if (event.candidate) {
      console.log("Sending ICE candidate");
      sendData({
        type: "candidate",
        candidate: event.candidate,
      });
    }
  };

  const onTrack = (event) => {
    console.log("Adding remote track");
    remoteVideoRef.current.srcObject = event.streams[0];
  };

  const createPeerConnection = () => {
    try {
      pc = new RTCPeerConnection({});
      pc.onicecandidate = onIceCandidate;
      pc.ontrack = onTrack;
      const localStream = localVideoRef.current.srcObject;
      for (const track of localStream.getTracks()) {
        pc.addTrack(track, localStream);
      }
      console.log("PeerConnection created");
    } catch (error) {
      console.error("PeerConnection failed: ", error);
    }
  };
- Moving on, we write a function to set the local description from the session description argument and send it through the signaling server. This function will be used upon sending an offer or an answer.
- Now, write 2 functions, one for offer and another for answer. One is used to create an offer with
createOfferwhile the other is used to create an answer withcreateAnswer. Both of them pass thesessionDescriptionto thesetAndSendLocalDescriptionfor sending it to the other peer.
	const setAndSendLocalDescription = (sessionDescription) => {
    pc.setLocalDescription(sessionDescription);
    console.log("Local description set");
    sendData(sessionDescription);
  };

  const sendOffer = () => {
    console.log("Sending offer");
    pc.createOffer().then(setAndSendLocalDescription, (error) => {
      console.error("Send offer failed: ", error);
    });
  };

  const sendAnswer = () => {
    console.log("Sending answer");
    pc.createAnswer().then(setAndSendLocalDescription, (error) => {
      console.error("Send answer failed: ", error);
    });
  };
Now, let’s implement a signalingDataHandler to handle all data events based on their type.
- On an offer event, it will create a peer connection, set the remote description, and send an answer.
- On an answer event, the remote description is set.
- On a candidate event, the
ICE Candidateis added.
	const signalingDataHandler = (data) => {
    if (data.type === "offer") {
      createPeerConnection();
      pc.setRemoteDescription(new RTCSessionDescription(data));
      sendAnswer();
    } else if (data.type === "answer") {
      pc.setRemoteDescription(new RTCSessionDescription(data));
    } else if (data.type === "candidate") {
      pc.addIceCandidate(new RTCIceCandidate(data.candidate));
    } else {
      console.log("Unknown Data");
    }
  };
- A socket event handler for the event
readyis used to create a peer connection and send an offer to the peer. Thereadyevent is fired when another peer has joined the same room as the existing one. It is typically the starting point for connecting both peers. - Another socket event handler for the event
datais used to receive the data from the server and pass it to thesignalingDataHandlerto take appropriate action. This event is fired every time a peer sends anOffer/Answer,ICE Candidate, or some configuration data. - Finally, call the
startConnectionfrom theuseEffecthook to start it at the beginning of the component’s lifecycle. We also provide acleanupfunction that will close the peer connection at the end of the component’s lifecycle.
	socket.on("ready", () => {
    console.log("Ready to Connect!");
    createPeerConnection();
    sendOffer();
  });

  socket.on("data", (data) => {
    console.log("Data received: ", data);
    signalingDataHandler(data);
  });

  useEffect(() => {
    startConnection();
    return function cleanup() {
      pc?.close();
    };
  }, []);
💡Note: By using adapter.js, browser compatibility can be improved when working with WebRTC.
“The WebRTC adapter is a JavaScript shim which lets you write code to the WebRTC specification and have it "just work" in all browsers with WebRTC support…”
Now that we have done everything, all that’s left is to run the client and see if it works. Start the server first and then start the client with:
npm start
Once the client has started, try entering a username and a common room name in 2 different browser tabs. Check the server log to see how data is being exchanged. When peer negotiation is done, the peers will connect and you should be able to see both the local and remote video on your app.
And there you have it. We’ve created a video chat app leveraging the power of WebRTC with Python and React.
You can find the source code for this client app here.
Feels like the app is complete, right? Not exactly. The app probably cannot work outside your localhost with just your signaling server in place. There is a reason for that.
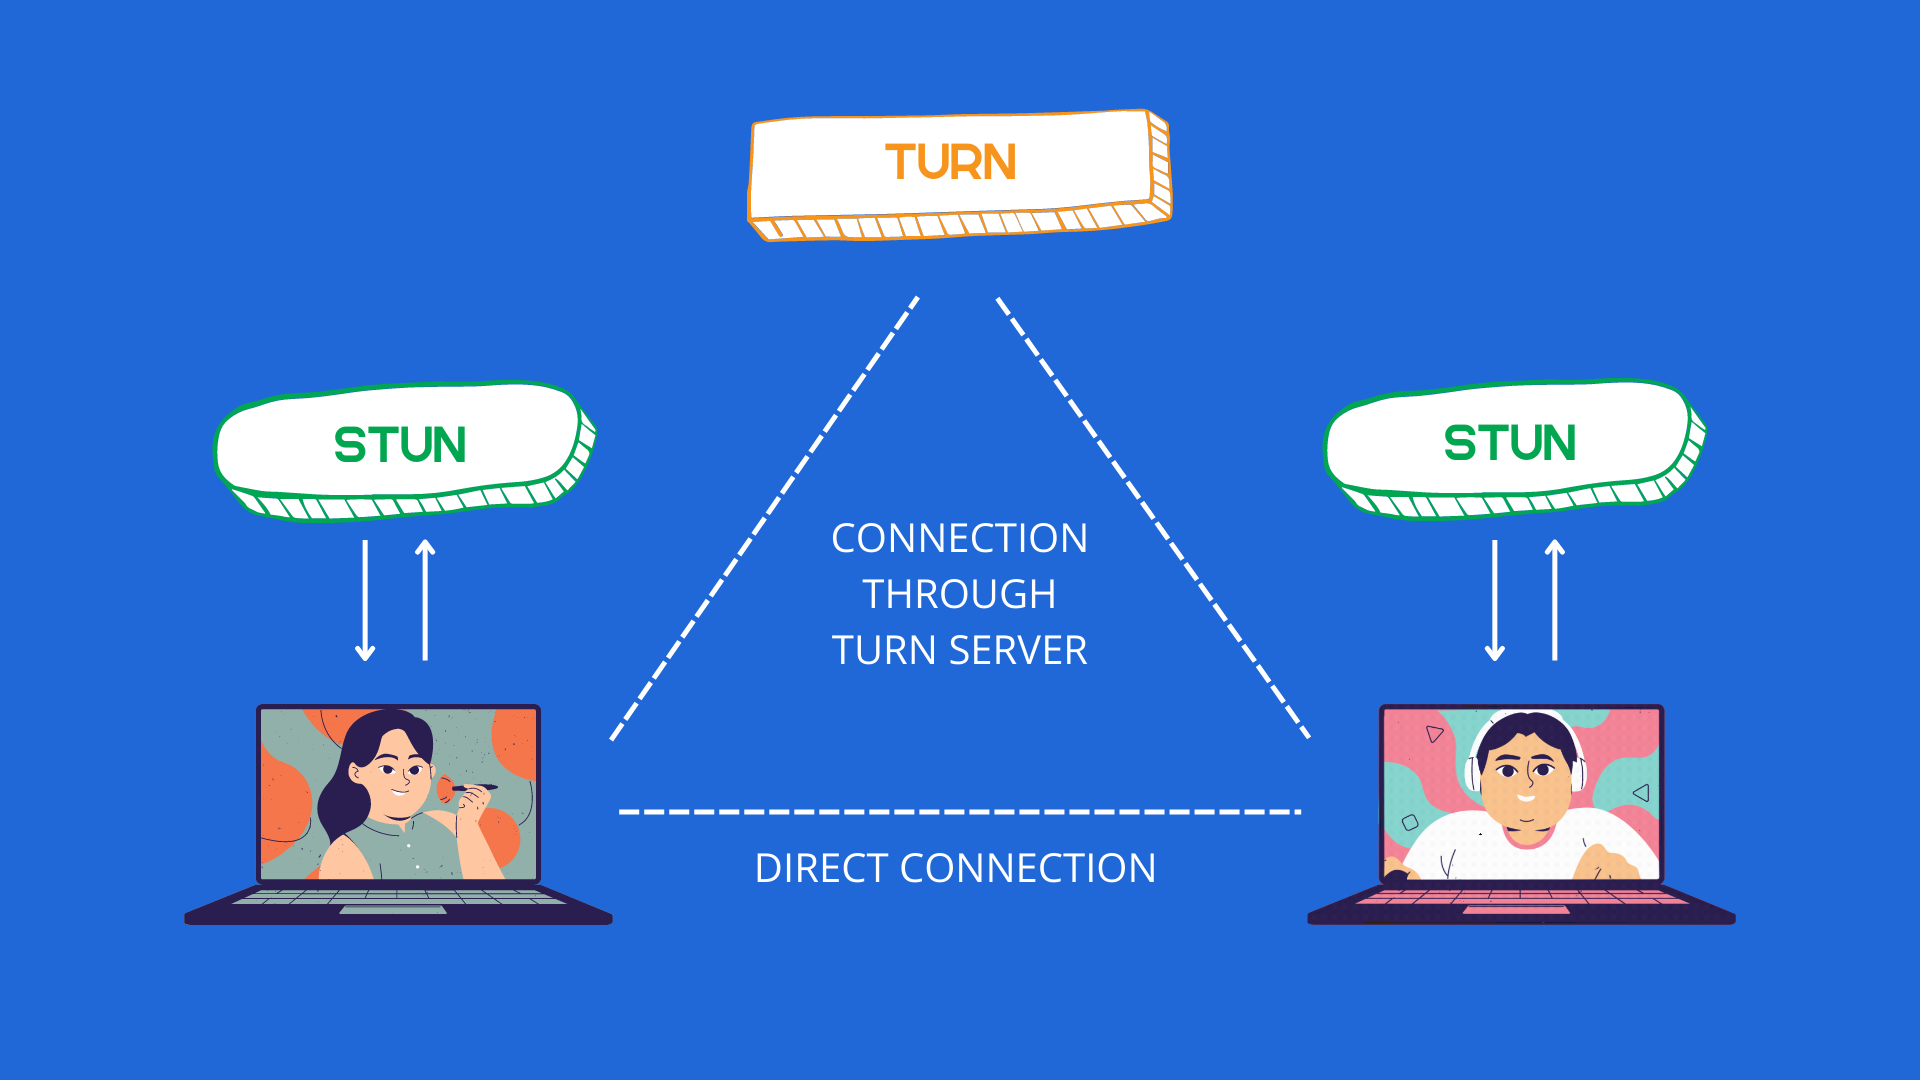
We already know that WebRTC uses Interactive Connectivity Establishment (ICE) for establishing a connection. There are some cases in which a peer is behind a NAT or firewall - cases where a direct connection cannot be established without the help of STUN/TURN servers. Let’s discuss how ICE handles these cases and finally get to make our app work outside the local network.
But before that, let’s explore the concepts behind STUN/TURN servers.
STUN/TURN server(s)
Usually, when peers try to connect with each other, there are 3 possible things that may happen:
- Direct connection over the local network: This happens when both peers are on the local network. They can start communicating with just their local IP addresses.
- Direct connection over the internet: When the peers are not on the same local network, they can communicate only through their public IP Addresses. In this scenario, both peers will need some help in getting to know their own public IP addresses.
- Routing media through a relay server: In cases where both these methods of connection are not possible, the only way for peers to communicate is to route the media through a relay server.
In Interactive Connectivity Establishment (ICE), there are mainly 3 types of candidates associated with different modes of connection:
- Host candidate
- Reflexive candidate
- Relayed candidate
Let’s find out how these candidates are selected by understanding some technical terms.
Network Address Translation(NAT)
NAT is the process of mapping one or more local(private) IP addresses to one global(public) IP address. It is designed for IP address conservation. Usually, when a LAN is behind a NAT, all the hosts share the same public IP address because of the NAT and can access the internet through that.
Some notable types of NAT are:
Unlike the other NATs, the Symmetric NAT doesn’t support a mechanism called Hole-Punching. Additionally, only the external host that receives a packet from the internal host can send a packet back in a Symmetric NAT. Due to this, all other NATs are collectively called Asymmetric NATs.
💡 Note: IPv6 removes almost any need for NAT, but there are still plenty of devices operating on IPv4/IPv6 that require NAT for address translation and security.
Coming back to the ICE candidates - when the peers are on the same local network and trying to connect, the Host candidate is used to establish the connection by using their private IP addresses to identify each other. But for peers located on different local networks, this is not possible as private IP addresses exist only within the NAT they are behind.
Session Traversal Utility for NAT(STUN)
When peers aren’t on the same local network, they can communicate only with the help of their public IP addresses on the internet. But since our peers are behind routers(NAT), they only know their private IP addresses. A STUN server solves this problem.
STUN is a network protocol used to retrieve the public IP address of a device behind NAT so that the device can communicate after knowing its address on the internet. ICE uses the STUN server to generate a Reflexive candidate containing the public IP address of a peer in order to connect directly with another peer in the shortest path possible.
💡 Note: The STUN server is used only when establishing a connection, allowing media to flow directly between the peers.
STUN servers are useful only when dealing with Asymmetric NATs. This is because, due to its nature, Symmetric NATs tend to accept packets only from the STUN server but not from the other peer. When a peer is behind a Symmetric NAT or a strict firewall that doesn’t allow direct connections, it is impossible for peers to connect using just their public IP addresses.
Traversal Using Relay NAT(TURN)
When a direct connection is not possible due to reasons like Symmetric NAT restriction or a firewall blocking a direct connection, the only way for peers to communicate is by routing the media through a relay server. A TURN server is used for cases like this.
💡 Note: Direct WebRTC peer connections are usually considered suspicious by the firewall and are blocked in some cases.
TURN is a network protocol that enables a server to relay data packets(media in this case) between devices. A TURN server is used by the ICE when no direct connections are possible. It generates a Relayed candidate so that the peers may route media to the TURN server which will relay it to the other peer continuously. This approach can also be used to increase media quality in transmission for peers with poor network connections.
💡 Note: The TURN server is used as long as the peers are connected, to relay media between them. It is generally a more expensive option.
TURN servers are usually referred to as Relay Servers. According to the RFC8656 specification, TURN is considered an extension to the STUN. So, a typical TURN server would include a STUN server implementation by default.
Now that we have established the basics, let’s look at what we should do to make our app work on all networks. The reason it didn’t work outside the localhost was the lack of STUN/TURN servers. To fix that, you can deploy some popular open-source STUN/TURN servers and use them.
To get started, have a look at these STUN/TURN server implementations:
- coturn - Free open source implementation of TURN and STUN Server
- eturnal STUN/TURN server
- STUNTMAN - Open source STUN server software
💡 Note: Almost 80% of all connections can be resolved with local IP addresses, or with a STUN server and public IP addresses. But it is recommended to use a TURN server to cover all clients in production.
Testing STUN/TURN Servers
Once you have deployed a STUN/TURN server, you can test it easily with the help of Trickle ICE. Go to the site, enter the server details and click on the Add Server button.
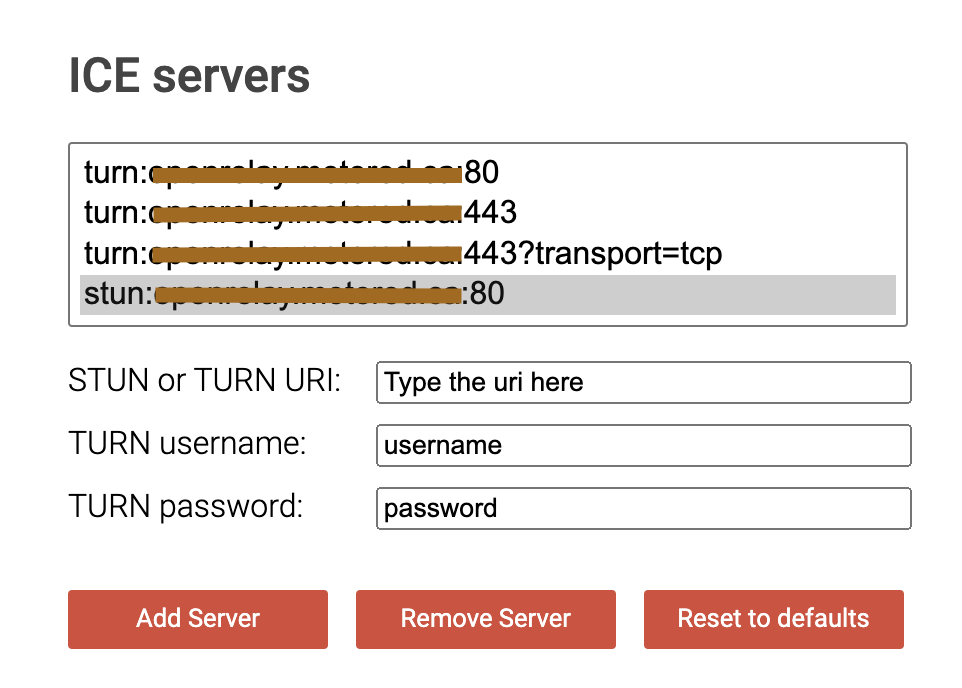
Now, scroll down and click on the Gather Candidates button.

If you see a done message at the end, then your server is working fine and can be used in the app. Otherwise, try to debug the issue with the help of log.
Once your STUN/TURN server is tested, go to the client code and add the STUN/TURN details in the iceServers config upon creating an RTCPeerConnection object. That’s all you need to do.
If you want to skip this step and use a free hosted server(not recommended for production), there are plenty of free STUN and TURN servers available. I will show a sample iceServers config using the OpenRelay servers.
pc = new RTCPeerConnection({
  iceServers: [{
      urls: "stun:openrelay.metered.ca:80",
    },
    {
      urls: "turn:openrelay.metered.ca:80",
      username: "openrelayproject",
      credential: "openrelayproject",
    },
    {
      urls: "turn:openrelay.metered.ca:443",
      username: "openrelayproject",
      credential: "openrelayproject",
    },
    {
      urls: "turn:openrelay.metered.ca:443?transport=tcp",
      username: "openrelayproject",
      credential: "openrelayproject",
    },
  ],
});
Listed below are a few resources you might be interested in if you want free STUN/TURN servers:
- Open Relay: Free WebRTC TURN Server
- Numb STUN/TURN server
- Always Online: STUN servers
- STUN+TURN servers list (Github Gist)
- webRTC stun / turn server list (Github Gist)

And that’s it! You are done with this exercise. Check out the fully functional app deployed here.
Finally, our app can now connect people across different networks. You have built your first video chat application using WebRTC. Now, try deploying it and using it with your friends. You should be able to replicate the results shown in this article.
Quick Links:
- Source code for Signaling Server.
- Source code for Client App.
- Deployed Demo App.
Engineering
Share
Related articles
See all articles