Home
/ Blog /
Building a Twitch clone with React and TailwindBuilding a Twitch clone with React and Tailwind
October 20, 202217 min read


Share


Twitch, owned by Amazon, is a streaming platform via which people can go live playing games, singing songs, or doing anything that can be filmed.
In this step-by-step guide, we will be exploring building the popular streaming platform known as Twitch and also grasp the basics of a video conferencing app in general with the aid of 100ms.
Our Twitch clone will consist of
- A video display - this is where the viewers see the stream
- Realtime chat
- Screen share option - to share screens for streaming the game
- Multiple hosts
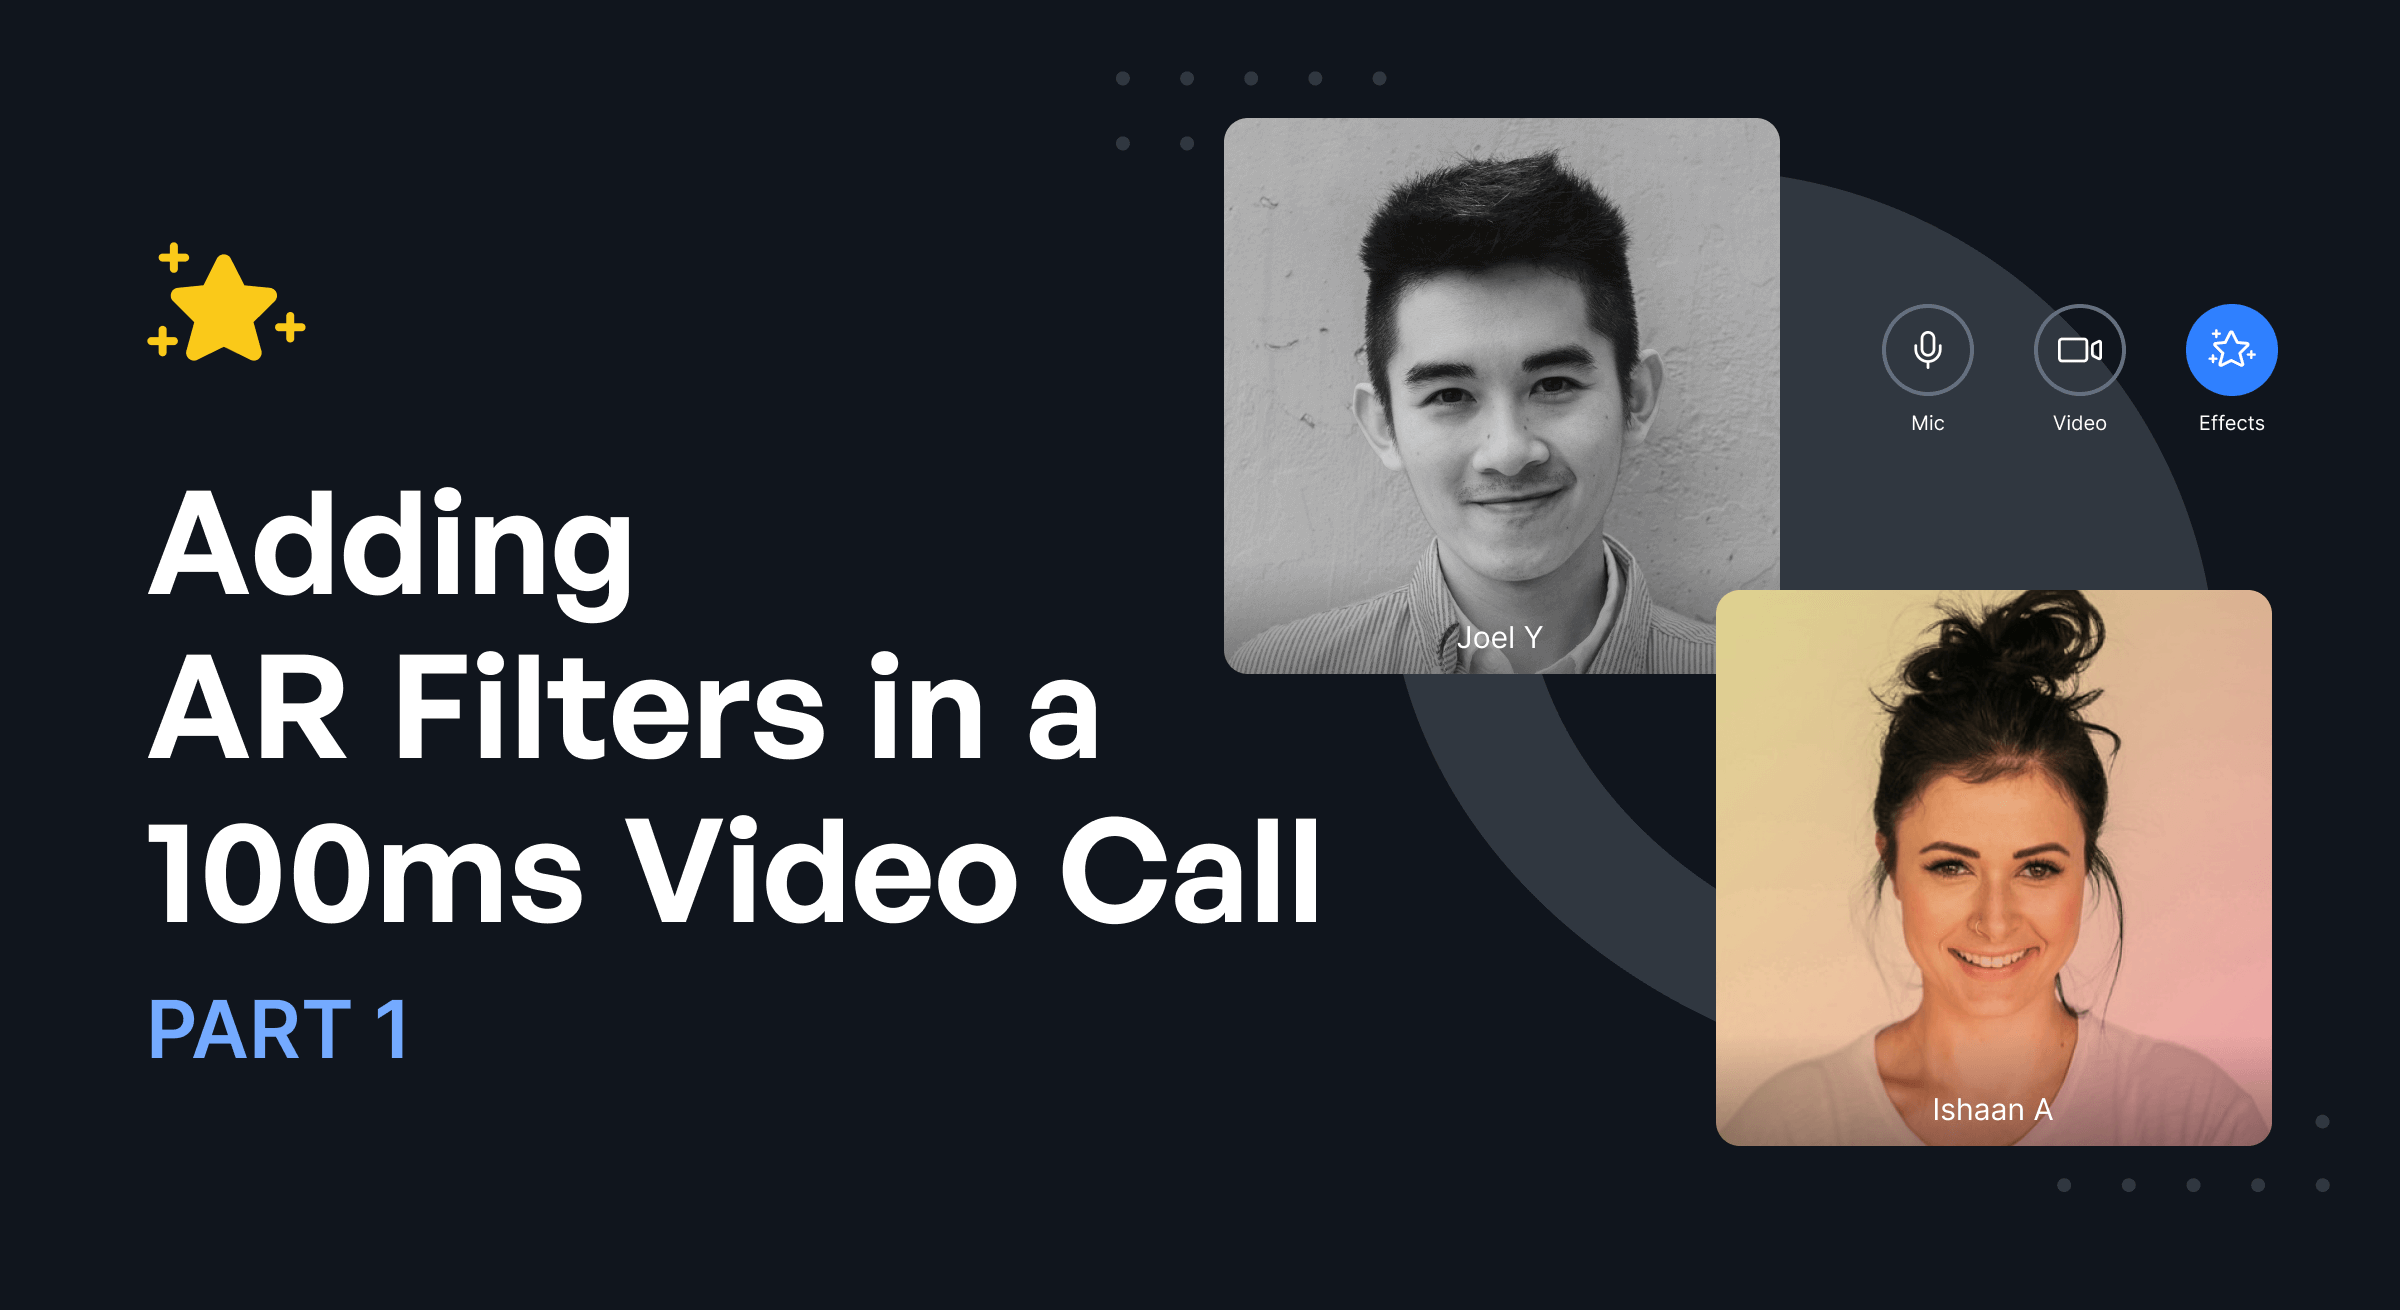
Stream in style! Add AR filters to your Video call
At the end of the tutorial, this is how your Twitch clone should look like:

To follow this tutorial you should have basic knowledge of JavaScript, React, Tailwind CSS, or a CSS library.
Also, have the following installed on your PC :
and an account with 100ms.
100ms is a cloud platform that allows developers to add video and audio features to all types of applications. It provides a dashboard that makes it quite easy to manipulate descriptive features of a video/audio platform from in-app interaction to the session recording. The 100ms SDK and packages are one of those very easy-to-use tools that save time without losing effectiveness.
Here are other React projects you can build on 100ms
- Building Clubhouse clone in React
- Building Slack huddle clone
- Build a Discord stage channel
Setting up the Project
I have created a starter project based on create-react-app and tailwind. Folders include utils, styles, assets, and components for utilities like the token call, styles, images, and js files respectively. You will also find some imports and hooks already done to make the starter project easy to use. Just follow the steps and you should get a working app.
Clone the repository and run npm install to install all dependencies and npm start to start the server in your local host.
When this is done, we get this:
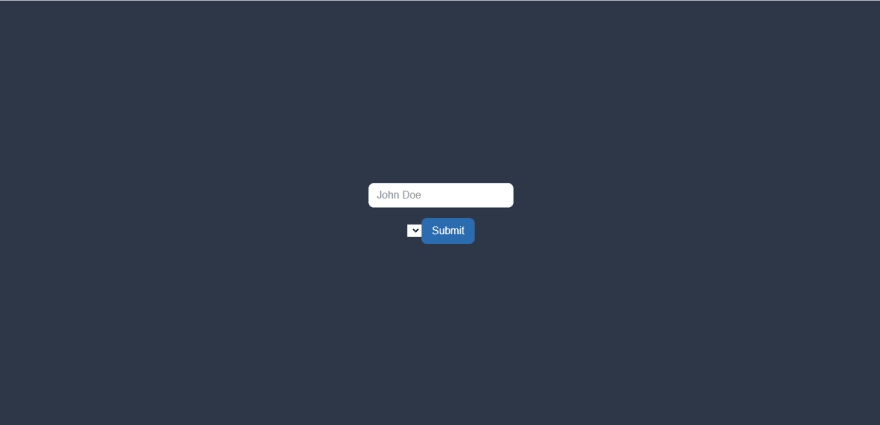
This will not navigate forward because some important credentials are needed to operate a room.
Now, let's go into getting our 100ms SDK setup and get the necessary credentials.
Retrieving Credentials
To activate and link the 100ms SDK to our app, a token_endpoint and room_id are needed.
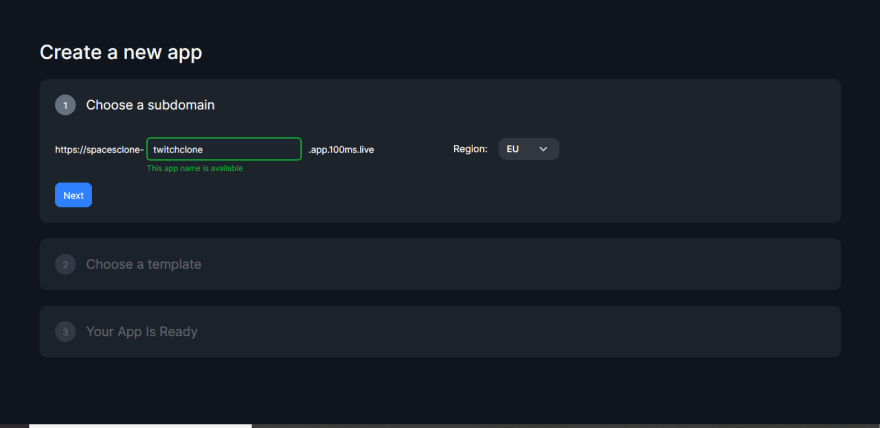
Register on the 100ms app, after registration, you would redirect to your dashboard to create an app.
Add a unique subdomain, (in this case the name is twitchclone) and from the template, options choose the “Virtual Event” option to create a template as seen below:
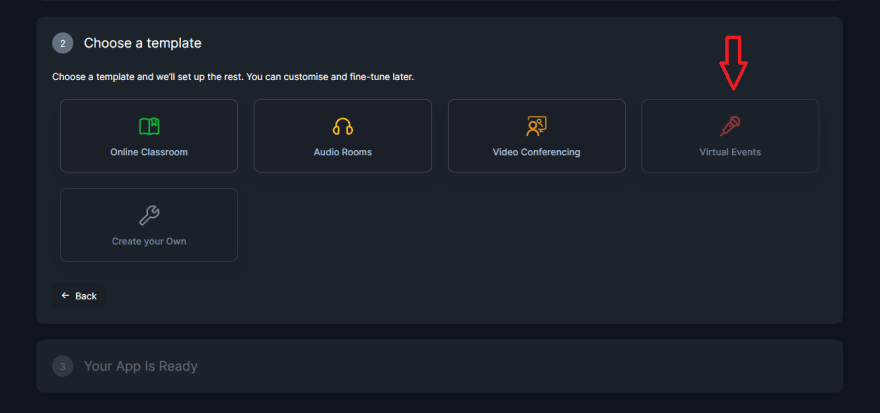
Note: It is not compulsory to use the virtual event template, you can create a custom app as long as the roles are well-defined.
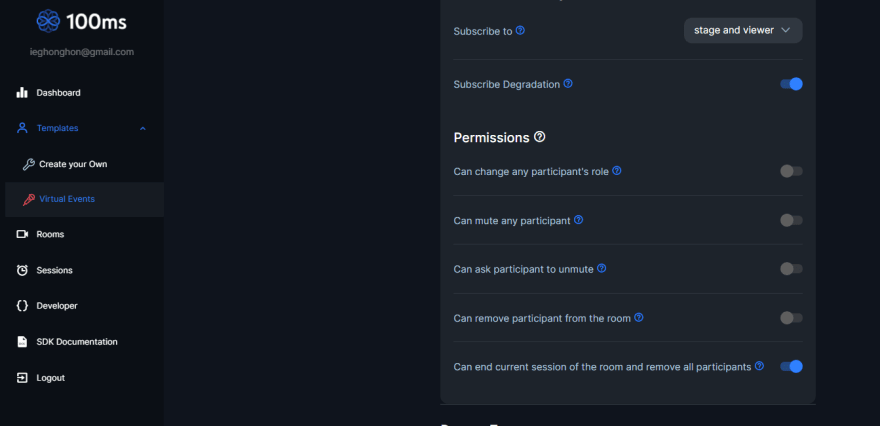
Create Roles
A role defines who a peer sees or hears, the quality at which they publish their video, and whether they have permission to publish video/screen share, mute someone, or change someone's role.
Our twitch clone would have the following roles:
Viewer— can only listen to the stage. To create this role, turn off all publish strategies.Stage— can speak, mute, and unmute himself as well as share screen. To create this role, turn on all publish strategies, then turn off all permissions except can end current session of the room and remove all participants.


Now we can create our room.
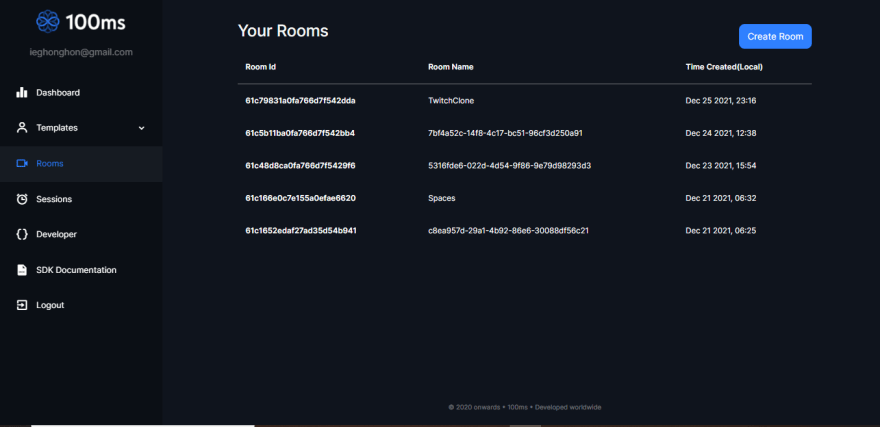
Create Room
Once a user joins a call, they are said to have joined a room. They are referred to as peers (local and peers).
To create a room, click on Rooms from the dashboard then Create Room as seen in the images below:

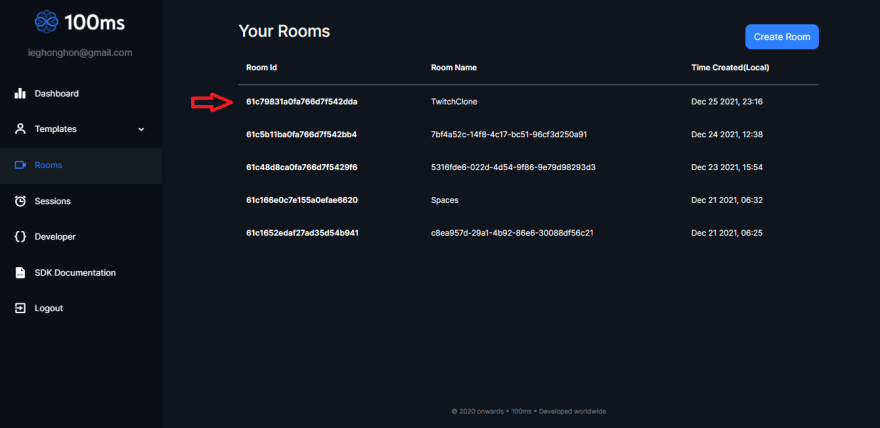
You can then get your room_id from the image above. To retrieve your token_endpoint, go to the developer section and copy the token_endpoint.

Now that we are done setting up our 100ms app, we can proceed with building our application.
Building our Clone
To use the SDK we installed previously, there are two hooks we need to be familiar with:
hmsActions- this is used to perform any action such as sending a message or joining a room.hmsStore- this contains the complete state of the room at any given time such as the participant details etc.
Having said that, let's get coding.......
We will start with the getToken.js file in the utils folder:
getToken.js
    const endPoint = "<token_endpoint>";
    export default async function getToken(role) {
    	const response = await fetch(`${endPoint}api/token`, {
    		method: 'POST',
    		body: JSON.stringify({
    			user_id: '1234', // a reference user id for the user
    			role: role, // stage, viewer
    			room_id: "<room_id>" // as present on the dashboard
    		}),
    	});
    	const { token } = await response.json();
    }
Fill in your token_endpoint and room_id following the steps outlined in the previous section.
To call the join function, add the following code to your joinRoom function in the JoinForm.js file
    getToken(role).then((token) => {
    	hmsActions.join({
    		userName: userName || 'Anonymous',
    		authToken: token,
    		settings: {
    			isAudioMuted: true,
    		},
    	});
    }).catch((error) => {
    	console.log('Token API Error', error);
    });
So as to publish our roles, in the Select.js file add the options to the select tag
    <option id="only" value='stage'>stage</option>
    <option value='viewer'>viewer</option>
Once this is done, you should get this
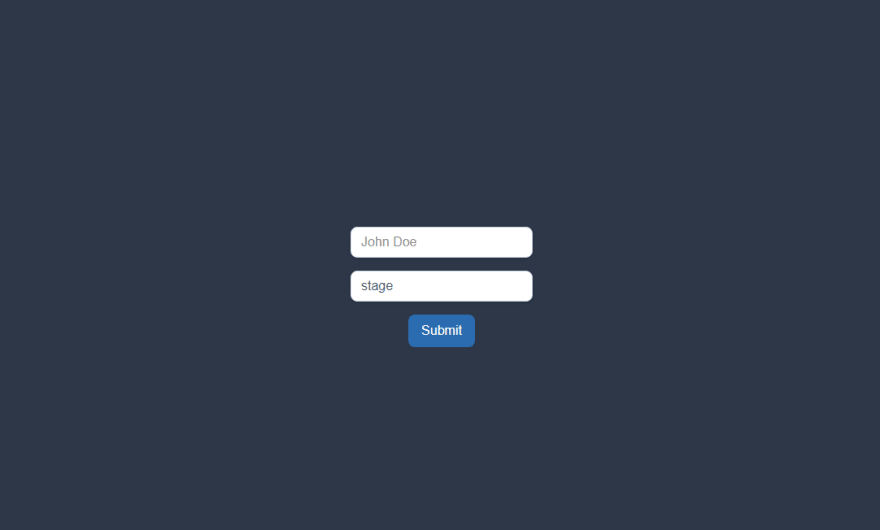
When a user joins a room, we want to hide this form and display the room which the user joined whether as a host(stage) or a viewer(listener).For this add the code below to your App.js file
{isConnected ? <Room /> : <JoinForm /> }
Pay attention here as we will be displaying different room features depending on the role a user joined as. For the stage/host, we want to display a mirror video, a chat section, and a control bar. For the viewer, we want to display the host's video, the screen shared, the chat section, and a leave button. To do this, we will use the ternary operator to select the appropriate component based on the user's role.
In this case, we are using the stage role i.e. stage role === localPeer.roleName === "stage" here let's refer to it as the isModerator keyword. Therefore isModerator === localPeer.roleName === "stage". And now we'll conditional render the right component based on this flag.
In the [Room.js](https://github.com/Anita9771/twitch/blob/main/src/components/Room/Room.js), add these:
    //for video display section
    {
      isModerator
        ? localPeer && <VideoTile peer={localPeer} isLocal={true} />
        : peers &&
          peers
            .filter(peer => !peer.isLocal)
            .map(peer => {
              return (
                <>
                  {' '}
                  <VideoTile isLocal={false} peer={peer} />{' '}
                </>
              );
            });
    }

    //For screen share display section
    {
      isModerator
        ? null
        : peers &&
          peers
            .filter(peer => !peer.isLocal)
            .map(peer => {
              return (
                <>
                  {' '}
                  <Screen isLocal={false} peer={peer} />{' '}
                </>
              );
            });
    }
In the above, we are looping through each member of the room i.e the localPeer and other peers.
Now that we have our room set up, let's work on the control bar, remember we have to render different features based on the role - ControlBar.js.
Let's add the toggle functions
    const isLocalAudioEnabled = useHMSStore(selectIsLocalAudioEnabled);
    const isLocalVideoEnabled = useHMSStore(selectIsLocalVideoEnabled);
    const isLocalScreenShared = useHMSStore(selectIsLocalScreenShared);

    const toggleAudio = async () => {
        await hmsActions.setLocalAudioEnabled(!isLocalAudioEnabled);
    };
    const toggleVideo = async () => {
        await hmsActions.setLocalVideoEnabled(!isLocalVideoEnabled);
    };
    const toggleScreen = async () => {
        await hmsActions.setScreenShareEnabled(!isLocalScreenShared);
    }
Then, we'll proceed to render buttons to see the current state and toggle it.
For audio controls
    {
      isLocalAudioEnabled ? (
        <img src={Unmute} alt="mute" className="image h-5 w-5 rounded-lg" />
      ) : (
        <img src={Mute} alt="unmute" className="image h-5 w-5 bg-gray-900 rounded-lg" />
      );
    }
For video display controls
{isLocalVideoEnabled ? "Hide" : "Unhide"}
For screen share controls
{isLocalScreenShared ? "Unshare" : "Share"}
To leave a room (viewer) and end session(host) control
    <button
      className="text-xs uppercase tracking-wider bg-white py-1 px-2 rounded-lg shadow-lg text-iwhite ml-2 bg-red-600"
      onClick={() => {
          hmsActions.endRoom(false, "reason") && hmsActions.leave();
      }}
    >
        End
    </button>;
In the above, we added video and screen share toggle buttons. Let's proceed to add the video and screen tile to effectively display the video and screen when we click on these buttons. In the Video Folder, you'll find two files, VideoTile.js and Screen.js. Both files are merely replicas of themselves except they share a different part of the stage while VideoTile.js shares the video, Screen.js shares the screen.
VideoTile.js
    React.useEffect(() => {
      (async () => {
        console.log(videoRef.current);
        console.log(videoTrack);
        if (videoRef.current && videoTrack) {
          if (videoTrack.enabled) {
            await hmsActions.attachVideo(videoTrack.id, videoRef.current);
          } else {
            await hmsActions.detachVideo(videoTrack.id, videoRef.current);
          }
        }
      })();
    }, [hmsActions, videoTrack]);
To display different screen sizes depending on the roles add
    {
      isModerator ? (
        <video
          ref={videoRef}
          autoPlay={true}
          playsInline
          muted={false}
          style={{ width: 'calc(85vw - 100px)' }}
          className={`object-cover h-70 -ml-3 mt-10-h h-auto w-24 shadow-lg" ${isLocal ? 'mirror' : ''}`}
        ></video>
      ) : (
        <video
          ref={videoRef}
          autoPlay={true}
          playsInline
          muted={false}
          className={`object-cover h-40 w-40 rounded-lg mt-12 shadow-lg ${isLocal ? 'mirror' : ''}`}
        ></video>
      );
    }
Screen.js
    React.useEffect(() => {
      (async () => {
        console.log(screenRef.current);
        console.log(screenTrack);
        if (screenRef.current && screenTrack) {
          if (screenTrack.enabled) {
            await hmsActions.attachVideo(screenTrack.id, screenRef.current);
          } else {
            await hmsActions.detachVideo(screenTrack.id, screenRef.current);
          }
        }
      })();
    }, [hmsActions, screenTrack]);
To display screen shared for viewer
    <video
      ref={screenRef}
      autoPlay={true}
      playsInline
      muted={false}
      className={`h-screen ${ isLocal ? "" : "" }`} >
    </video>
At this point, we are almost done building our app final part is adding the chat section. The 100ms SDK fully supports in-room chat and P2P chat. But, we'll be working with in-room chat where both host and viewers can all chat. It is important to note that the chats do not persist, meaning when a new peer joins they can't see the earlier chat. The starter project comes with a chat section that has been built for you. Import the files to the Room.js file and join the room.
Finally, let's add the header and footer tab to the room to give a static twitch-like display.
Footer.js
    <p className="text-red-700 flex mx-2">
        <img src={User} alt="avatar" className="w-5 h-5 mr-2" />
        {peers.length}
    </p>
     <button
    className='text-xs uppercase tracking-wider bg-white py-1 px-2 rounded-lg shadow-lg text-iwhite ml-2 bg-red-600'
       onClick={() => {
              hmsActions.leave();
            }}
       >
         Leave
       </button>
This is also where we add the count of persons in a room peers.length.
Room.js
Import the Header, ChatContainer, ControlBar, and Footer respectively. The final Room.js code base should look like this:
    import React from "react";
    import Screen from "../Video/Screen";
    import VideoTile from "../Video/VideoTile";
    import ControlBar from "../Control/ControlBar";
    import ChatContainer from '../Chat/ChatContainer';
    import Footer from "../Control/Footer";
    import Header from "../Control/Header";
    import {
      useHMSStore,
      selectLocalPeer,
      selectPeers
    } from "@100mslive/hms-video-react";

    const Room = () => {
      const localPeer = useHMSStore(selectLocalPeer);
      const isModerator = localPeer.roleName === "stage";
      const peers = useHMSStore(selectPeers);


       return (
        <div className="flex flex-row">
          <Header />
              <div className="flex flex-wrap">
                  {
                  isModerator ?
                      (localPeer && < VideoTile peer={localPeer} isLocal={true}  /> )
                    :
                    (peers &&
                      peers
                        .filter((peer) => !peer.isLocal)
                        .map((peer) => {
                          return (
                            <>
                              <VideoTile isLocal={false} peer={peer} />
                            </>
                          );
                        }))
                  }

          </div>

          <div className="bg-gray-900 m-0 h-screen z10 self-center flex-wrap absolute top-0 left-0" style={{ width: 'calc(90vw - 100px)' }}>
          {
                  isModerator ?
                      null
                    :
                    (peers &&
                      peers
                        .filter((peer) => !peer.isLocal)
                        .map((peer) => {
                          return (
                            <>
                              <Screen isLocal={false} peer={peer}/>
                            </>
                          );
                        }))
                  }
          </div>
          <ChatContainer />


          {
            isModerator ? <ControlBar /> : <Footer />
          }


        </div>
      );
    };

    export default Room;
Now, let's get twitching.
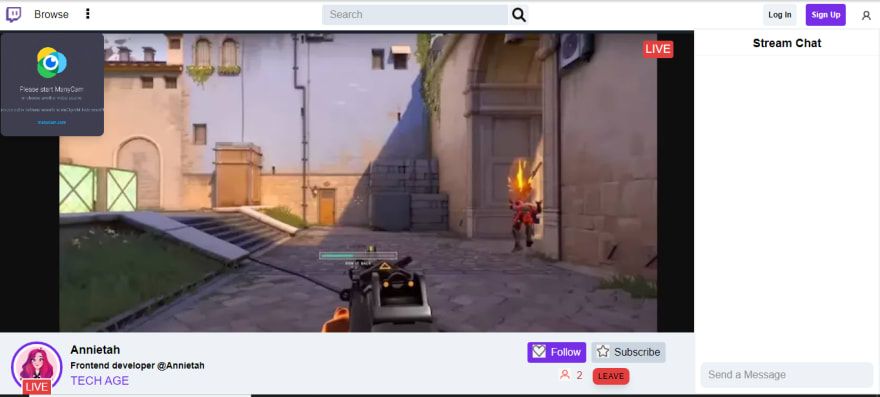
The stage/host room display should look something like this
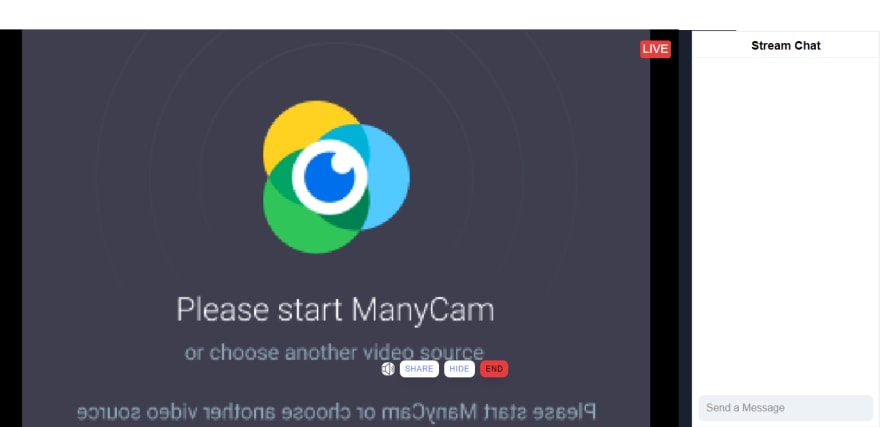
In the above, we can see that the host can see the number of persons in a room, mute/unmute self, share screen, hide/unhide video tile, and as well end the session.
The viewer/listener's page should look like this:
The viewer gets to see the video and screen displayed by the host and can also leave the room.
Note: This was made possible by conditional rendering and the fantastic 100ms SDK helping accomplish this with very few lines of code and in a short time. I bet it would take days to figure out how to build a streaming platform from scratch.
Check out the demo here.
Conclusion
100ms is that SDK tool that provides multiple solutions with just a few clicks and hooks. There are numerous more use cases of 100ms like recording, face time 1-1, and lots more.
You can get the full source code here.
Engineering
Share
Related articles
See all articles