Home
/ Blog /
Why vKYC is more than just a video callWhy vKYC is more than just a video call
April 12, 202310 min read


Share


Following global digitalization trends, KYC (Know Your Customer) has taken the form of a paperless, live video verification process. This vKYC, also known as video KYC, is already live in several countries such as India, Estonia, and Germany, and is already being mandated in some of them.
There are several variations in the process based on the regulatory requirements of the country, but the essence of video KYC is straightforward:
- The user and a KYC agent connect in a live video call. During the call, the agent verifies the user's identity through a live photograph and clear images of their officially valid documents.
- The agent captures these images, and AI-driven Face-Match/Face Liveness checks are performed to further authenticate the user's identity and prevent potential fraud or identity theft.
While there are several video SDKs available in the market to assist with a basic video call setup, this blog explores some use-case-specific features of the 100ms SDK that can facilitate a quick user journey for building vKYC into your app.
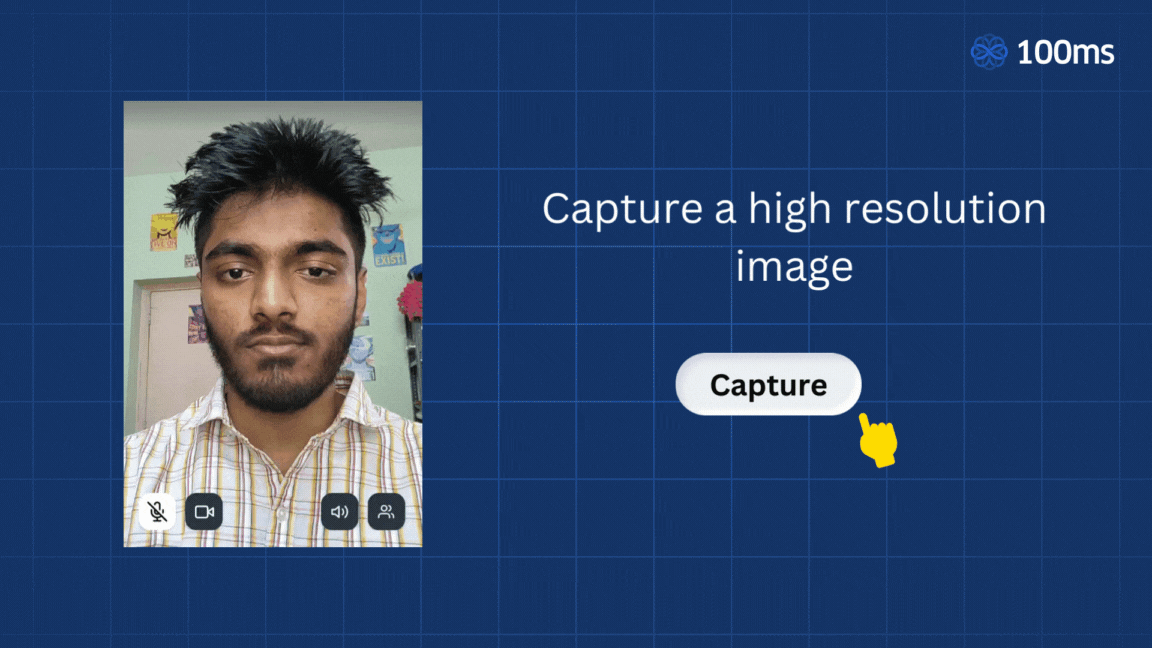
Capture photo/frame at the highest resolution
During verification, the KYC agent occasionally needs to take pictures of the user and their documents. However, attempting to capture a frame from the video stream may not be the best idea. Not only is it difficult to implement, but the quality of the output may not be good enough for verification purposes most of the time.
With 100ms, capturing and saving a high-resolution photo (with a quality similar to the default camera app on the phone) is possible with a simple SDK method call.
Android
Give a file path to save the image to the method. The image is stored in JPEG format by default.
val localVideoTrack : HMSVideotrack = hmsPeer.videoTrack
val cameraControl = (localVideoTrack as? HMSLocalVideoTrack)?.getCameraControl()
...
// capture the image and save it to the specified file path
val imagePath = File(getExternalFilesDir(null), "captured_image.jpeg")
cameraControl.captureImageAtMaxSupportedResolution(imagePath) { isSuccess ->
    if (isSuccess) {
        Log.d(TAG, "Image saved to path: ${imagePath.absolutePath}")
    }
}
iOS
Get access to UIImage instance of the captured image and save it in the format of your wish.
let localVideoTrack = peer.localVideoTrack()
...
// capture the image
localVideoTrack.captureImageAtMaxSupportedResolution(withFlash: false) { image in
		// create JPEG from `UIImage` and save it the specified file path
		if let imageData = image.jpegData(compressionQuality: 0.8) {
        let documentsPath = NSSearchPathForDirectoriesInDomains(.documentDirectory, .userDomainMask, true)[0]
        let imagePath = documentsPath.appending("/captured_image.jpeg")
				let fileManager = FileManager.default
        fileManager.createFile(atPath: imagePath, contents: imageData, attributes: nil)
				print("Image saved to path: \(imagePath)")
    }
}
Camera controls
Having access to camera controls like tap-to-focus, zoom and flash can help improve the quality of video verification. We will now explore these camera controls in detail and how to enable them with 100ms.
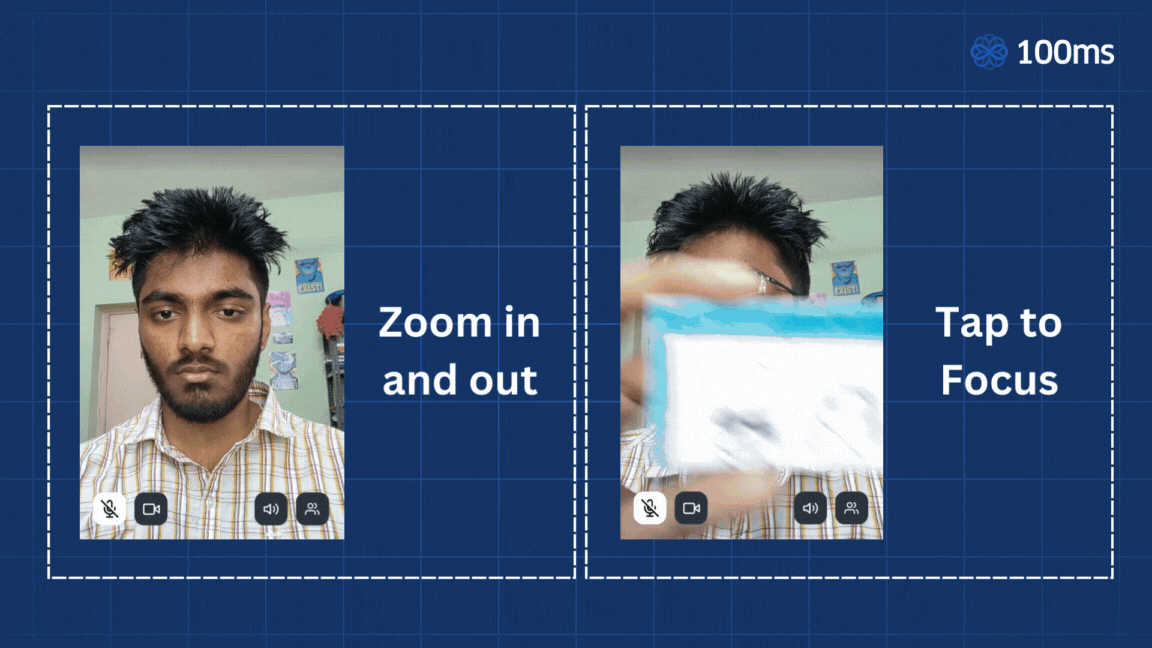
Manual/Tap-to-focus
Sometimes, the subject of a photo might be out of focus, even with the default autofocus of the mobile camera working in the background. This can result in documents appearing blurry during verification. With 100ms, it is possible to capture better quality frames by implementing the tap-to-focus feature.
Android
Use a simple GestureDetectorCompat instance to map the video view’s coordinates to the SDK method and add support for tap-to-focus.
val localVideoTrack : HMSVideotrack = hmsPeer.videoTrack
val cameraControl = (localVideoTrack as? HMSLocalVideoTrack)?.getCameraControl()
...
val localVideoView : HMSVideoView = findViewById(R.id.local_video)
localVideoView.addTrack(localVideoTrack)
...
// create a gesture detector
val gestureDetector = GestureDetectorCompat(context, object : GestureDetector.SimpleOnGestureListener() {

    override fun onDown(e: MotionEvent?) = true
		// on tap event listener
    override fun onSingleTapUp(event: MotionEvent): Boolean {
				// check if tap-to-focus is supported
        if (cameraControl.isTapToFocusSupported())
						// set focus to the coordinates from tap event
            cameraControl.setTapToFocusAt(
                event.x,
                event.y,
                viewWidth = width,
                viewHeight = height
            )
        return true
    }
})
// attach the gesture detector to the local video view
localVideoView.setOnTouchListener { _, event ->
    var didConsume = gestureDetector.onTouchEvent(event)
    didConsume
}
iOS
Simply set the cameraFocusMode in HMSTrackSettings configuration, after initializing the SDK. The tap-to-focus will be enabled on local video view.
...
// configure track settings
sdk.trackSettings = HMSTrackSettings.build { videoSettingsBuilder, audioSettingsBuilder in
    // set focus mode to `TapToAutoFocus`
		videoSettingsBuilder.cameraFocusMode = .focusModeTapToAutoFocus
    ...
}
Zoom
The user might want to zoom in/out to better view the documents or scope in on something important, as part of the verification. With the 100ms SDK, it is possible to easily implement pinch-to-zoom-like features based on gestures.
Android
Use a simple ScaleGestureDetector instance to add zoom with pinch gesture, using the SDK methods like this:
val localVideoTrack : HMSVideotrack = hmsPeer.videoTrack
val cameraControl = (localVideoTrack as? HMSLocalVideoTrack)?.getCameraControl()
...
val localVideoView : HMSVideoView = findViewById(R.id.local_video)
localVideoView.addTrack(localVideoTrack)
...
// set `lastZoom` to be the minimum zoom value
var lastZoom = cameraControl.getMinZoom()
// create a scale gesture detector
val scaleGestureDetector = ScaleGestureDetector(
    context,
    object : ScaleGestureDetector.SimpleOnScaleGestureListener() {
        override fun onScale(detector: ScaleGestureDetector): Boolean {
						// check if zoom is supported
            if (cameraControl.isZoomSupported()) {
								// update zoom value based on detected change
								// in scaleFactor for the pinch gesture
                lastZoom *= detector.scaleFactor
                cameraControl.setZoom(lastZoom)
                return true
            }
            return false
        }
    })
// attach the scale gesture detector to the local video view
localVideoView.setOnTouchListener { _, event ->
    var didConsume = scaleGestureDetector.onTouchEvent(event)
    didConsume
}
iOS
Use a UIPinchGestureRecognizer instance with a callback to implement pinch-to-zoom functionality, like this:
class ViewController: UIViewController {

    let localVideoView = HMSVideoView()

    override func viewDidLoad() {
        super.viewDidLoad()
        // add a pinch gesture recognizer to the camera view
        let pinchGesture = UIPinchGestureRecognizer(target: self, action: #selector(handlePinchGesture(_:)))
        localVideoView.addGestureRecognizer(pinchGesture)
    }

    @objc func handlePinchGesture(_ gesture: UIPinchGestureRecognizer) {
        // get access to the video track and make sure it's local video tack
        if let localVideoTrack = localVideoView.videoTrack() as? HMSLocalVideoTrack {
            // modify the underlying camera device to change zoom factor
            localVideoTrack.modifyCaptureDevice { device in

                guard let device = device else { return }

                let newZoomFactor = device.videoZoomFactor * gesture.scale
                // make sure to not exceed camera zoom range
                let clampedZoomFactor = max(device.minAvailableVideoZoomFactor, min(newZoomFactor, device.activeFormat.videoMaxZoomFactor))
                // set the new zoom factor on camera device
                device.videoZoomFactor =  clampedZoomFactor
            }
        }
    }
}
Flash
In low lighting conditions, a flash light can help identify the subject and the documents clearly. Here’s how you can easily enable/disable the flash with 100ms SDK.
Android
Toggle flash based on its enabled status.
val localVideoTrack : HMSVideotrack = hmsPeer.videoTrack
val cameraControl = (localVideoTrack as? HMSLocalVideoTrack)?.getCameraControl()
...
// check if flash is supported
if(cameraControl.isFlashSupported()){
		// toggle flash
		cameraControl.setFlash(enable: !cameraControl.isFlashEnabled())
}
iOS
Toggle flash based on its enabled status.
let localVideoTrack = peer.localVideoTrack()
...
localVideoTrack.modifyCaptureDevice { device in

    guard let device = device else { return }
		// check if flash is supported
    guard device.isTorchModeSupported(.on) else { return }
    // toggle flash
    device.torchMode = device.torchMode == .off ? .on : .off
}
Picking the right video SDK
Building a reliable and scalable video infrastructure from scratch is super expensive and time-consuming. For vKYC use cases, the right way to go live is by integrating a highly customizable, reliable and easy-to-integrate live video solution like 100ms. 100ms offers live video SDKs that can help you build high-quality live video experiences—from video conferencing to interactive live streaming, at scale.
Compliance and Security
100ms is SOC 2 (both Type 1 and 2), HIPAA and CERT-In VAPT compliant when it comes to compliance certifications. From a security perspective, this is what it could mean to its customers:
- Third-party vendor assess the 100ms infrastructure and tech stack once every year for security vulnerabilities.
- Calls and recordings are always encrypted during transmission and storage rendering any unauthorized access useless.
- Customer data isn’t stored without permission, you can choose not to share any data/recordings of the video KYC sessions from your app.
Reliability and other things…
100ms SDK comes with built-in reliability—from optimizing for bad network conditions to noisy environment, the SDK can handle all the edge cases that degrade call quality. Do check out this blog on how 100ms tests for network reliability, that was written before adaptive bitrate was added to improve it. As for call recordings, they go to your own AWS S3 or GCP bucket to ensure that you are in control with a 100% success rate.
There are several other things that can’t be covered in this blog, that make 100ms the best choice for video KYC. For example, network quality reports feature can help the agents get real-time network speed of the user. This can also be used to check if the user meets the minimum network speed requirement before proceeding to the verification.

To know more in detail about 100ms, check out the basic concepts of 100ms and then get started on Android and iOS SDKs.
Video
Share
Related articles
See all articles