Video KYC
Introduction
vKYC is an abbreviation for Video Know Your Customer. This guide focuses on helping you integrate 100ms in your video KYC workflow. In such a workflow, a customer gets on a call with an agent who does the KYC verification on a video call.
Architectural Workflow
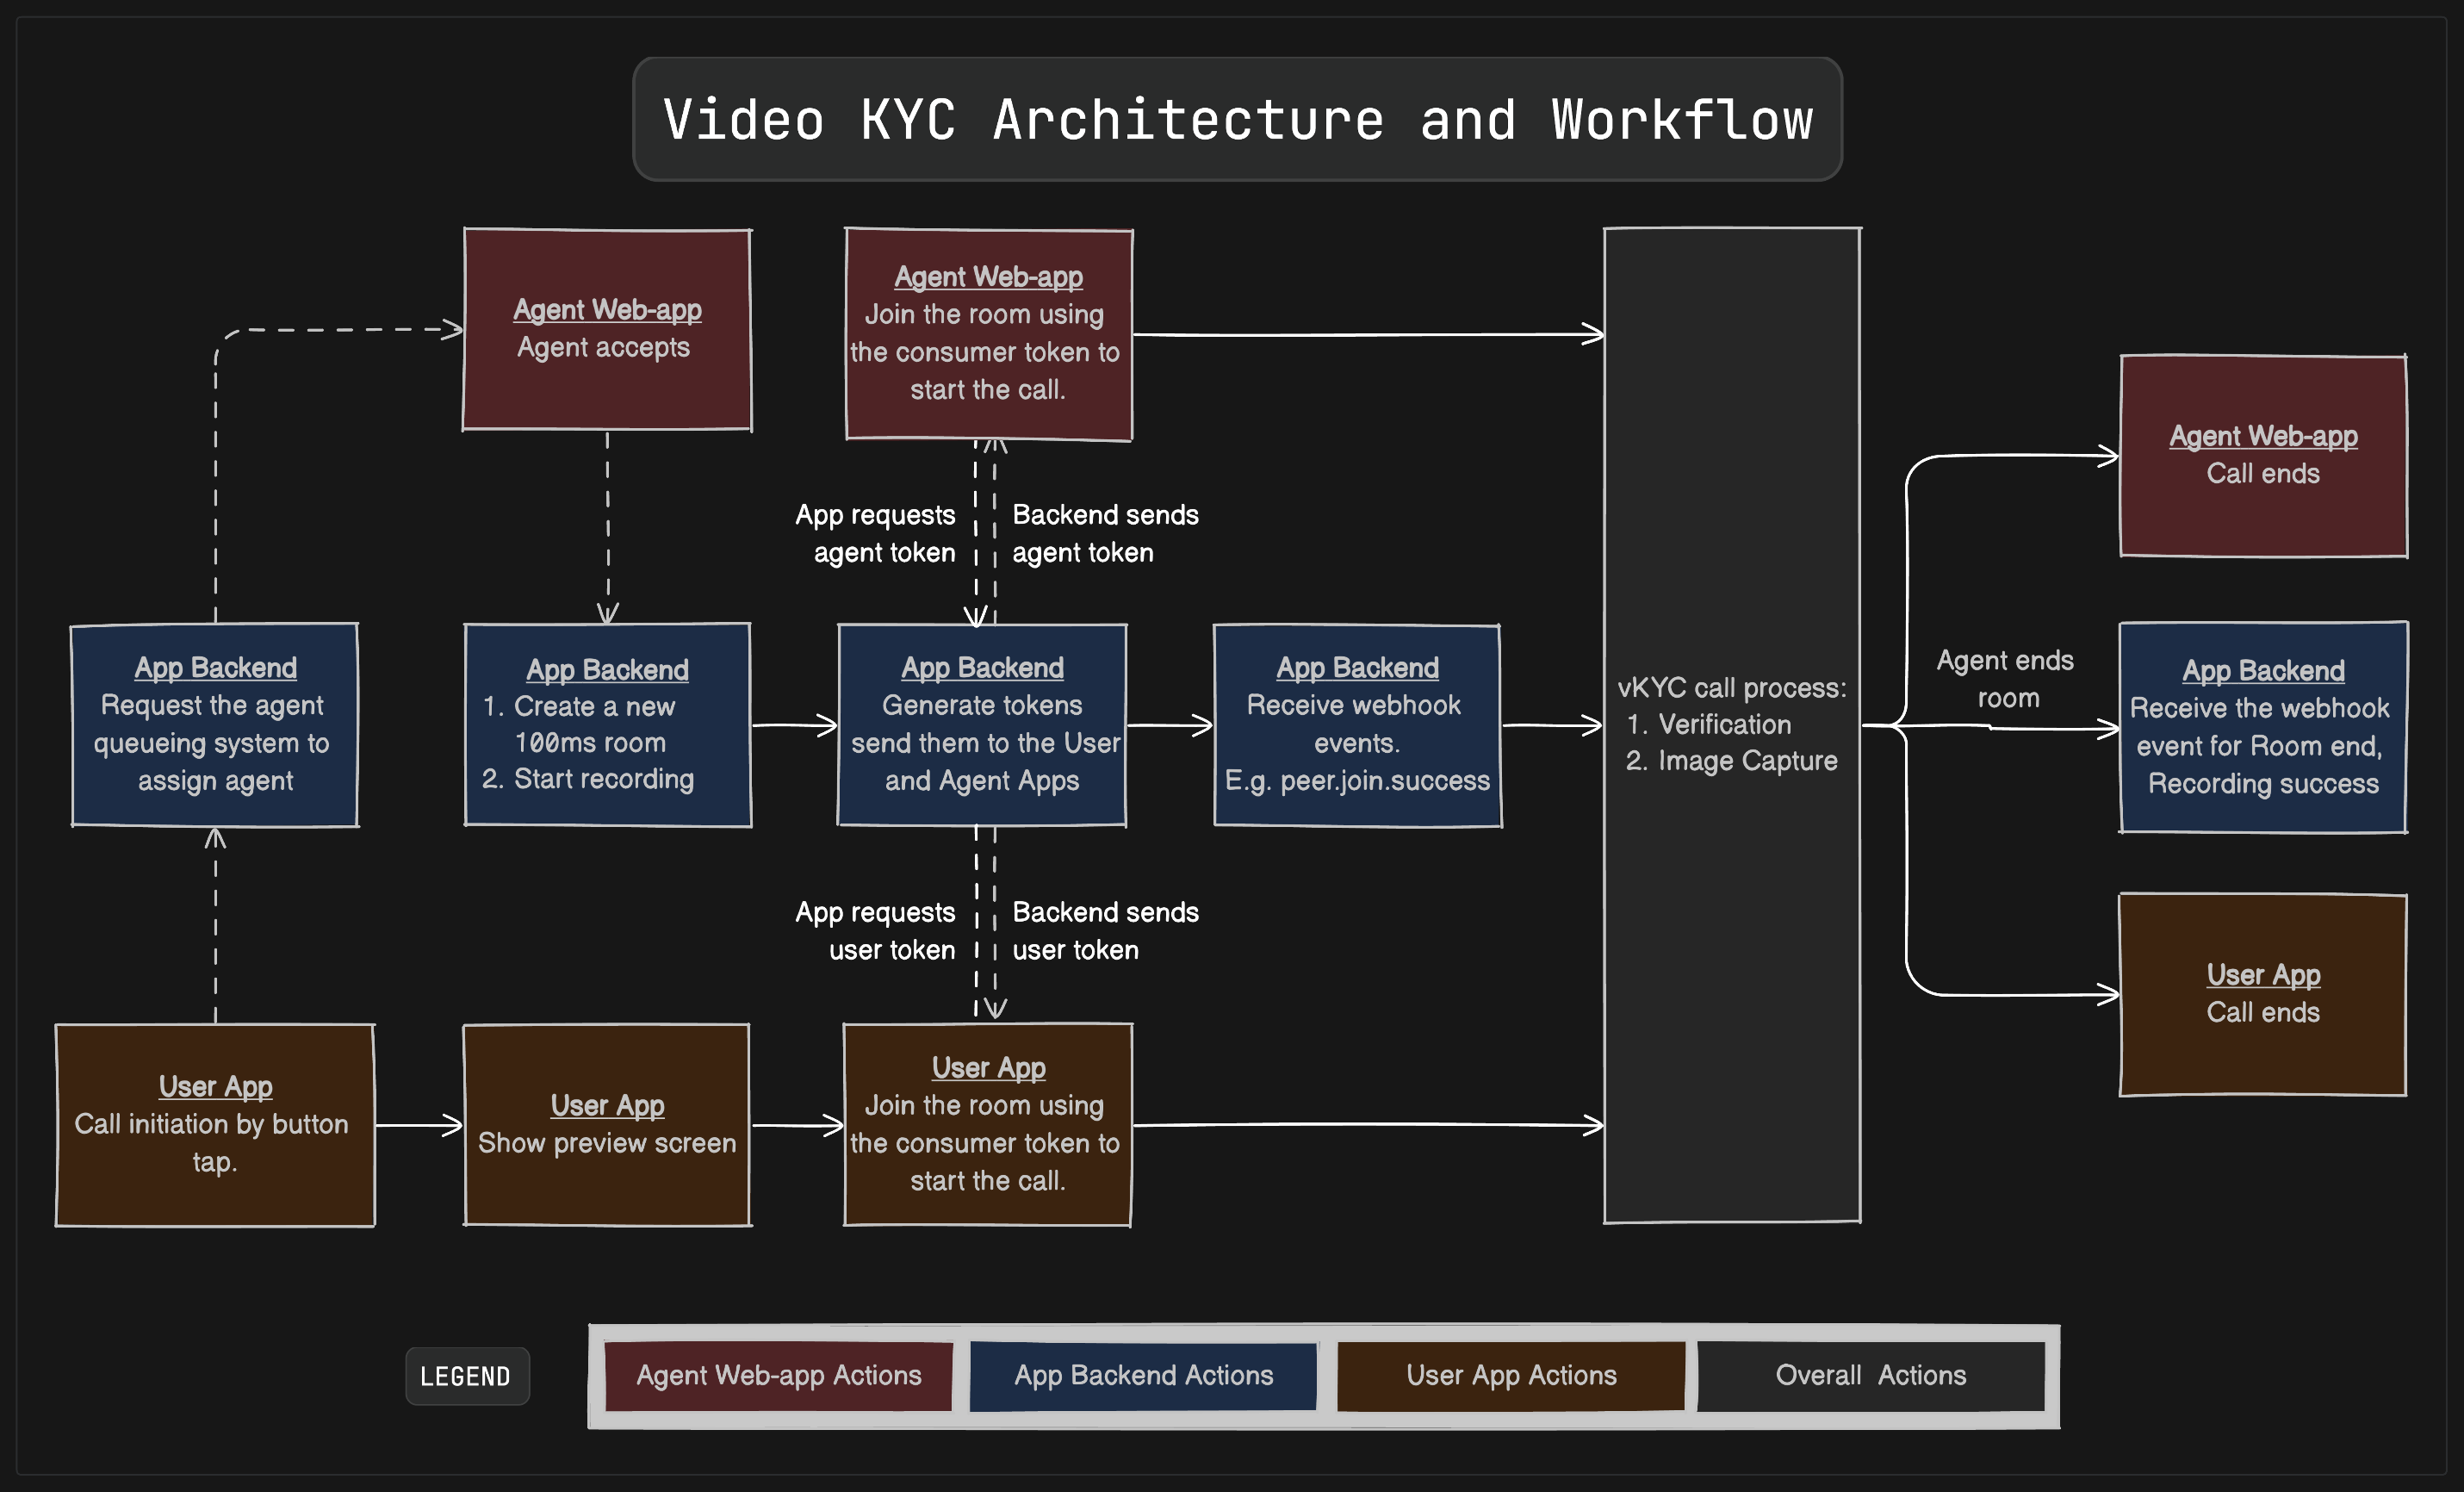
Integration Milestones
Creating the vKYC call template
Estimated Effort - 2 Days
Create a template through dashboard
-
Roles
Create both of the following roles with the given settings.- Publish Strategy -
- Role can share: Audio, Video; No Screenshare
Note
You can also keep this video off, this helps save bandwidth on the consumer’s side. The downside is the consumer doesn’t see any agent video, but only hears their audio. We recommend keeping this off.
- Video Quality: 360p
- Can publish Simulcast?: Enable
- Video Simulcast Layers: 360p, 180p
- Subscribe Strategy -
- Subscribe to: agent, customer
- Subscribe Degradation: Enable
- Permissions -
- Mute any peer: Enable
- Ask any peer to unmute: Enable
- End current session: Enable
- Receive preview room state: Enable
- Maximum number of peers in a room: No limit
- Publish Strategy -
-
Recordings
- Storage: Configure your cloud storage bucket
- Room Composite Recording: Enable
- Enable auto-start on room join: Enable
- SFU Recording: Disable
-
Advanced Settings
- Room-state: Enable
-
Additional settings to be turned on via API
- Turn on subscribe degradation for the agent, but with the option to not turn video off. Use the Update Template API. The parameter required
"videoAlwaysEnabled": true
- Turn on subscribe degradation for the agent, but with the option to not turn video off. Use the Update Template API. The parameter required
Getting the basics right
Estimated Effort - 2 Days
-
Create a Room via API
-
Join a Session
-
Render the video
-
End the Session - Two methods
- Using Web SDK
- Using Android SDK
Building out the workflow necessities
Estimated Effort - 7 Days
- Controlling the camera
- For Web, implement Switch Camera API.
- For Android, implement Camera Controls API.
- Capture images
- For Web, implement Frame Capture API.
- For Android, use Camera Controls API to capture at the high possible resolution.
Note
To transfer the captured images to the agent, use any upload API of your choice. Our recommendation is to not use 100ms’ session store or broadcast methods for this as this can cause loss of data.
- For error handling
- For Web, handle network (disconnection, reconnection) and autoplay errors.
- For Android, handle network errors.
- Add cloud storage bucket details on the 100ms Dashboard in the Recordings tab of your template to store your recordings.
- Setup and enable Room Composite Browser based recording
- Through API
- Through Web SDK
- Through Android SDK
Setting up analytics
Estimated Effort - 2 Days
- Integrate webhooks for receiving callbacks from the server (E.g. peer.leave, peer.join, beam.recording.success, etc.)
- Listen to 100ms’ network states for an overall network picture.
- Use stats for nerds to get more detailed stats including jitter, latency, frame drop, and more.
Debugging and QA
Estimated Effort - 7 Days
- Familiarise yourself with events Inspector on the Dashboard to debug issues promptly.
- Test using network throttling to check for performance in low bandwidth conditions.
Frequently Asked Questions
-
How do I implement switch/tap-to-focus/zoom camera functionality?
Refer to Building out the workflow necessities.
-
How do I implement image capture?
Refer to Building out the workflow necessities.
Our native Frame Capture API that can capture the current camera frame at 720p which should be good enough for capturing OCR details. You can also use the Camera Controls API on Android.
Note
In case you want to capture image, at a higher quality, you can use the browser’s native
getUserMediamethod to capture the image. Codesandbox reference for you to check out.
-
How do I transfer the captured image to the agent?
Refer to the note in Building out the workflow necessities.
-
How do I initiate recording?
There are two ways to accomplish this.
- Recommended method: Use Room Composite Recording with or without the auto-start functionality. This is a browser-based recording happening on a cloud browser. The benefits include lower A/V sync issues and faster time-to-video (p50 is 9 seconds). It does take about 2 seconds for this recording to auto-start. You can enable this through the Recordings tab on the dashboard. Use the following guide to enable this.
- SFU Recording method: This is done by composing the individual video tracks post-call. The benefit of using this is that it starts automatically with the room, but there can be potential A/V sync issues, and the time to get the video is longer (p50 is 1 minute 50 seconds for a 3-minute session). Enable this by configuring the recording in the policy itself.
-
How do I track active rooms and user/customer presence in those rooms?
- You can use our server-side Active Rooms API to track active rooms.
- You can listen to webhook events to track peers, sessions and rooms and push subsequent updates.
-
How do I receive recordings?
You can listen to webhook events for recording.
-
How does 100ms improve disconnection rates?
100ms’ SDK handles connection retries under the hood. This retry suite has been built up over browser versions, and devices, and uses a bandwidth estimation system that’s been iterated on for millions of calls. You can listen to these retries by listening to SDK errors.
-
How does 100ms improve A/V sync recording failures?
We have Room Composite browser-based recording which uses 100ms’ cloud browser system. Browsers natively implement A/V sync correction better than server-side systems because it is recording what it sees.
-
How does 100ms improve permission errors?
100ms’ preview API and pre-built UI have been optimized with prompts, and readable error codes with actions. Using the same preview screen can help reduce permission errors.
-
How can I debug issues for a particular room?
Use 100ms’ event inspector to debug detailed room logs with events for join, leave, join failures, subscribe degradations etc. Refer to Setting up analytics and Debugging and QA.
-
How can I track detailed network stats in real-time during call?
You can listen to 100ms’ network states for an overall network picture and stats for nerds to get more detailed stats including jitter, latency, frame drop etc. Refer to Setting up analytics.
-
How do I know what resolutions and aspect ratios are best for my use-case?
Based on the client side device, you will have to choose the aspect ratios. This sheet will show calculations for checking how much bitrate is consumed in different resolutions/aspect ratios.
Additional Resources
- Understanding Mental Model of 100ms SDK
- Quickstart guide on the basics of setting up video conferencing from scratch using JS on Web
- Quickstart guide on the basics of setting up video conferencing from scratch using Android