Home
/ Blog /
WebRTC Video Call Basics: A Beginner's GuideWebRTC Video Call Basics: A Beginner's Guide
August 4, 202311 min read


Share


What is WebRTC?
WebRTC is a free and open-source technology that enables real-time communication between web browsers and mobile applications using simple APIs. With WebRTC, developers can directly embed real-time communication capabilities into web and mobile applications, including voice and video calling, chat, file sharing, and screen sharing, without requiring any plugins or external software.
WebRTC utilizes a combination of media codecs, encryption, and network protocols to provide secure and efficient real-time communication. It is built on top of several web technologies and is designed to be easy to use for developers. WebRTC consists of two primary components:
- Media channels: They are responsible for exchanging audio and video data between peers, allowing real-time audio and video communication using codecs such as VP8, VP9, and H.264.
- Data channels: They enable the exchange of arbitrary data between peers, such as text messages or game data. They are built on top of the SCTP transport protocol and can be used for reliable or unreliable data transfer.
Both media and data channels utilize the same peer connection, allowing developers to build powerful real-time applications by combining audio, video, and data exchange.
With WebRTC, you can build a wide range of real-time communication applications such as video conferencing platforms, voice and video calling apps, live streaming services, collaborative whiteboards, online gaming platforms with voice chat, and customer support systems with screen sharing capabilities. The possibilities are endless, allowing you to create immersive and interactive experiences directly in web browsers and mobile applications.
How WebRTC works?
WebRTC was designed to be a P2P protocol, which means that there are always only 2 people connected through a single WebRTC connection and we call them peers. If you want to know more about how use cases like video conferences use WebRTC, this blog on WebRTC server-side architecture.
Let us take some time to understand how WebRTC works from a high-level overview:
- Signaling: Before two peers can establish a WebRTC connection, they need to exchange information about each other, such as IP addresses and session descriptions. This is done using a signaling server, which acts as an intermediary between the peers. The signaling server is not part of the WebRTC specification and can be implemented using any technology.
- Peer connection: Once the peers have exchanged information via the signaling server, they can establish a peer connection. The peer connection allows the peers to exchange audio, video, and data directly, without going through a server.
- Media capture and processing: Before the peers can exchange audio and video, they need to capture it from their devices. WebRTC provides APIs for capturing audio and video from webcams and microphones. Once the audio and video are captured, they need to be encoded using a codec. The encoded media is then sent over the peer connection.
- Media rendering: Once the media is received by the other peer, it needs to be decoded and rendered on the screen. WebRTC provides APIs to help render audio and video on the web page.
- NAT traversal: When direct connections are not possible due to network issues, WebRTC uses NAT (Network Address Translators) traversal mechanisms to overcome them. These techniques include STUN (Session Traversal Utilities for NAT) and TURN (Traversal Using Relay NAT).

Flow of a WebRTC Video Call
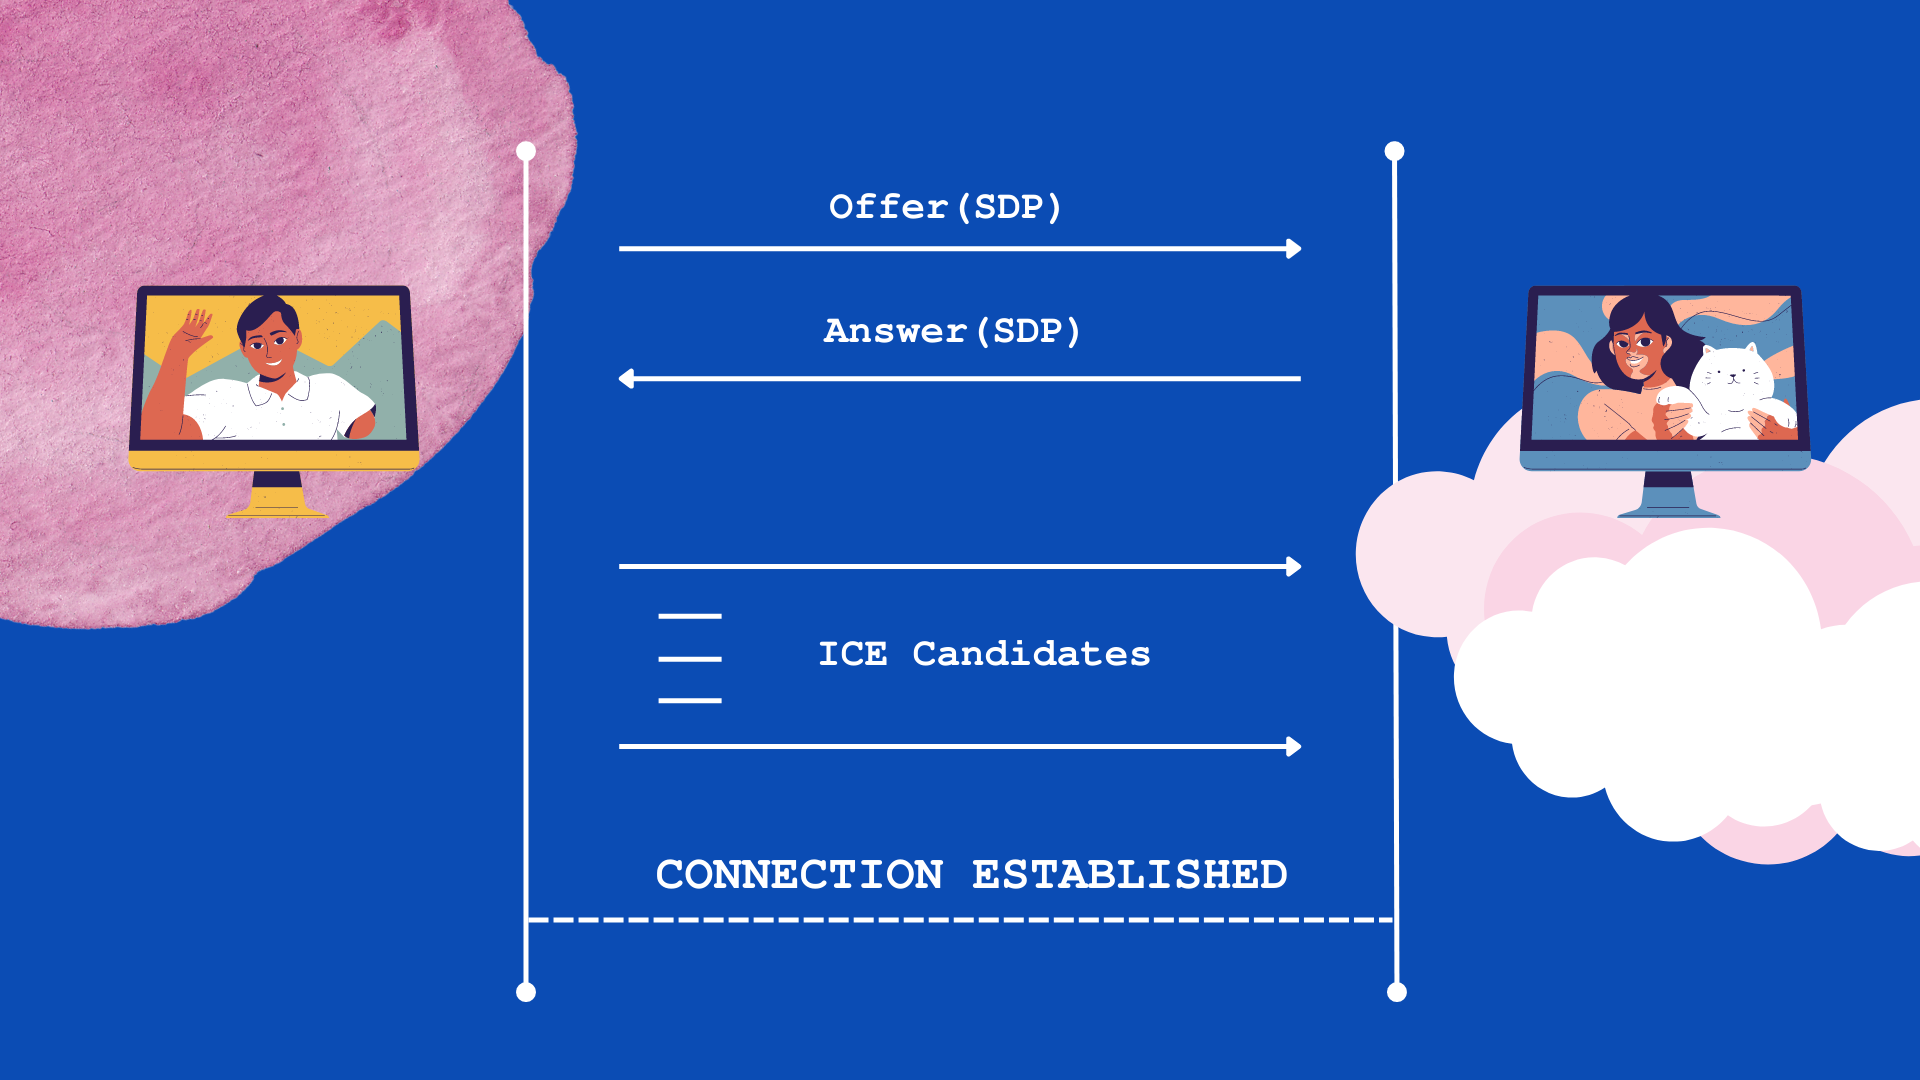
Now that we know the components involved in a WebRTC video call, let’s take a look at the basic flow of events that must occur for the connection to happen ie., video call:
- Peer A creates an
RTCPeerConnectionobject for the connection. - Peer A creates an offer SDP message with
createOffer()and callssetLocalDescription()to set it as the local SDP description. - Peer A now sends this offer in a stringified form to Peer B via a signaling server.
- Peer B creates an
RTCPeerConnectionobject and callssetRemoteDescription()with Peer A’s offer to know about its setup. - Peer B creates an answer SDP message with
createAnswer()and callssetLocalDescription()to set it as the local SDP description. - Peer B now sends this answer in a stringified form to Peer A using a signaling server.
- Peer A calls
setRemoteDescription()with the answer received to know about Peer B’s setup. - Either of these peers can send ICE Candidates to the other on generation, with the help of the
onicecandidatecallback, and set the candidates received from the other usingaddIceCandidate(). - Connection is established by the end of this flow.
A Sample WebRTC Video Call App
In the previous section, we discussed the role of a signaling server and the usual flow in establishing WebRTC connections. Now, let's try to code a sample WebRTC app. Please note that this code assumes the existence of a signaling server and uses some placeholder functions for signaling and handling incoming data. If you’re looking to build a working demo, check out this blog on building your first WebRTC app.
Here, we’ll assume a function signal('eventName',data) that can be used to send data via the signaling server. And, we’ll use fromSignal.on('eventName') to listen for data coming from the signaling server. These functions need to be implemented based on your specific signaling server implementation. The allowed events in this example are listed below:
offer- used to send offer SDPanswer- used to send answer SDPcandidate- used to send ICE candidatesend- used to signal the termination of call
<!DOCTYPE html>
<html>
  <head>
    <title>WebRTC App</title>
  </head>
  <body>
    <video id="localVideo" autoplay></video>
    <video id="remoteVideo" autoplay></video>
    <button id="startButton">Start Call</button>
    <button id="hangupButton">Hang Up</button>

    <script src="main.js"></script>
  </body>
</html>
The provided code snippet demonstrates a basic WebRTC video chat application. The HTML file sets up the necessary elements, including video containers, buttons to start and hang up the call, and a script reference to the main JavaScript file.
// Initialize variables
let localStream;
let remoteStream;
let localPeerConnection;
let remotePeerConnection;

// Get references to HTML elements
const startButton = document.getElementById('startButton');
const hangupButton = document.getElementById('hangupButton');
const localVideo = document.getElementById('localVideo');
const remoteVideo = document.getElementById('remoteVideo');

// Add event listeners
startButton.addEventListener('click', startCall);
hangupButton.addEventListener('click', hangupCall);

// Create the offer
function startCall() {
  startButton.disabled = true;
  hangupButton.disabled = false;

  // Get local media stream
  navigator.mediaDevices.getUserMedia({ video: true, audio: true })
    .then(stream => {
      localStream = stream;
      localVideo.srcObject = stream;

      // Create local peer connection
      localPeerConnection = new RTCPeerConnection();

      // Add local stream to connection
      localStream.getTracks().forEach(track => {
        localPeerConnection.addTrack(track, localStream);
      });

      // Create offer
      localPeerConnection.createOffer()
        .then(offer => {
          localPeerConnection.setLocalDescription(offer);

          // Send offer to signaling server
          signal('offer', offer);
        })
        .catch(error => {
          console.error('Error creating offer:', error);
        });

      // Set up remote peer connection
      remotePeerConnection = new RTCPeerConnection();

      // Add remote stream to connection
      remotePeerConnection.ontrack = event => {
        remoteStream = event.streams[0];
        remoteVideo.srcObject = remoteStream;
      };

      // Handle ice candidates for local peer connection
      localPeerConnection.onicecandidate = event => {
        if (event.candidate) {
          // Send ice candidate to signaling server
          signal('candidate', event.candidate);
        }
      };

      // Handle incoming ice candidates for remote peer connection
      fromSignal.on('ice-candidate', candidate => {
        remotePeerConnection.addIceCandidate(candidate);
      });

      // Handle incoming offer from remote peer
      fromSignal.on('offer', offer => {
        remotePeerConnection.setRemoteDescription(offer);

        // Create answer
        remotePeerConnection.createAnswer()
          .then(answer => {
            remotePeerConnection.setLocalDescription(answer);

            // Send answer to signaling server
            signal('answer', answer);
          })
          .catch(error => {
            console.error('Error creating answer:', error);
          });
      });

      // Handle incoming answer from remote peer
      fromSignal.on('answer', answer => {
        localPeerConnection.setRemoteDescription(answer);
      });
    })
    .catch(error => {
      console.error('Error accessing media devices:', error);
    });
}

// Hang up the call
function hangupCall() {
  localPeerConnection.close();
  remotePeerConnection.close();
  localPeerConnection = null;
  remotePeerConnection = null;
  startButton.disabled = false;
  hangupButton.disabled = true;
  localVideo.srcObject = null;
  remoteVideo.srcObject = null;

  // Send hang up signal to signaling server
  signal('end','hang-up');
}

// Function for sending data to signaling server
function signal(eventName, data) {
  // Your implementation for sending data to the signaling server
}

// Event listener for other incoming data from signaling server
fromSignal.on('data', data => {
  // Your implementation for handling incoming data from the signaling server
});
The main.js file contains the core logic of the app. It initializes variables, such as localStream, remoteStream, localPeerConnection, and remotePeerConnection, to handle media streams and peer connections. The startButton and hangupButton elements are assigned event listeners to trigger the respective call functions when the button is clicked.
When the startButton is clicked, the startCall function is executed. It requests access to the local media stream using the getUserMedia API, enabling video and audio. Upon obtaining the stream, it is assigned to the localVideo element for display.
The function then creates a localPeerConnection, adds the local stream to the connection, and generates an offer using createOffer. Upon successfully creating the offer, it sets the local description and sends the offer to the signaling server via the signal function.
Simultaneously, the remotePeerConnection is set up to handle the incoming stream. ICE candidates are handled for the localPeerConnection, and incoming ICE candidates and offers are processed from the signaling server using event listeners.
Upon receiving an offer, the app sets the remote description for the remotePeerConnection and generates an answer using createAnswer. Once the answer is created, it sets the local description, sends the response to the signaling server, and completes the connection establishment.
In the hangupCall function, the call is terminated by closing both the localPeerConnection and remotePeerConnection. The media streams and video elements are reset, and a hang-up signal is sent to the signaling server.
To use the signaling server, you need to implement the signal and fromSignal functions according to your specific server implementation. The signal function sends data to the signaling server, such as offers, answers, ICE candidates, and hang-up signals. The fromSignal event handler handles incoming data from the signaling server.
Conclusion
In this article, we explored WebRTC's powerful capabilities for building real-time communication applications. WebRTC enables seamless audio, video, and data communication between web browsers and mobile apps without the need for plugins. We covered vital concepts like setting up a signaling server, creating media streams, establishing peer-to-peer connections, setting up data channels, and handling errors and events.
WebRTC has great potential for the future of real-time communication. It's an open-source technology with wide browser support, making it versatile for applications like video conferencing, collaboration tools, and gaming. As the web evolves, WebRTC will continue to shape how we communicate and interact online.
To further explore WebRTC and enhance your understanding, here are some quality resources and documentation:
- WebRTC official website
- The official website provides comprehensive documentation, tutorials, and specifications for WebRTC.
- MDN WebRTC documentation
- Mozilla Developer Network (MDN) offers detailed documentation on WebRTC APIs, concepts, and usage.
- WebRTC codelabs
- Google's WebRTC codelabs provide hands-on tutorials and code examples to help you get started with WebRTC development.
- WebRTC samples
- The WebRTC samples repository on GitHub offers a collection of sample applications, demos, and code snippets covering various WebRTC use cases.
- Real-Time Communication with WebRTC book
- Real-Time Communication with WebRTC" by Salvatore Loreto and Simon Pietro Romano is a comprehensive guidebook that covers all aspects of WebRTC development.
Frequently Asked Questions
How does WebRTC video call work?
WebRTC enables direct peer-to-peer communication by exchanging information through a signaling server, allowing audio, video, and data to be captured, encoded, and rendered between connected peers, with NAT traversal for overcoming network obstacles.
What is WebRTC calling?
WebRTC calling refers to real-time communication between users using web browsers or applications, enabling audio and video calls directly between peers over the internet without the need for external plugins or software installations.
What are the benefits of WebRTC video conferencing?
WebRTC video conferencing offers seamless real-time communication, less bandwidth, reduced infrastructure costs, and enhanced user experience, enabling easy collaboration and global connectivity for businesses and individuals.
Basics
Share
Related articles
See all articles