Home
/ Blog /
How to build WhatsApp like audio-video calling in Flutter using CallKitHow to build WhatsApp like audio-video calling in Flutter using CallKit
July 25, 202323 min read


Share


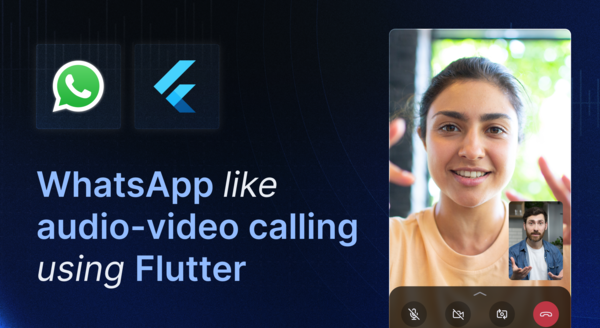
With over 2 billion active users, WhatsApp needs no introduction. In this tutorial, we will build an audio and video-calling WhatsApp clone using Flutter.
One key feature that sets WhatsApp apart from other messaging apps is its calling functionality, which allows users to make voice and video calls to other users over the internet for free, regardless of their location. Integrating something similar into your apps should be quick and easy.
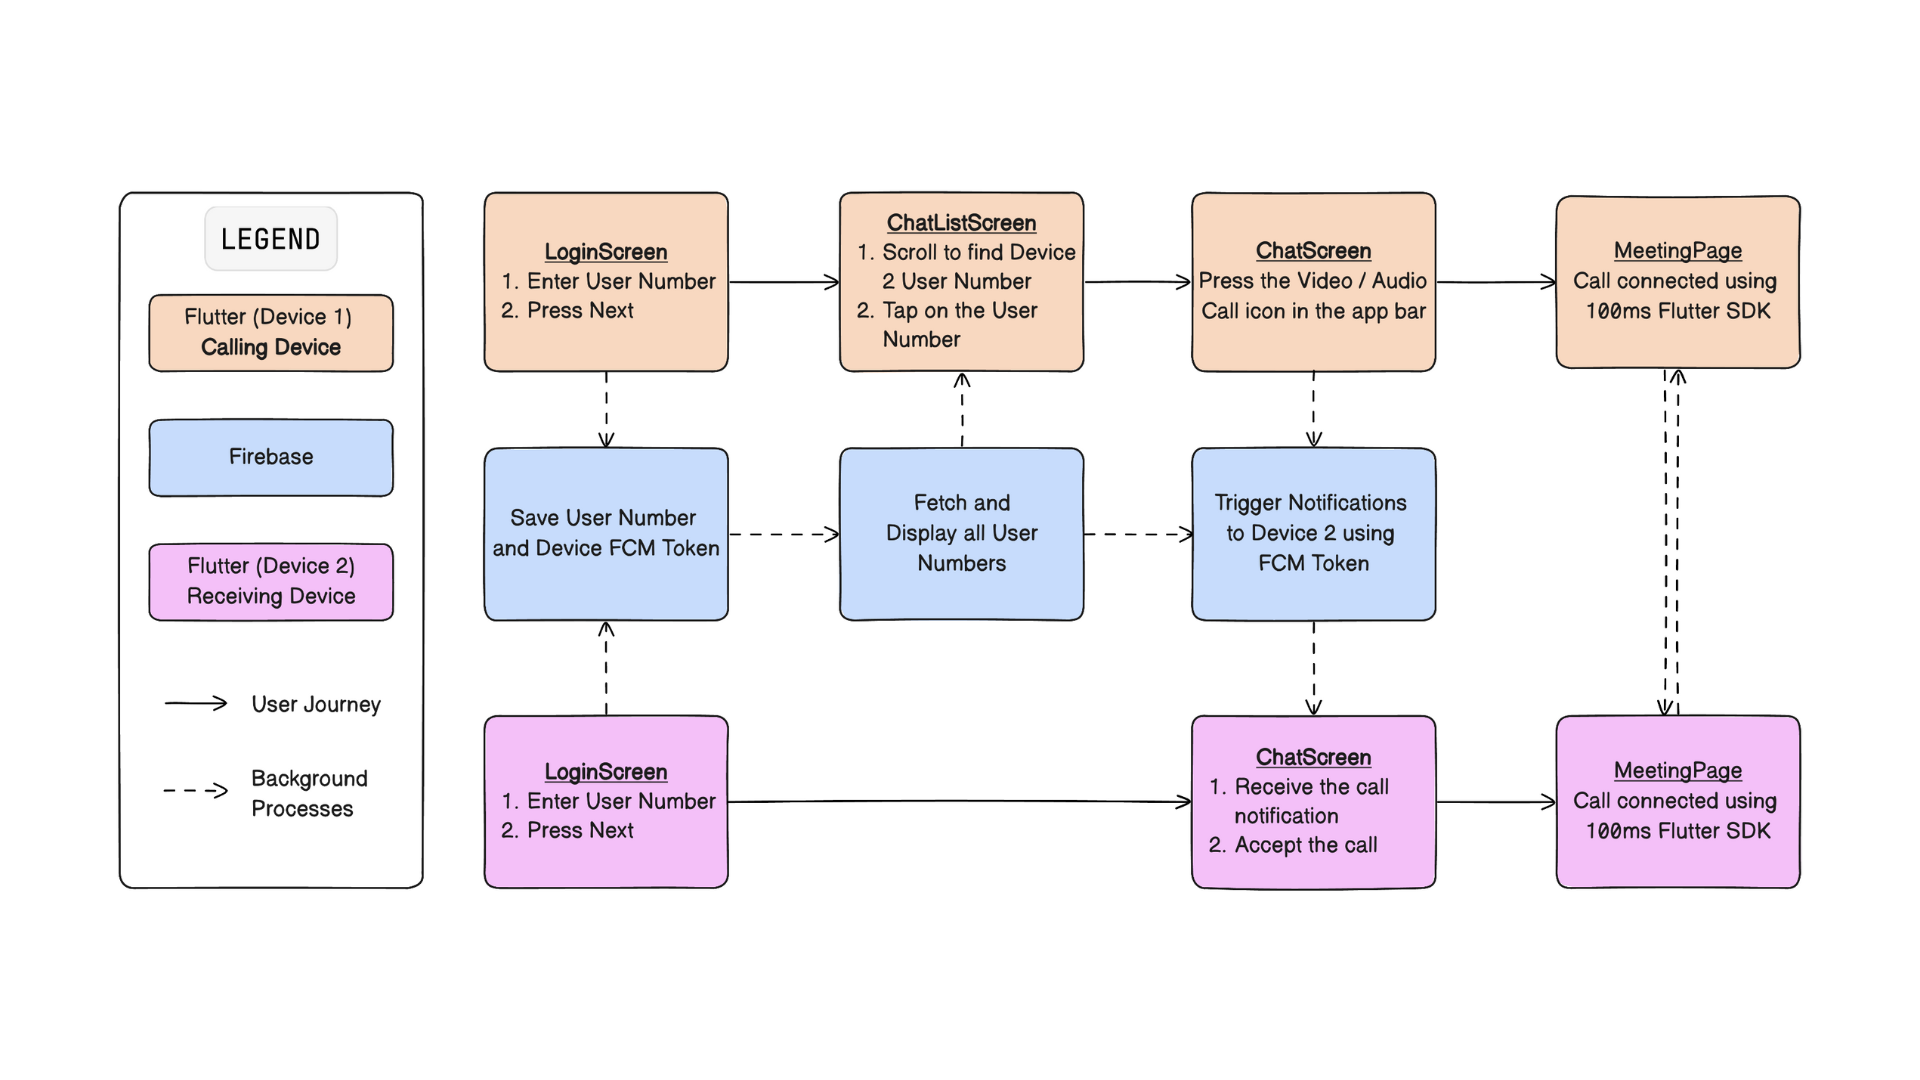
This demo is limited to replicating the calling functionality of WhatsApp and not messaging and authorisation. The video/audio calling is accomplished using 100ms’ Flutter SDK and call notifications are instrumented using Firebase. Following is an architectural diagram that shows how the demo will work.
Setting Up The Project
We start by cloning the hms-callkit-demo as the starter for this project.
- Fork the project and clone it to your system.
- Make sure you have Flutter SDK installed on your system. Check the steps here.
- Run
flutter pub getto fetch all required dependencies.
100ms Dashboard Setup
Next, we will set up our project template on the 100ms dashboard.
- Go to https://dashboard.100ms.live/dashboard.
- Create a new account or login into an existing one.
- Click on the ‘Create Template’ button.

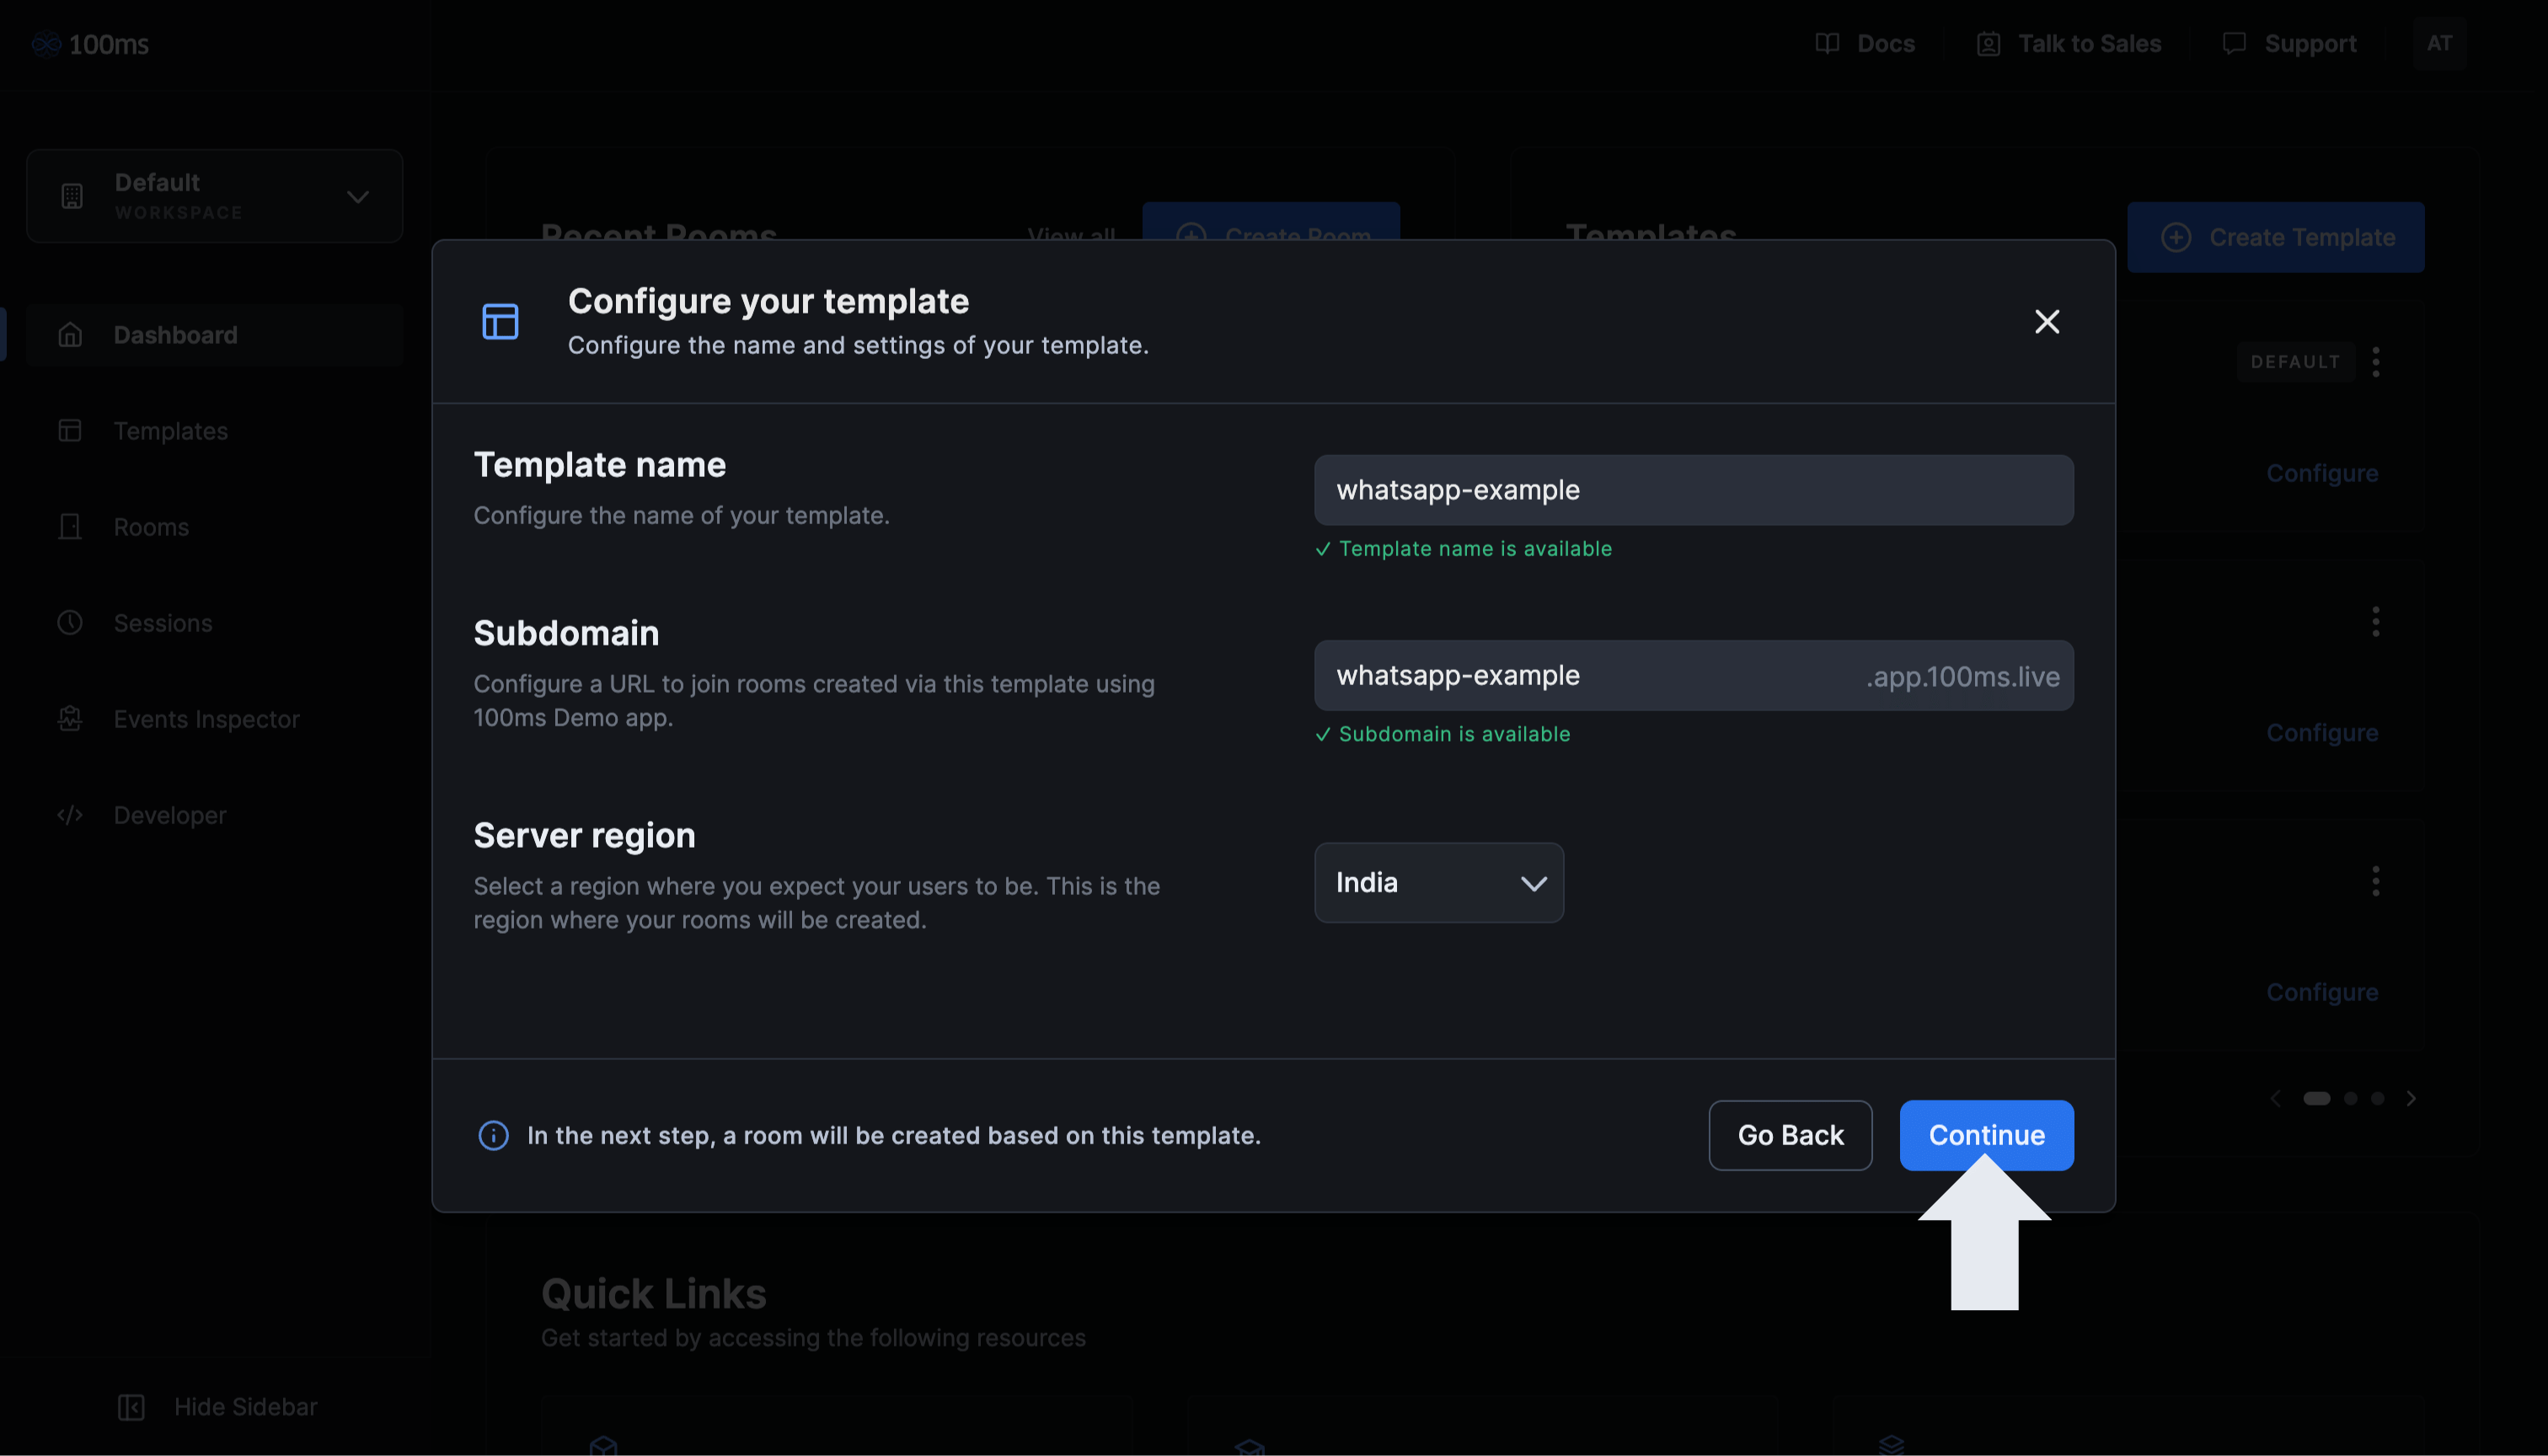
- Select the ‘Video Conferencing’ template as follow:

- Enter a Template name and a Subdomain of your choice. Click on ‘Continue’.
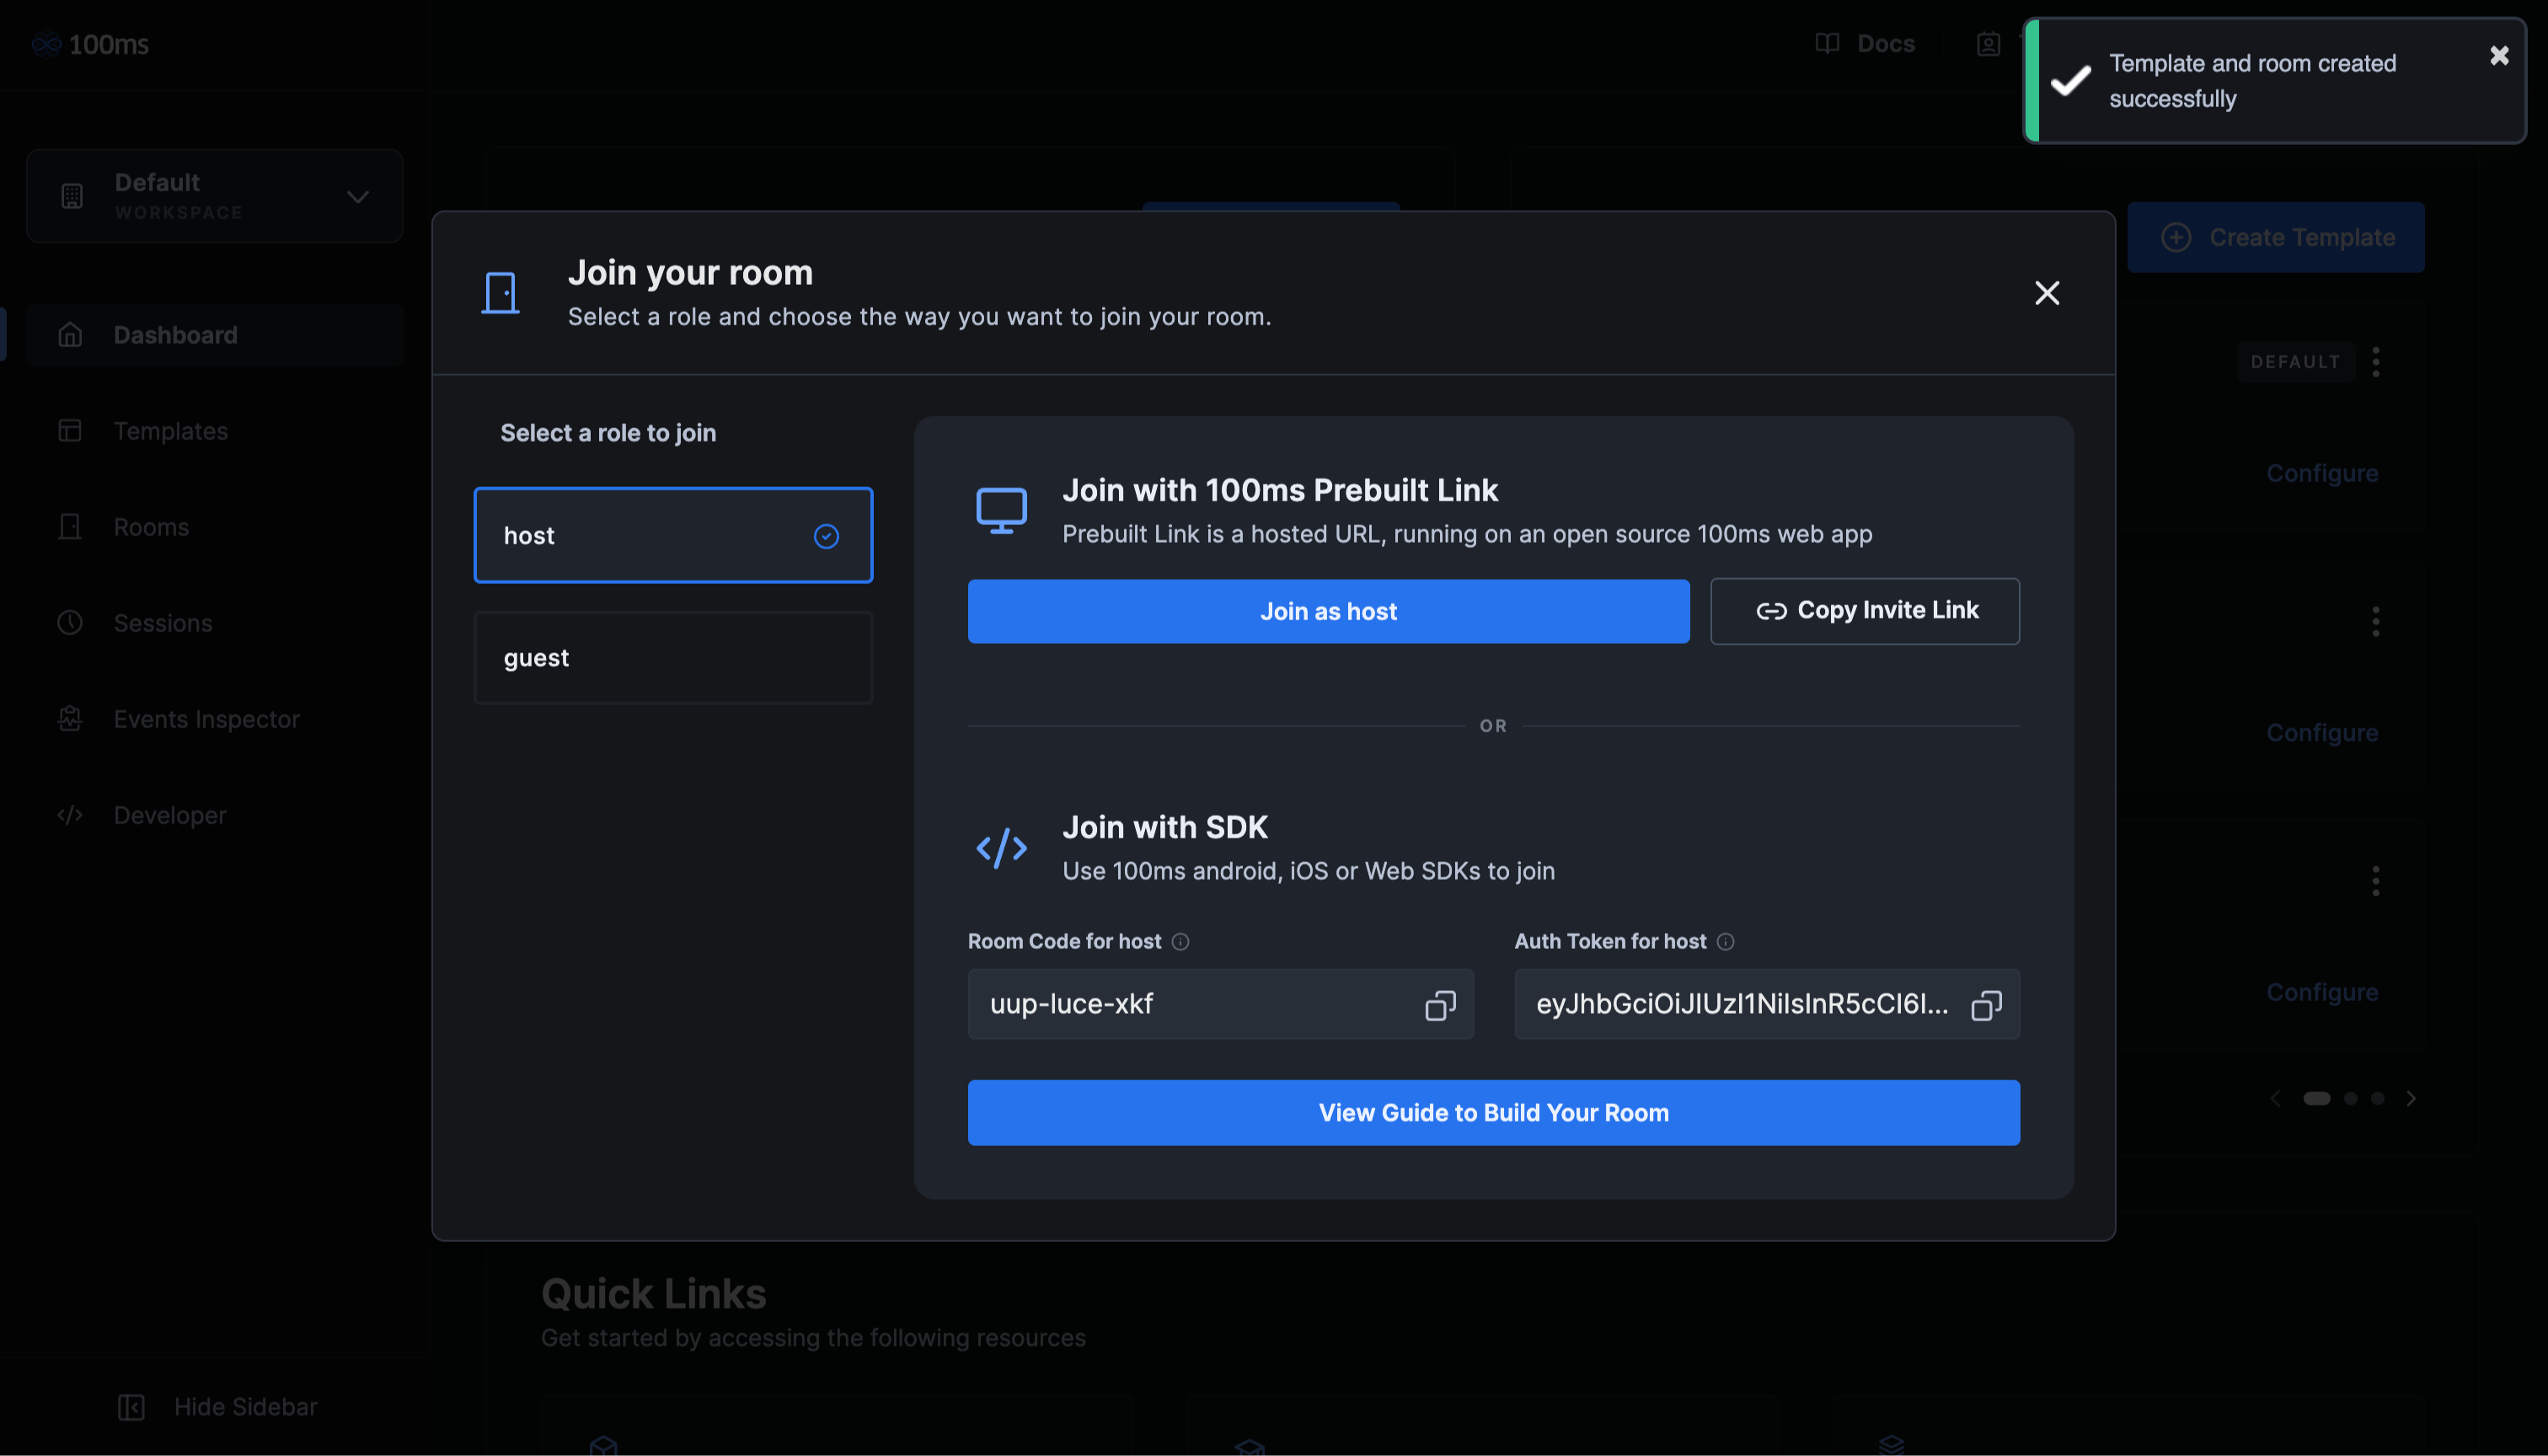
- A Template and room would be successfully created. Close the dialog window and use the side navigation bar to switch to ‘Developer’ section.
- Copy the Token endpoint using the adjacent button to use later.

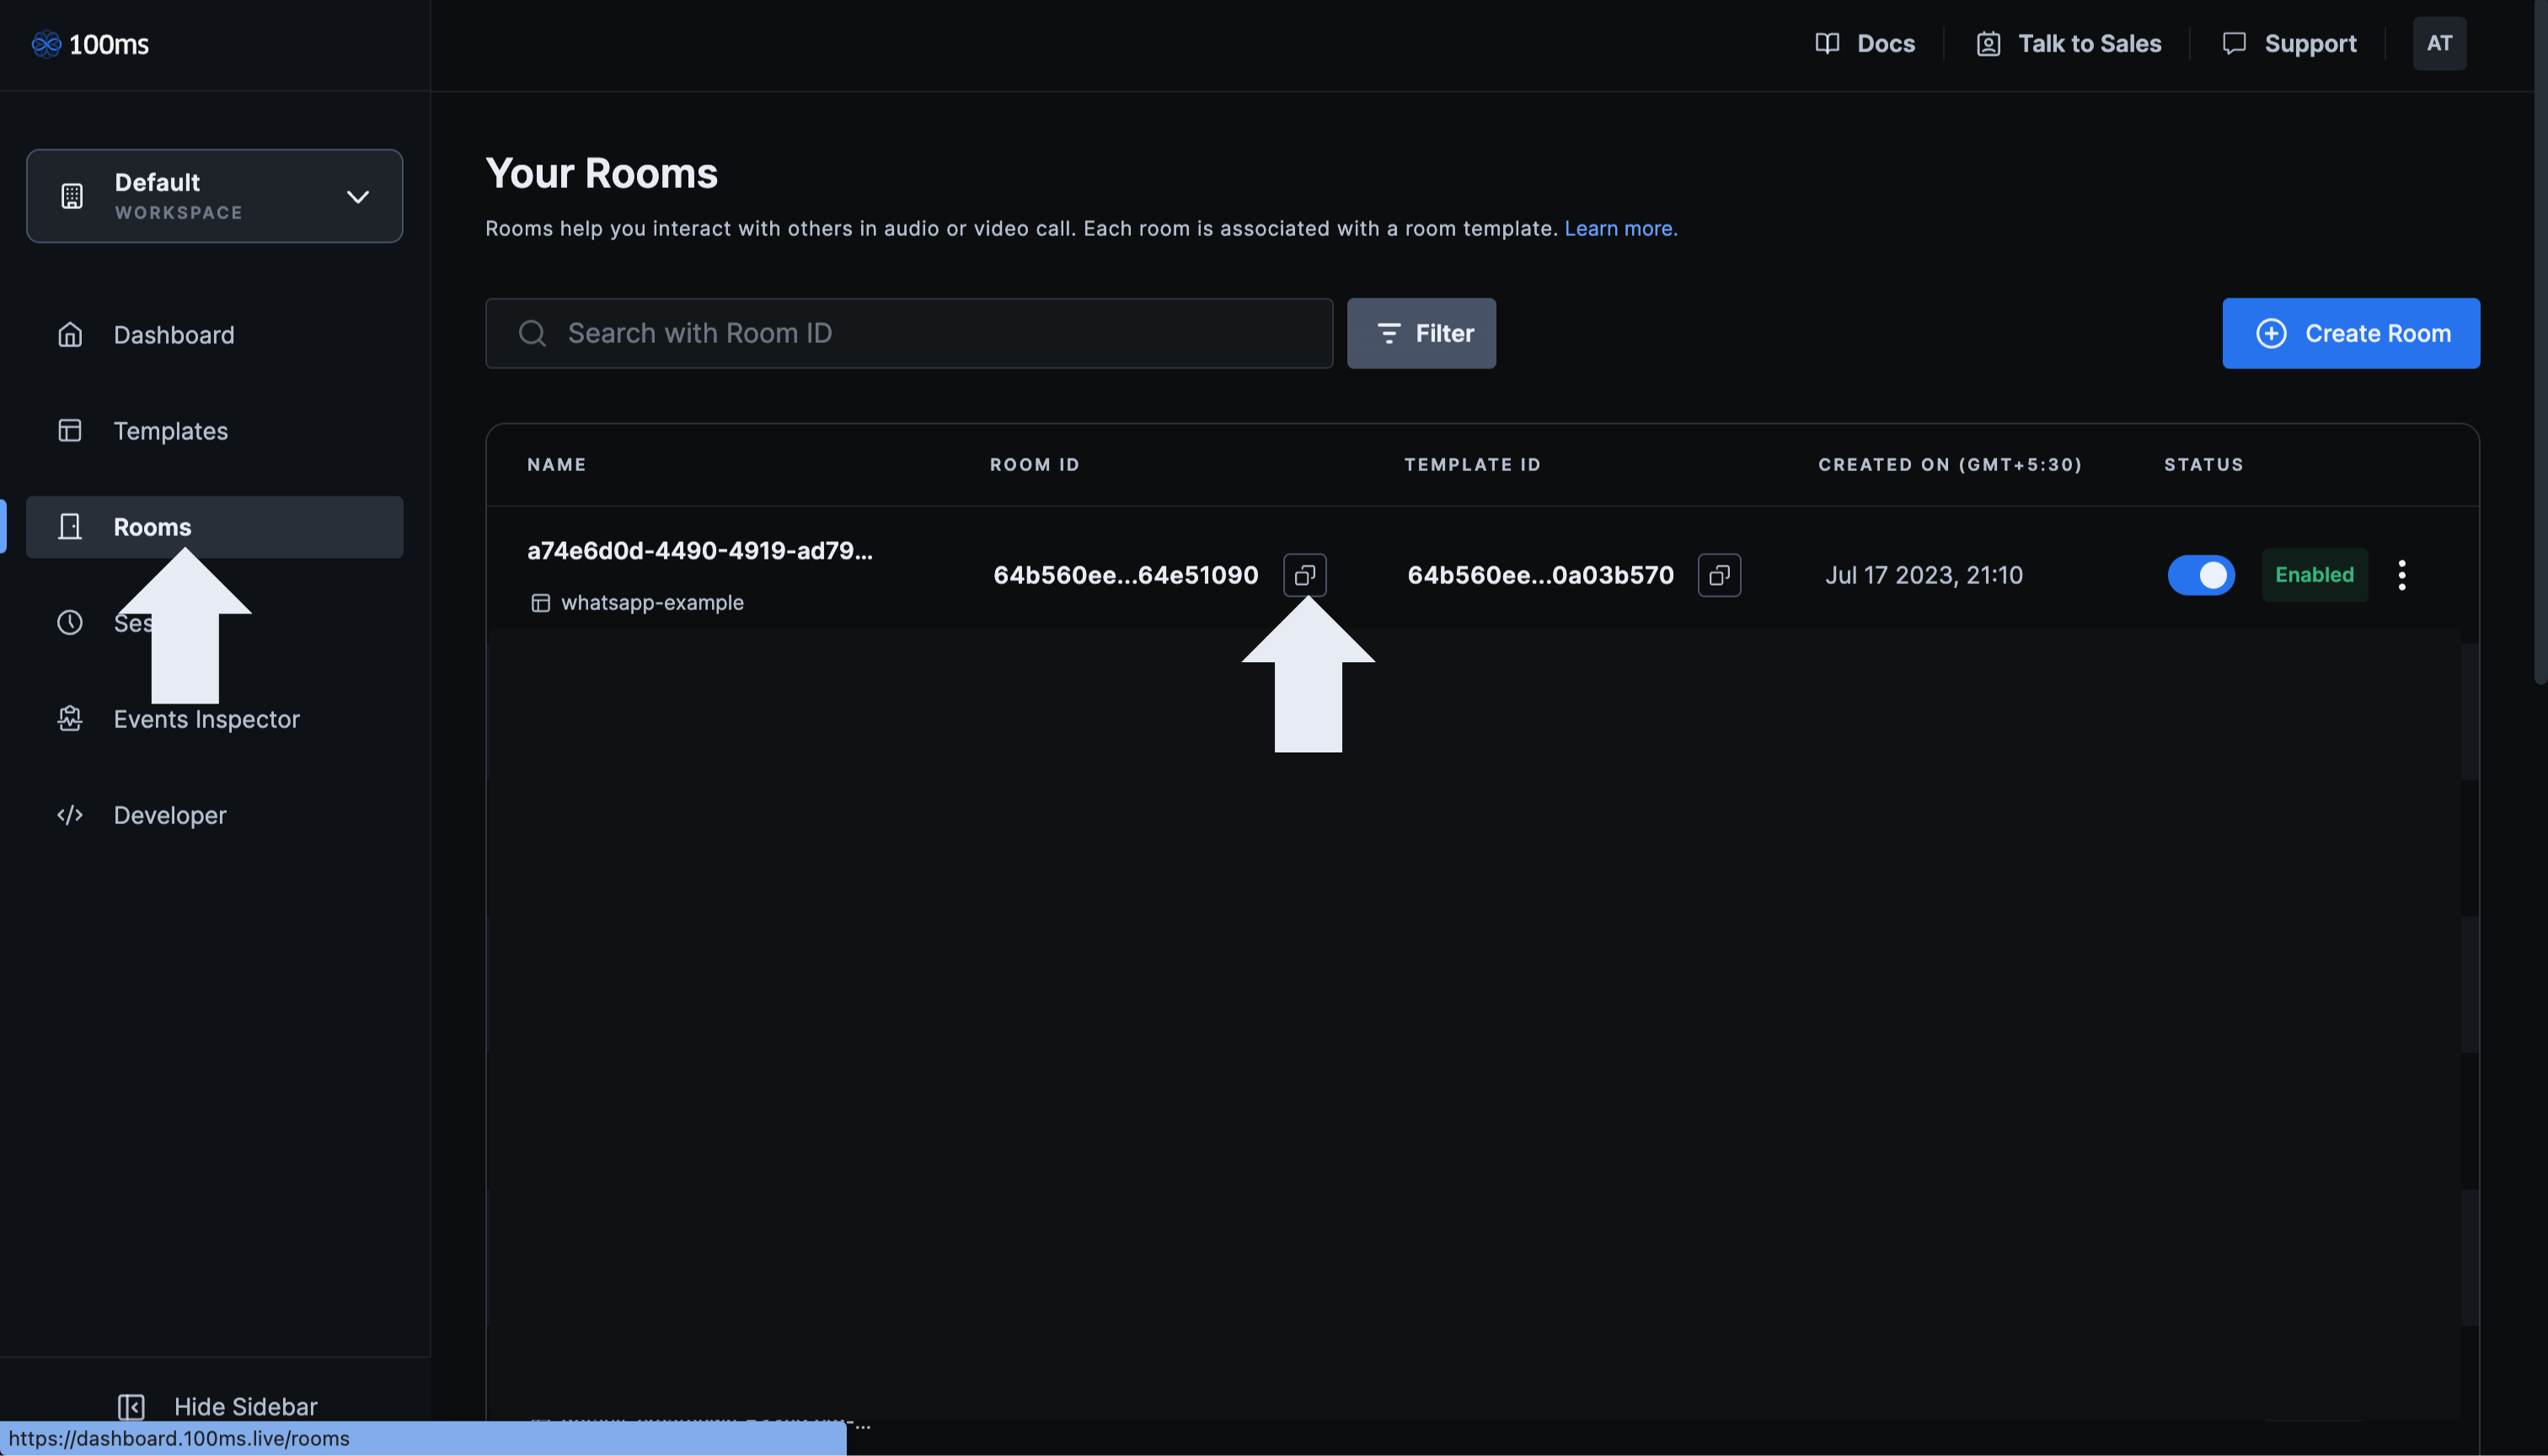
- Lastly, click on ‘Rooms’ using the side navigation and copy the Room Id of the same template just created.
Firebase Cloud Messaging Setup
- Start by creating a new Firebase project on the Firebase console.
- Next, add Firebase to your Flutter app following the documentation here.
- We will be using Firebase Cloud Messaging (FCM) to send notifications. To trigger them from the Flutter app, we need to enable Cloud Functions.
This would require your project to be on the Blaze pricing plan.
- The repository hms-callkit-demo already contains a functions folder that has the Firebase Cloud Functions that can be directly deployed.
Those are all the configuration steps required to get started. We are now ready to build our WhatsApp Call Demo.
Replicating The User Interface
Create a new directory called whatsapp_ui inside the lib folder of the Flutter project.
Add a new file called whatsapp_page.dart and paste the following code to it, to create a WhatsApp Home Screen-like interface.
import 'package:flutter/material.dart';

class WhatsAppScreen extends StatefulWidget {
  const WhatsAppScreen({super.key});

  @override
  State<WhatsAppScreen> createState() => _WhatsAppScreenState();
}

class _WhatsAppScreenState extends State<WhatsAppScreen>
    with TickerProviderStateMixin {
  late TabController tabBarController;
  final tabColor = const Color.fromRGBO(0, 167, 131, 1);
  final appBarColor = const Color.fromRGBO(31, 44, 52, 1);
  @override
  void initState() {
    super.initState();
    tabBarController = TabController(length: 3, vsync: this);
  }

  @override
  Widget build(BuildContext context) {
    return DefaultTabController(
      length: 3,
      child: Scaffold(
        appBar: AppBar(
          elevation: 0,
          backgroundColor: appBarColor,
          centerTitle: false,
          title: const Text(
            'WhatsApp',
            style: TextStyle(
              fontSize: 20,
              color: Colors.grey,
              fontWeight: FontWeight.bold,
            ),
          ),
          actions: [
            IconButton(
              icon: const Icon(Icons.search, color: Colors.grey),
              onPressed: () {},
            ),
            PopupMenuButton(
              icon: const Icon(
                Icons.more_vert,
                color: Colors.grey,
              ),
              itemBuilder: (context) => [
                PopupMenuItem(
                    child: const Text(
                      'Create Group',
                    ),
                    onTap: () {})
              ],
            ),
          ],
          bottom: TabBar(
            controller: tabBarController,
            indicatorColor: tabColor,
            indicatorWeight: 4,
            labelColor: tabColor,
            unselectedLabelColor: Colors.grey,
            labelStyle: const TextStyle(
              fontWeight: FontWeight.bold,
            ),
            tabs: const [
              Tab(
                text: 'CHATS',
              ),
              Tab(
                text: 'STATUS',
              ),
              Tab(
                text: 'CALLS',
              ),
            ],
          ),
        ),
        body: TabBarView(
          controller: tabBarController,
          children: [
            const Text('Chats'),
            const Text('Status Contact Screen'),
            const Text('Calls')
          ],
        ),
        floatingActionButton: FloatingActionButton(
          onPressed: () {},
          backgroundColor: tabColor,
          child: const Icon(
            Icons.comment,
            color: Colors.white,
          ),
        ),
      ),
    );
  }
}
Next, we will work on a flow to add users to the application. To be able to send notifications, using Firebase, we need to store the FCM Token of the users.
We will not use authentication to keep the demo simple for this example.
Instead, we can create a login screen to store the number and FCM Token of the user to Firebase Firestore and retrieve it from there when trying to connect.
We will create a new file called login_page.dart under the same directory whatsapp_ui and add the following code to it.
import 'package:country_picker/country_picker.dart';
import 'package:firebase_messaging/firebase_messaging.dart';
import 'package:flutter/material.dart';
import 'package:hms_callkit/whatsapp_ui/utils/custom_button.dart';
import 'package:hms_callkit/whatsapp_ui/utils/firestore_service.dart';

import '../app_navigation/app_router.dart';
import '../app_navigation/navigation_service.dart';

class LoginScreen extends StatefulWidget {
  static const routeName = '/login-screen';
  const LoginScreen({Key? key}) : super(key: key);

  @override
  State<LoginScreen> createState() => _LoginScreenState();
}

class _LoginScreenState extends State<LoginScreen> {
  final phoneController = TextEditingController();

  Country? country;

  @override
  void dispose() {
    super.dispose();
    phoneController.dispose();
  }

  void pickCountry() {
    showCountryPicker(
        context: context,
        onSelect: (Country country) {
          setState(() {
            country = country;
          });
        });
  }

  @override
  Widget build(BuildContext context) {
    final size = MediaQuery.of(context).size;

    return SafeArea(
      child: Scaffold(
        body: SingleChildScrollView(
          child: Padding(
            padding: const EdgeInsets.all(18.0),
            child: Column(
              crossAxisAlignment: CrossAxisAlignment.center,
              children: [
                const Text('WhatsApp will need to verify your phone number.'),
                const SizedBox(height: 10),
                TextButton(
                  onPressed: pickCountry,
                  child: const Text('Pick Country'),
                ),
                const SizedBox(height: 5),
                Row(
                  children: [
                    if (country != null) Text('+${country!.phoneCode}'),
                    const SizedBox(width: 10),
                    SizedBox(
                      width: size.width * 0.7,
                      child: TextField(
                        controller: phoneController,
                        decoration: const InputDecoration(
                          hintText: 'phone number',
                        ),
                      ),
                    ),
                  ],
                ),
                SizedBox(height: size.height * 0.6),
                SizedBox(
                  width: 90,
                  child: CustomButton(
                    onPressed: () async {},
                    text: 'NEXT',
                  ),
                ),
              ],
            ),
          ),
        ),
      ),
    );
  }
}
Note: We use an external package
country_pickerto add the option for users to pick their country as is on the WhatsApp sign-in screen. This package can be found here.
Under the whatsapp_ui directory create another folder called utils. Create a colors.dart file, and add the following colors from WhatsApp’s designs to it.
import 'package:flutter/material.dart';

const backgroundColor = Color.fromRGBO(19, 28, 33, 1);
const appBarColor = Color.fromRGBO(31, 44, 52, 1);
const messageColor = Color.fromRGBO(5, 96, 98, 1);
const tabColor = Color.fromRGBO(0, 167, 131, 1);
Next, create a custom_button.dart file and modify it with the following code.
import 'package:flutter/material.dart';
import 'colors.dart';

class CustomButton extends StatelessWidget {
  final String text;
  final VoidCallback onPressed;
  const CustomButton({
    Key? key,
    required this.text,
    required this.onPressed,
  }) : super(key: key);

  @override
  Widget build(BuildContext context) {
    return ElevatedButton(
      onPressed: onPressed,
      style: ElevatedButton.styleFrom(
        backgroundColor: tabColor,
        minimumSize: const Size(double.infinity, 50),
      ),
      child: Text(
        text,
        style: const TextStyle(
          color: Colors.black,
        ),
      ),
    );
  }
}
Lastly, we will create a user_data.dart file for a simple UserData model as:
class UserData {
  String numberOfUser;
  String fcmTokenOfUser;

  UserData({required this.numberOfUser, required this.fcmTokenOfUser});
}
And, a firestore_service.dart file to save data to Firestore:
import 'package:cloud_firestore/cloud_firestore.dart';

class FirestoreService {
  final CollectionReference _userData =
      FirebaseFirestore.instance.collection('users');

  static late QuerySnapshot _querySnapshot;
  static final _db = FirebaseFirestore.instance;

  // Updates user data
  Future<void> updateUserData(
      String fcmTokenIdentifier, String phoneNumber) async {
    final reference = _userData.doc(fcmTokenIdentifier);

    await reference.set({
      'number': phoneNumber, // Mobile Number of User
      'token': fcmTokenIdentifier, // FCM Token
    });
  }
}
Now, we can update the onPressed of the CustomButton on the login_page.dart to store the FCM token and phone number to the Firestore as follows:
if (phoneController.value.text.isNotEmpty) {
      String? token = await FirebaseMessaging.instance.getToken();
      await FirestoreService().updateUserData(
            token ?? "TokenNotFound",
            phoneController.value.text.toString());

      NavigationService.instance
            .pushNamedAndRemoveUntil(AppRoute.whatsappHome);
    } else {
      ScaffoldMessenger.of(context).showSnackBar(
             const SnackBar(
                   content: Text("Please enter a valid phone number!")
				)
			);
    }
Using the data stored on Firebase Firestore, we can prepare a chats list to show on the WhatsAppScreen of the applications. Create a new file called chats_list.dart and add the following code to it:
import 'package:cloud_firestore/cloud_firestore.dart';
import 'package:flutter/material.dart';
import 'package:hms_callkit/whatsapp_ui/utils/user_data.dart';

import '../app_navigation/app_router.dart';
import '../app_navigation/navigation_service.dart';

class ChatListScreen extends StatelessWidget {
  ChatListScreen({super.key});

  final Stream<QuerySnapshot> _postStream =
      FirebaseFirestore.instance.collection('users').snapshots();

  @override
  Widget build(BuildContext context) {
    return Scaffold(
      body: StreamBuilder(
          stream: _postStream,
          builder: (BuildContext context, AsyncSnapshot<dynamic> snapshot) {
            if (!snapshot.hasData) {
              return const Center(
                child: CircularProgressIndicator(),
              );
            }
            return ListView(
              children:
                  snapshot.data!.docs.map<Widget>((DocumentSnapshot document) {
                // PostData.fromMap(snapshot.data() as Map<String, dynamic>);
                Map<String, dynamic> data =
                    document.data()! as Map<String, dynamic>;
                return GestureDetector(
                  onTap: () {
                    NavigationService.instance
                        .pushNamedIfNotCurrent(AppRoute.whatsappChat,
                            args: UserData(
                              numberOfUser: data['number'],
                              fcmTokenOfUser: data['token'],
                            ));
                  },
                  child: Column(
                    children: [
                      ListTile(
                        leading: const Icon(
                          Icons.account_circle,
                          size: 50,
                        ),
                        title: Text(data['number']),
                        subtitle: Row(children: const [
                          Icon(
                            Icons.check,
                            size: 18,
                          ),
                          SizedBox(
                            width: 5,
                          ),
                          Text("You: Last message")
                        ]),
                      ),
                      const Divider(),
                    ],
                  ),
                );
              }).toList(),
            );
          }),
    );
  }
}
The ChatListScreen() also needs to be added on the WhatsAppScreen by modifying the body as below:
body: TabBarView(
          controller: tabBarController,
          children: [
            ChatListScreen(),
            const Text('Status Contact Screen'),
            const Text('Calls')
          ],
        ),
Finally, we add a ChatScreen to show individual chats.
This is the same screen users can initiate a video call from.
import 'package:flutter/material.dart';
import 'package:hms_callkit/whatsapp_ui/utils/colors.dart';
import 'package:hms_callkit/whatsapp_ui/utils/user_data.dart';

import '../app_navigation/app_router.dart';
import '../app_navigation/navigation_service.dart';
import '../hmssdk/join_service.dart';
import '../utility_functions.dart';

class ChatScreen extends StatelessWidget {
  UserData userData;
  ChatScreen({super.key, required this.userData});

  @override
  Widget build(BuildContext context) {
    return Scaffold(
      appBar: AppBar(
        elevation: 0,
        backgroundColor: appBarColor,
        centerTitle: false,
        leadingWidth: 20,
        title: Row(
          children: [
            const Icon(
              Icons.account_circle,
              size: 40,
            ),
            const SizedBox(
              width: 5,
            ),
            Text(
              userData.numberOfUser,
              style: const TextStyle(
                fontSize: 20,
                color: Colors.grey,
                fontWeight: FontWeight.bold,
              ),
            ),
          ],
        ),
        actions: [
          IconButton(
            icon: const Icon(Icons.video_call, color: Colors.grey),
            onPressed: () async {
              await getPermissions();
              //Enter the tokenEndPoint, role and userId here
              //TODO: CLEAR OUT DATA
              String? authToken = await getAuthToken(
                  roomId: "<YOUR ROOMID HERE>",
                  role: "host",
                  tokenEndpoint:
                      "<YOUR TOKEN ENDPOINT HERE>/api/token",
                  userId: "USER${userData.numberOfUser}");
              //Checking whether authentication token is null or not
              if (authToken != null) {
                call(
                    receiverFCMToken: userData.fcmTokenOfUser,
                    authToken: authToken);

                NavigationService.instance.pushNamedIfNotCurrent(
                    AppRoute.previewPage,
                    args: authToken);
              } else {
                ScaffoldMessenger.of(context).showSnackBar(
                    const SnackBar(content: Text("Auth token is null")));
              }
            },
          ),
          IconButton(
            icon: const Icon(Icons.call, color: Colors.grey),
            onPressed: () {},
          ),
          PopupMenuButton(
            icon: const Icon(
              Icons.more_vert,
              color: Colors.grey,
            ),
            itemBuilder: (context) => [
              PopupMenuItem(
                  child: const Text(
                    'View contact',
                  ),
                  onTap: () {})
            ],
          ),
        ],
      ),
    );
  }
}
Remember to pass your Room Id and Token endpoint, copied earlier in the tutorial, to
getAuthTokenfunction in the code above.
We also need to modify the app_router.dart to configure Navigation in the application.
			case whatsappLogin:
        return MaterialPageRoute(
            builder: (_) => const LoginScreen(), settings: settings);
      case whatsappHome:
        return MaterialPageRoute(
            builder: (_) => const WhatsAppScreen(), settings: settings);
      case whatsappChat:
        return MaterialPageRoute(
            builder: (_) => ChatScreen(
                  userData: settings.arguments as UserData,
                ),
            settings: settings);
And, update the initialRoute in main.dart to:
initialRoute: AppRoute.whatsappLogin
We are now ready to test the application! 🥳
Note: The complete code for this project is available on GitHub here.
Testing The Demo
It is time to test our WhatsApp Call Kit demo.
- Launch the application on two emulators or mobile devices.
- Pick a country and enter a phone number. Click on ‘NEXT’ to navigate to the HomeScreen. Do this on both devices or emulators.
- The data fetched from Firestore should list all devices signed into the app.
- From your first device, select the number logged into the second one and open the chat. Click on the Video Call icon to start a new call.
- The second device should then receive a notification which can be tapped on to accept the call and join room.
Voila! We have successfully created a WhatsApp-like audio/video-calling app in Flutter using 100ms.
Conclusion
This project is only a starting point for building out different applications using 100ms and CallKit.
You can use a similar system to notify users of upcoming scheduled meetings. An example of this would be virtual doctor-patient appointments or scheduled live lectures in a learning app.
Do join our Discord Server to follow along with our latest developments and get your queries answered.
Engineering
Share
Related articles
See all articles