Screen Share
100ms React Native Package provides support for sharing the entire screen of the device to the room.
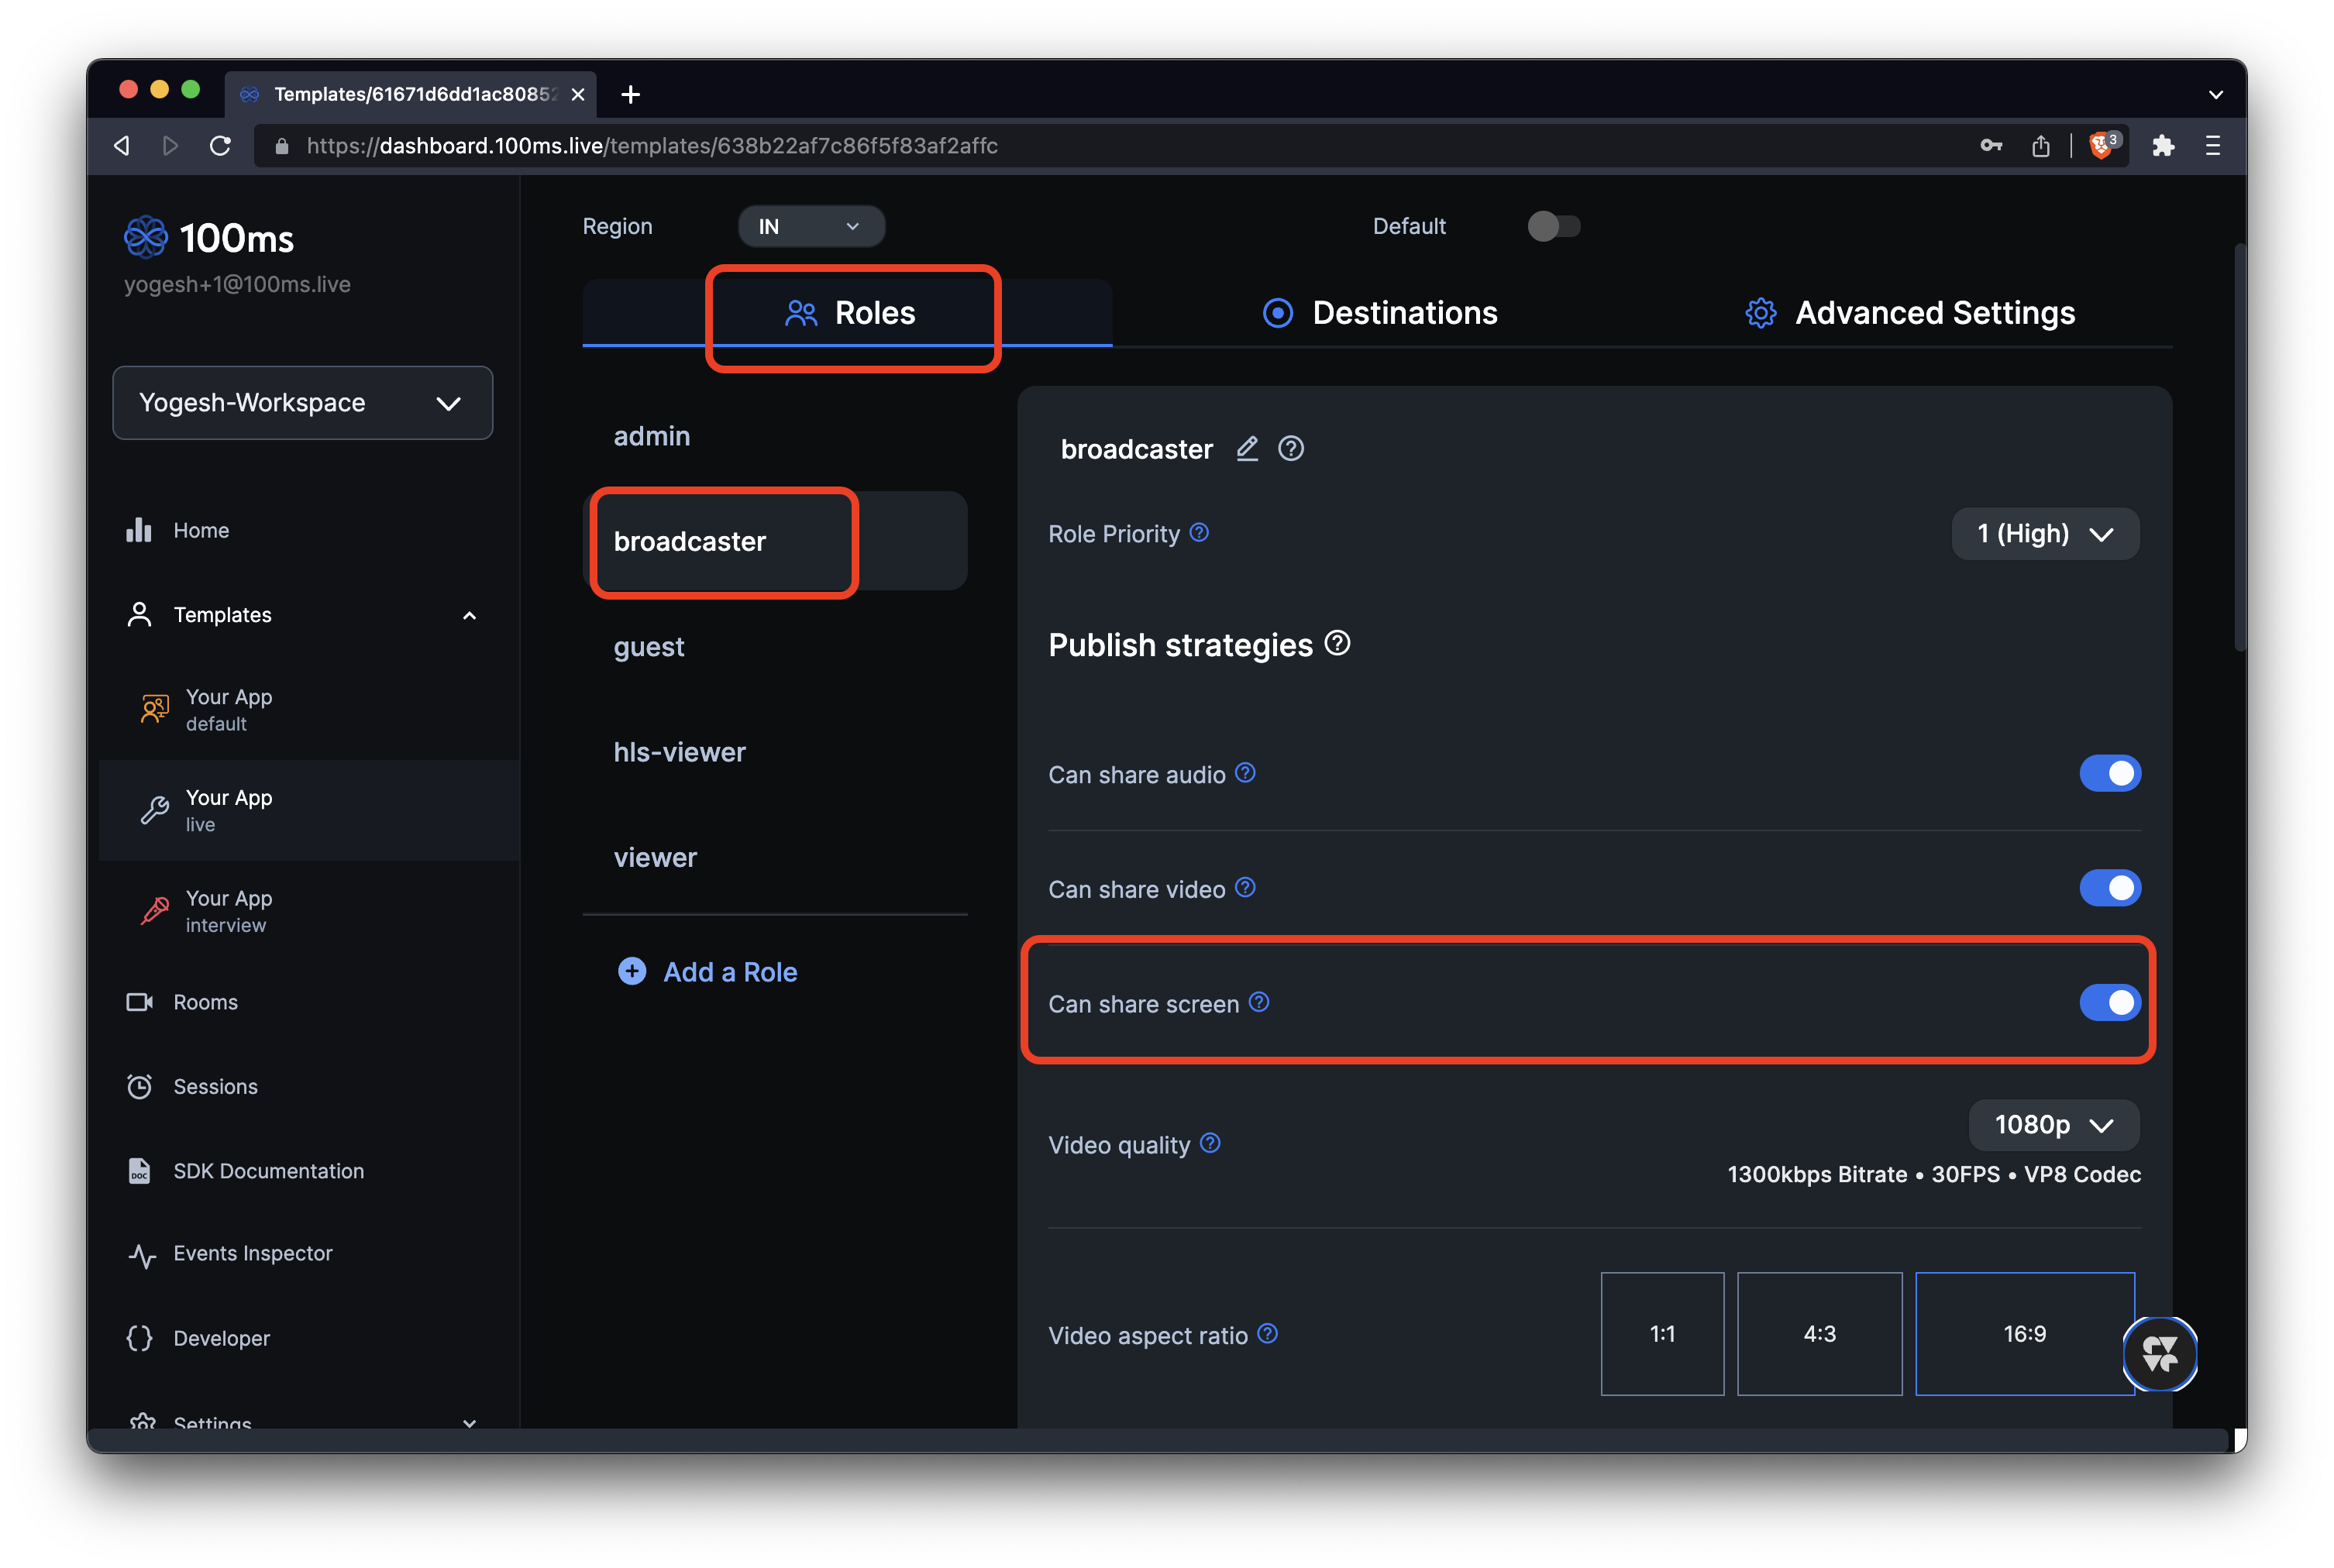
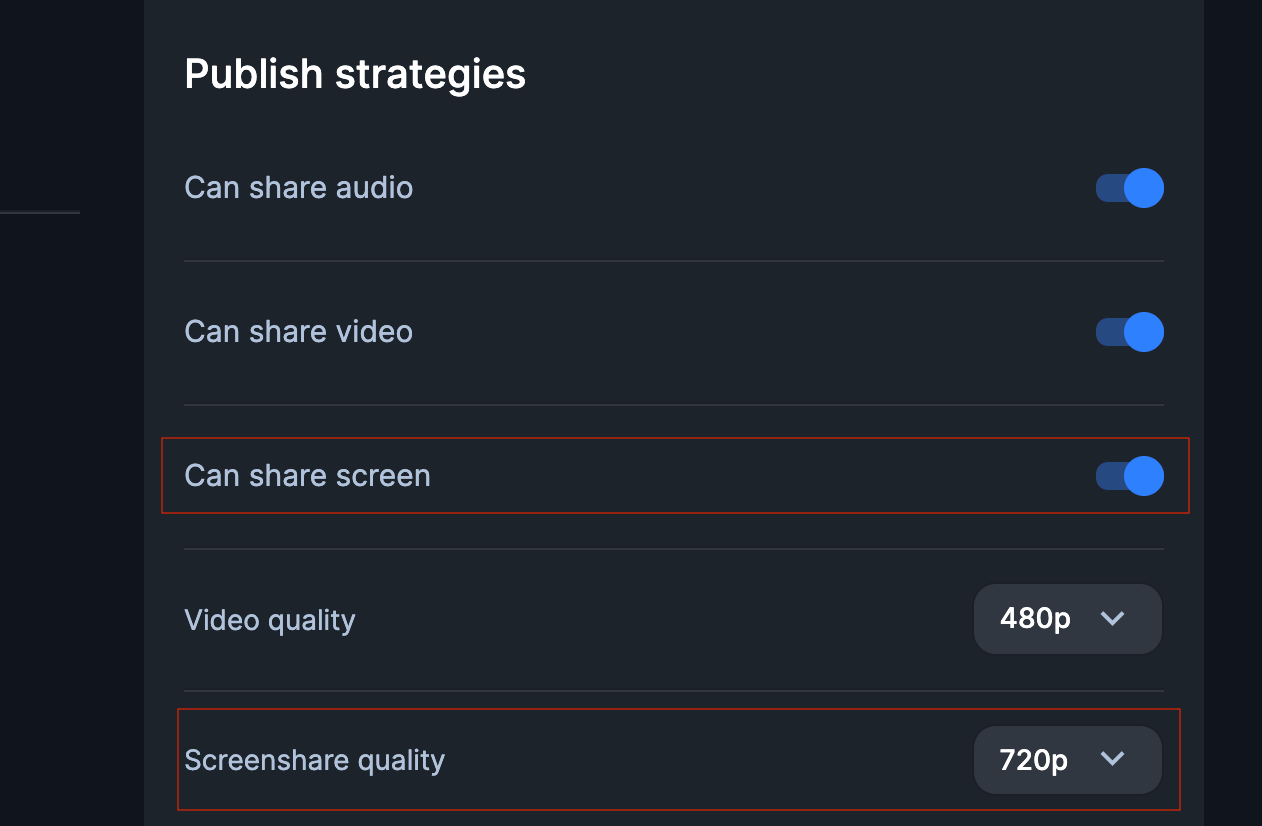
Please note that for a peer to share their screen, their role must have screenshare enabled in the dashboard. Also select the appropriate resolution for the Screen share quality. 1080p is recommended for better text readability.
Android Setup
Step 1 - Add Screenshare Activity in your AndroidManifest file
Add HmsScreenshareActivity to manifest located at android/app/src/main/AndroidManifest.xml as follows -
<application
  android:name=".MainApplication"
  ...
  android:label="@string/app_name">

  ...
  <!-- Add below activity in your "application" tag -->
  <activity
    android:name="com.reactnativehmssdk.HmsScreenshareActivity"
    android:label="@string/app_name" />
  ...

</application>
Step 2 - Add Permission in in your AndroidManifest file
If you are targeting Android 14 and above, You also need to add FOREGROUND_SERVICE_MEDIA_PROJECTION permission in manifest located at android/app/src/main/AndroidManifest.xml as follows -
<manifest {...}><uses-permission android:name="android.permission.FOREGROUND_SERVICE_MEDIA_PROJECTION" />{...} </manifest>
iOS Setup
You need to create an iOS broadcast upload extension. It uses Apple's ReplayKit framework to record the device screen and delivers frame samples to your broadcast extension. You can share not only your own app but also the entire device sceeen including other apps on the device.
Step 1 - Open Xcode project at the
Open your iOS Xcode project xed ios.
Step 2 - Add Broadcast Upload Extension
Click on your project in the Project Navigator to show the project settings. Press + at the bottom of the target list to add a new target.
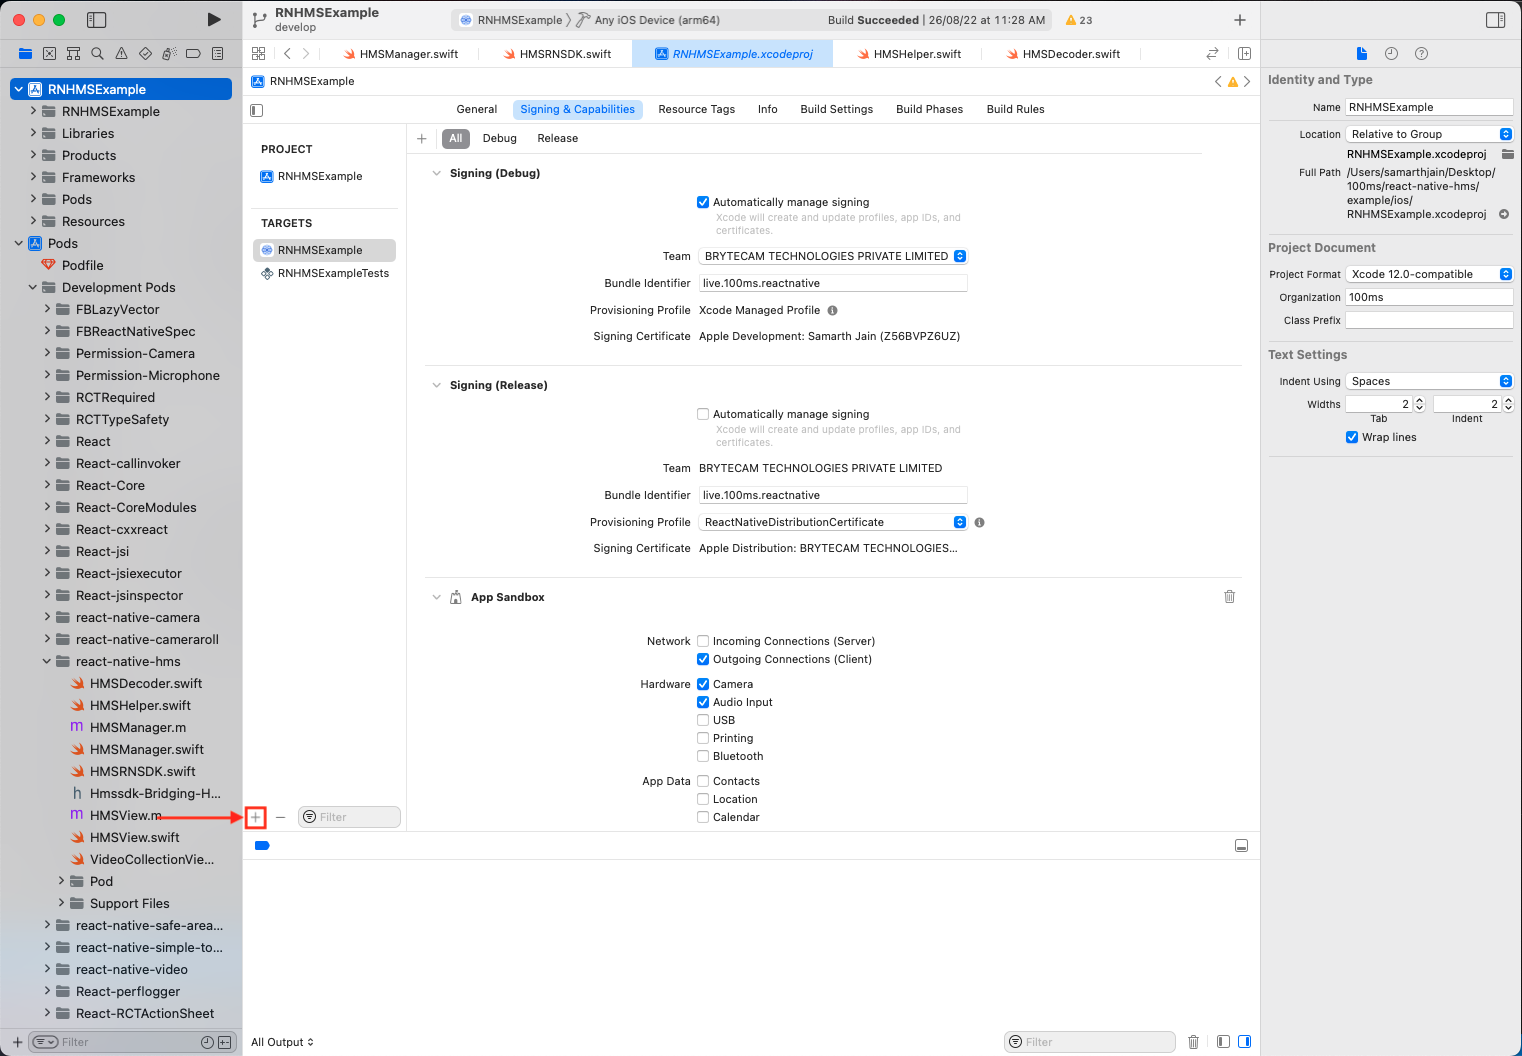
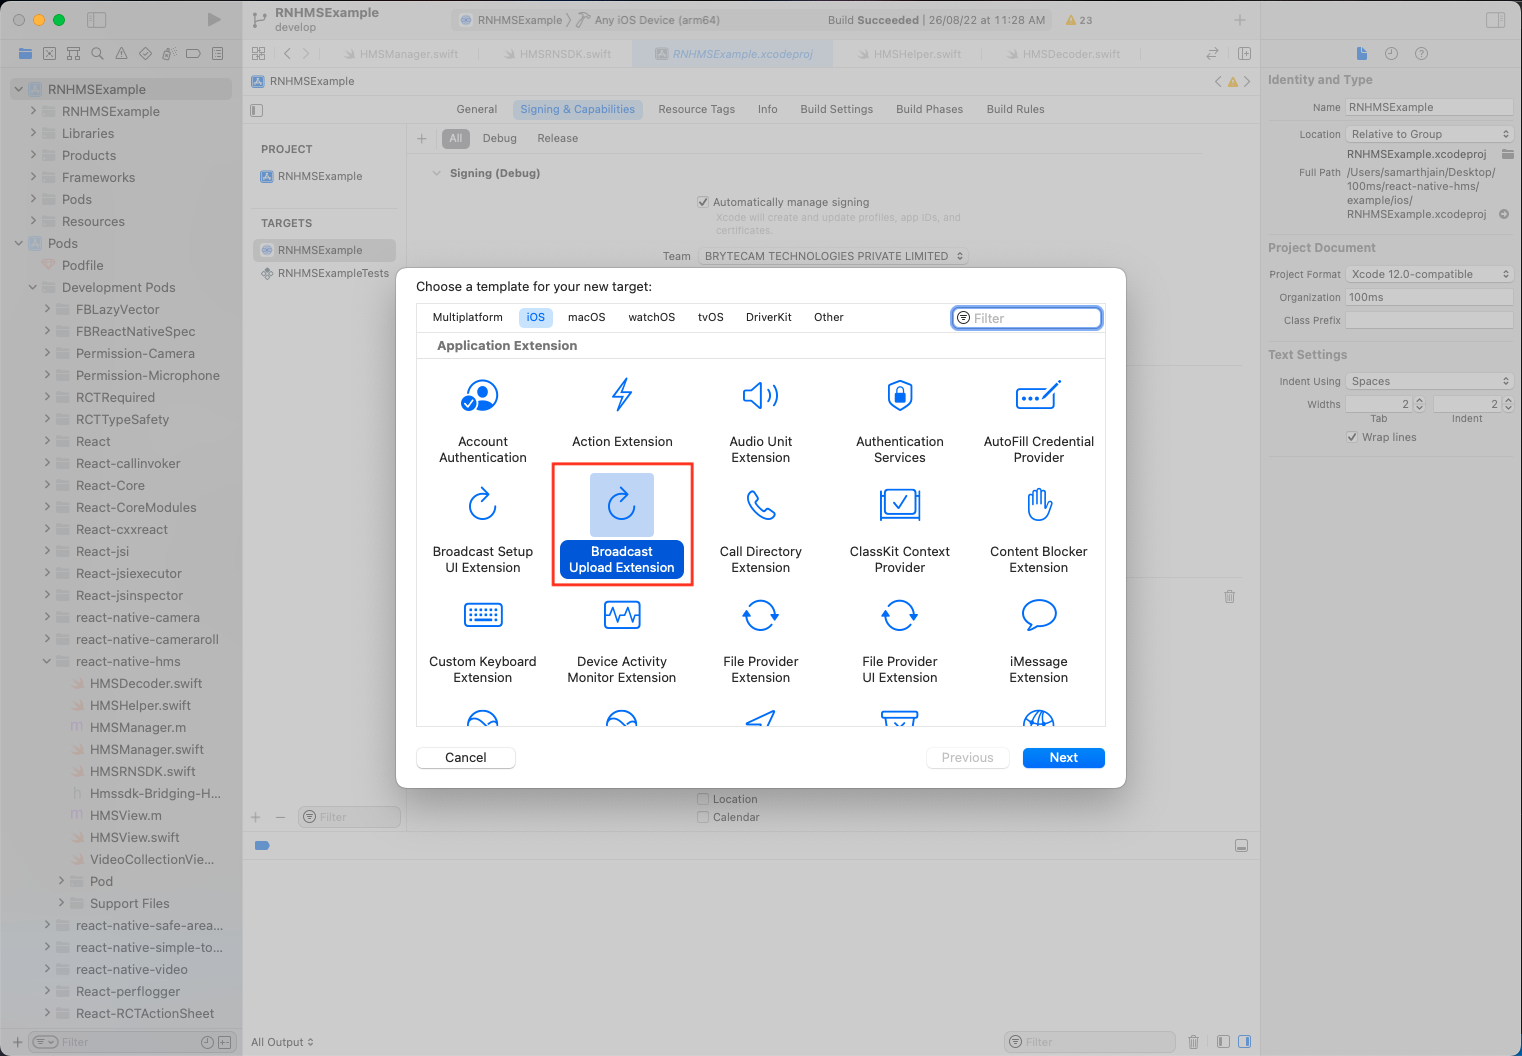
Select the Broadcast Upload Extension type for your new target.
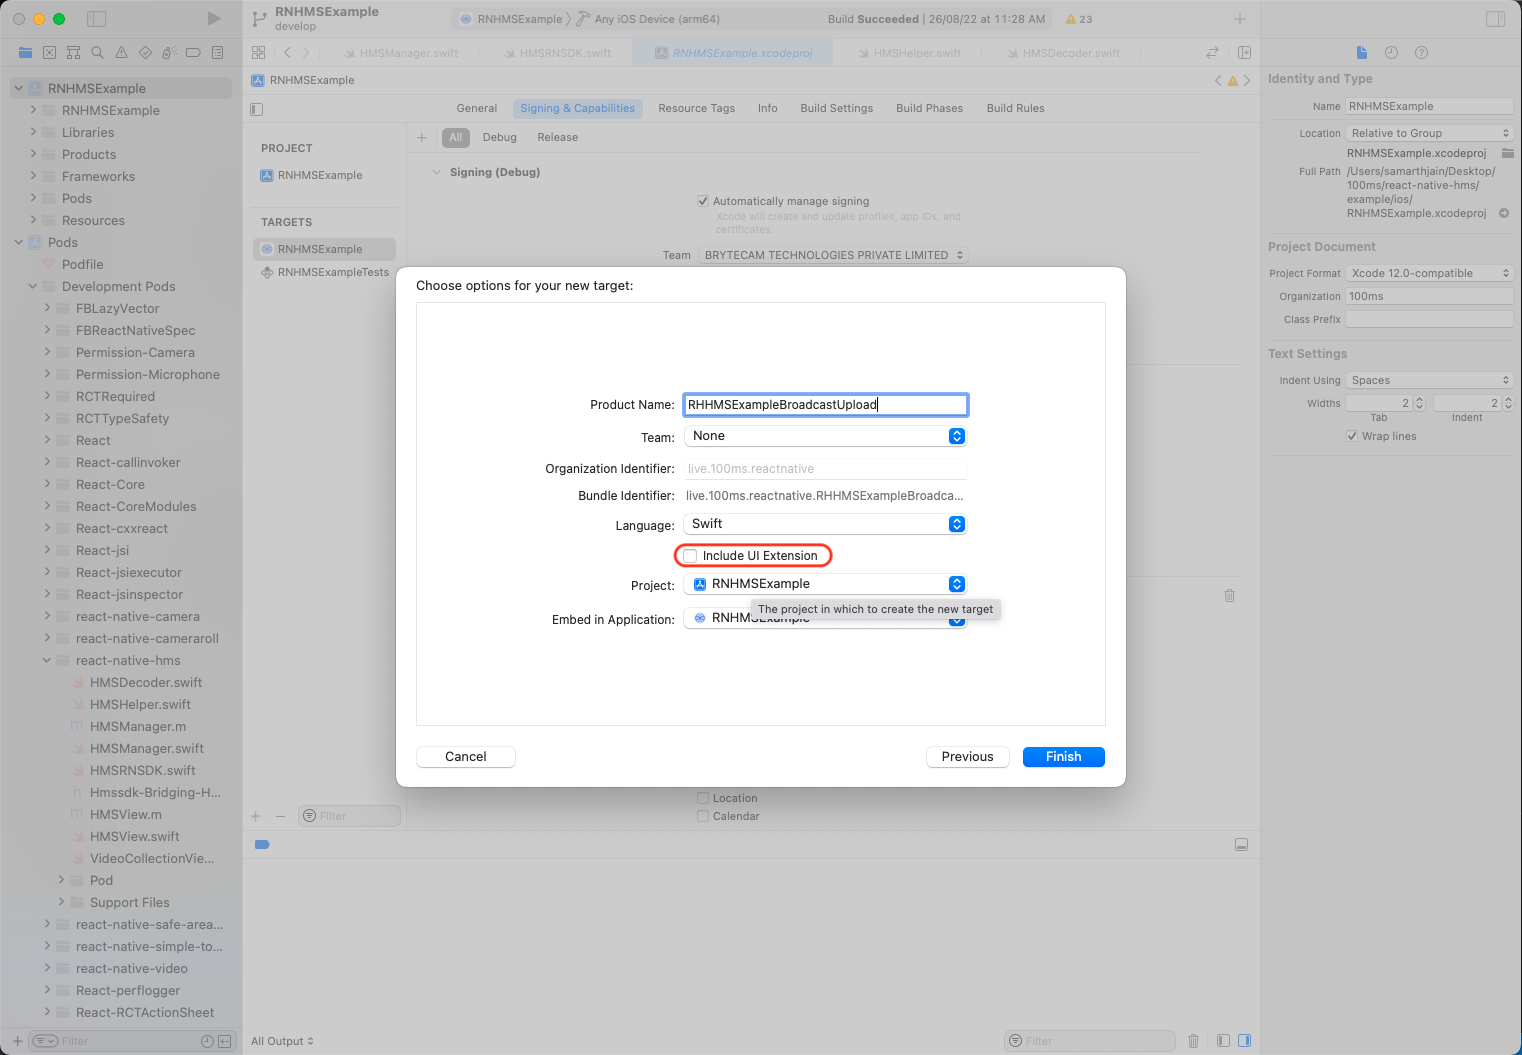
Enter your new target detail in the dialog. Uncheck Include UI Extension option.
In the following dialog, activate the new scheme for the new target.

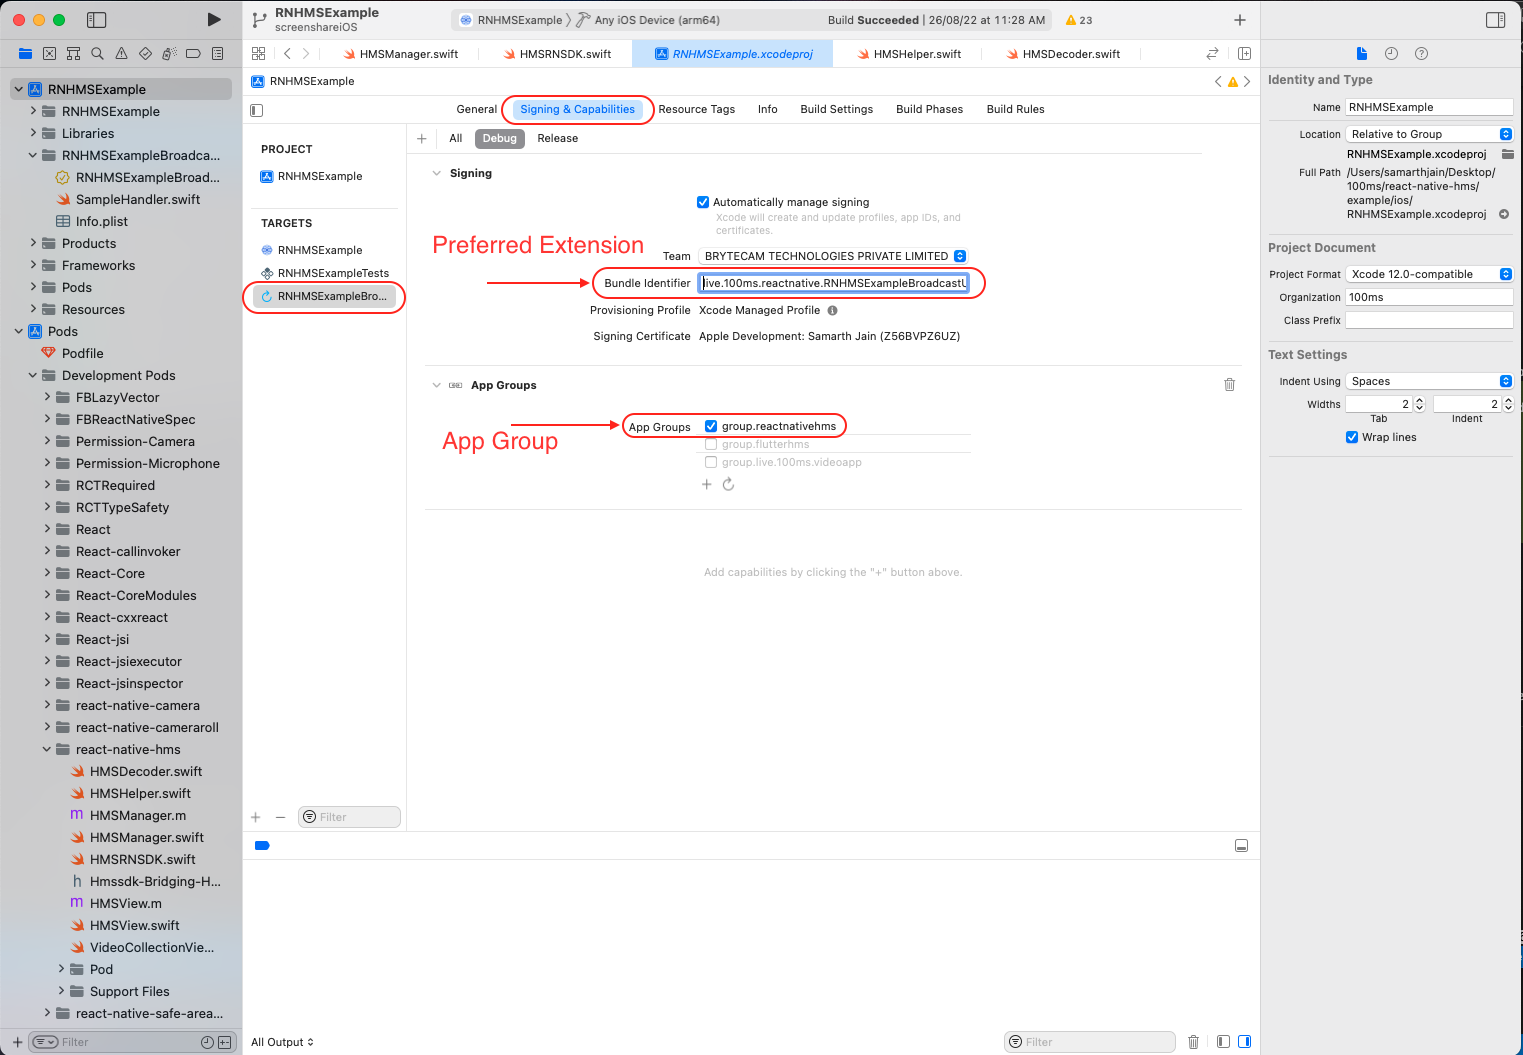
Step 3 - Add App Group
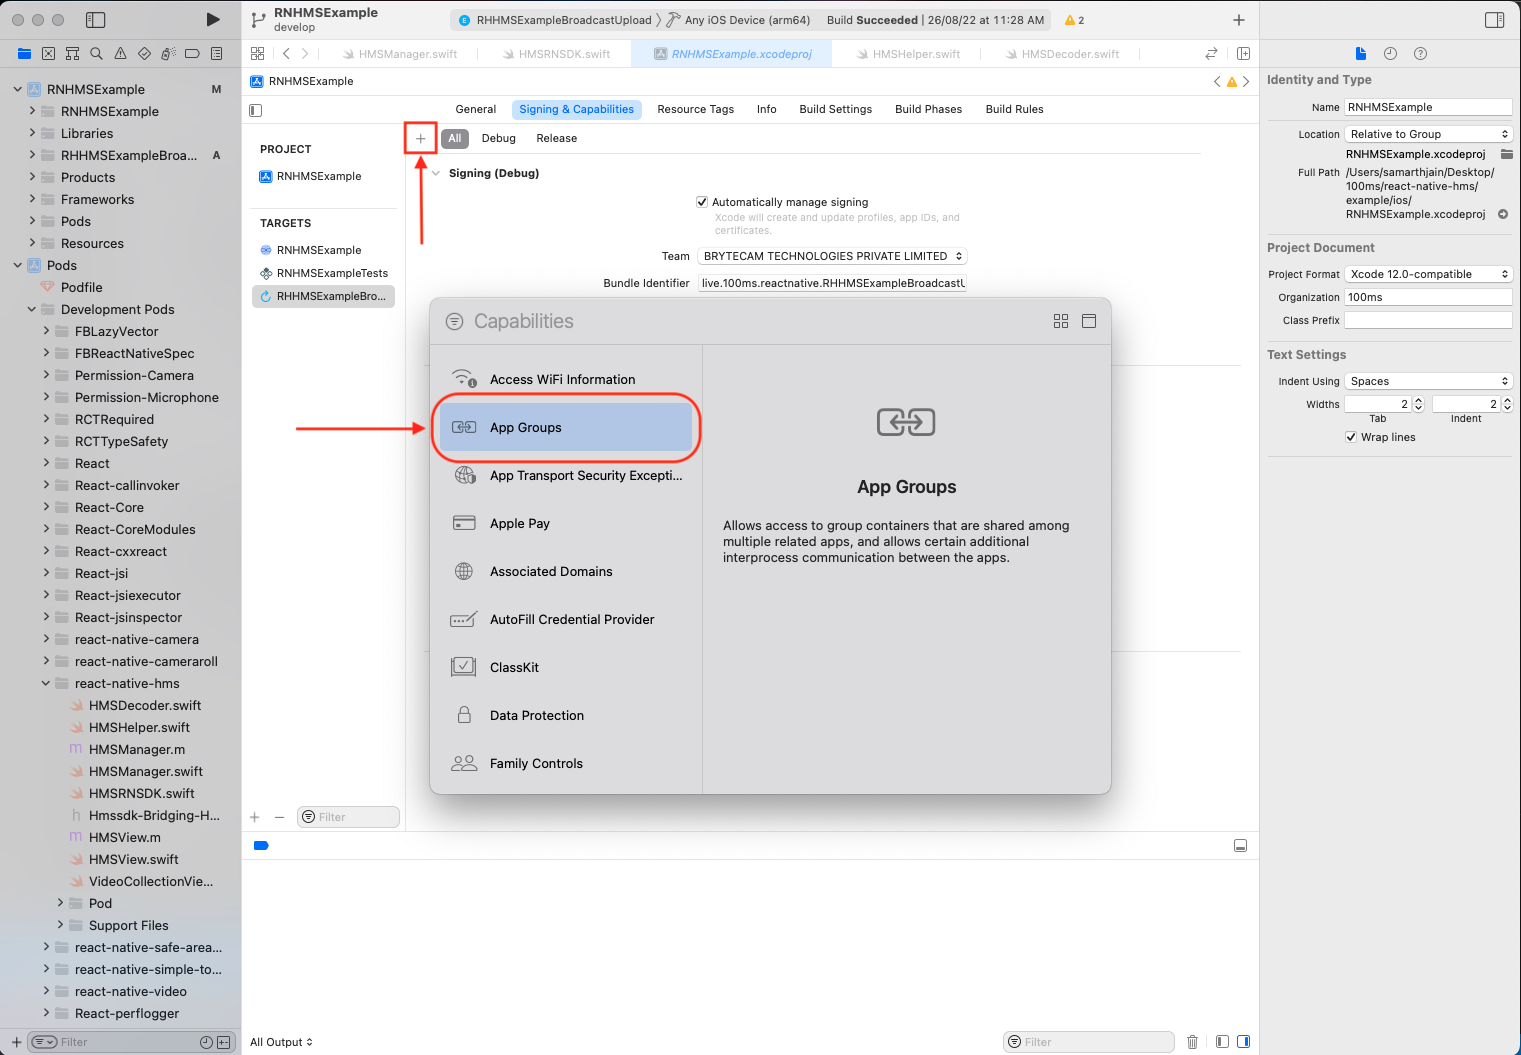
Click + icon in Signing & Capabilities section.
Select App Group from the list of Capabilities.
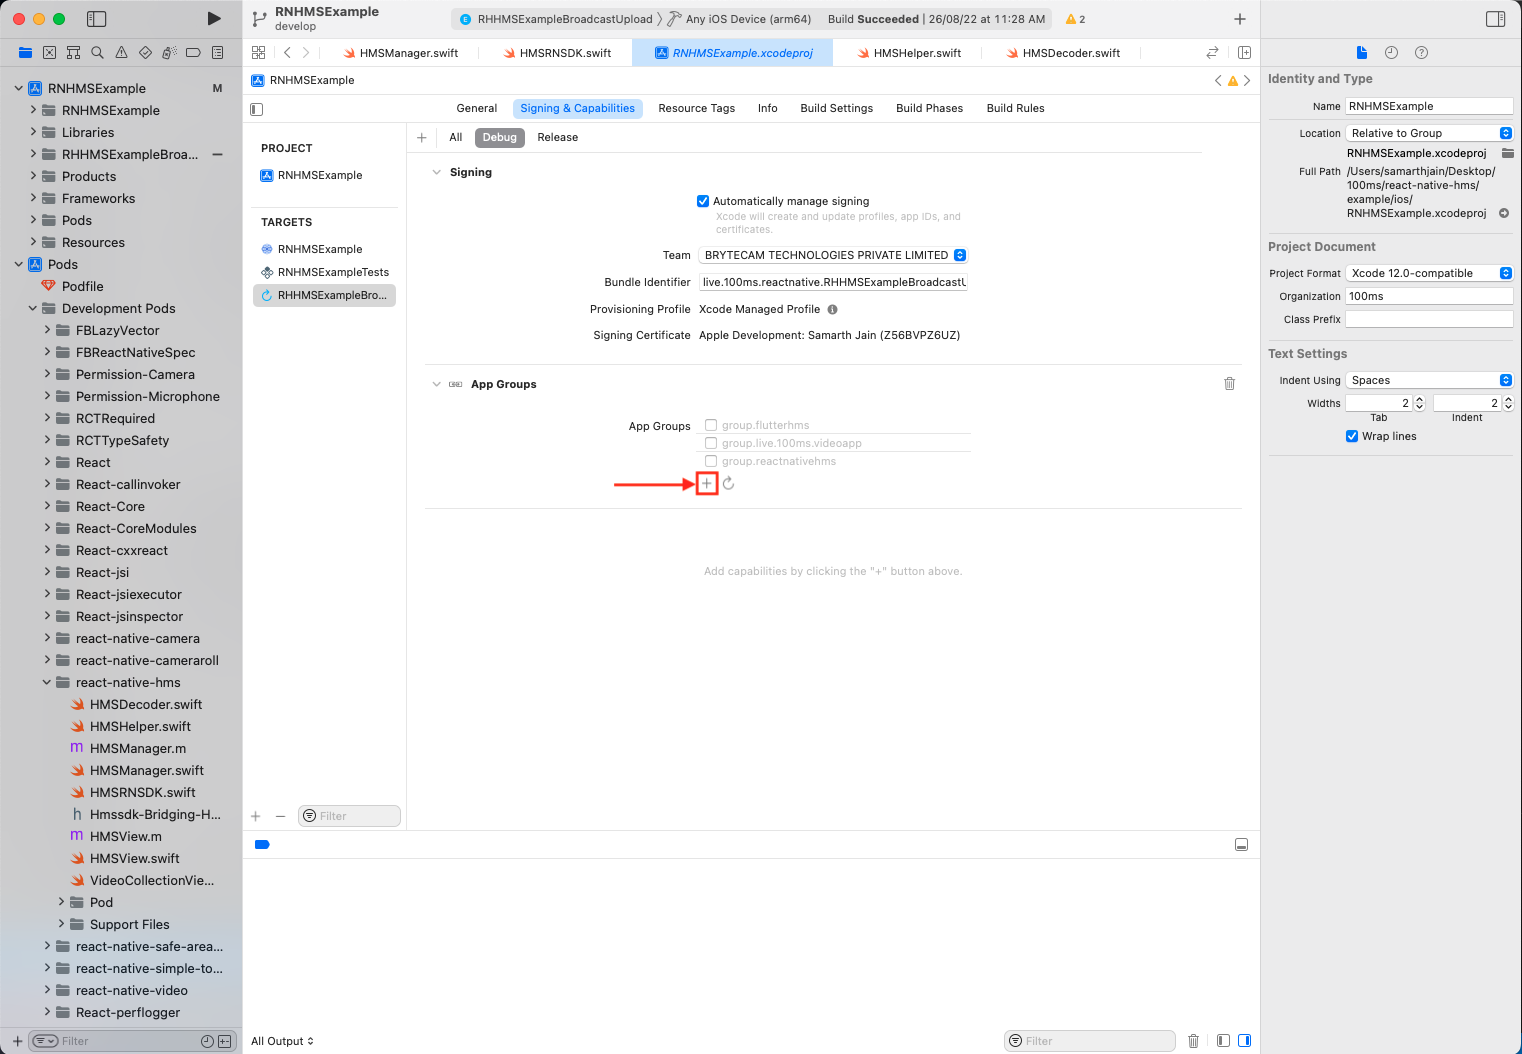
New section should be added under Signing & Capabilities named App Groups. Click + icon under that.
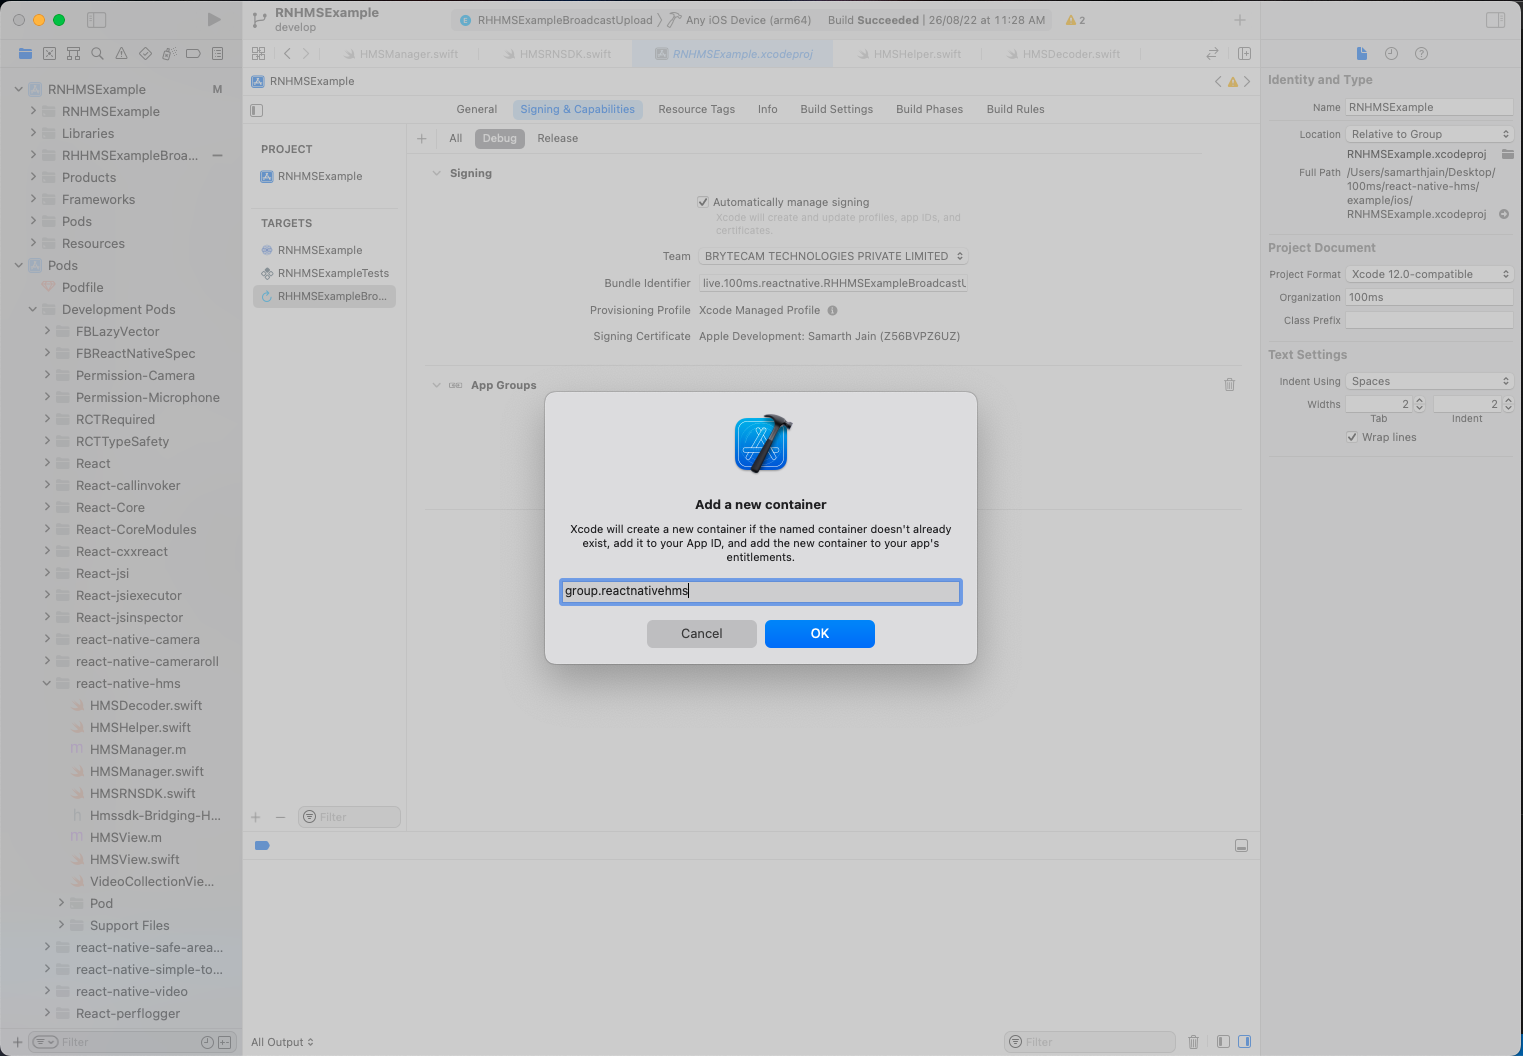
Enter App Aroup name. This must be unique to your Apple Development Account. The standard practice is to use your domain name like group.your.domain.name.
Step 4 - Edit Podfile
In ios folder of your react project and open Podfile.
Paste the following code and replace the extension name you just created:
# ENSURE TO SET THE CORRECT SCREENSHARE EXTENSION TARGET NAME BELOW
target 'RNHMSExampleBroadcastUpload' do
  use_modular_headers!
  pod 'HMSBroadcastExtensionSDK'
end
A sample of complete Podfile snippet after adding the Screenshare Target is as follows -
require_relative '../node_modules/react-native/scripts/react_native_pods'
require_relative '../node_modules/@react-native-community/cli-platform-ios/native_modules'

platform :ios, '13.0'

# ENSURE TO SET THE CORRECT EXTENSION TARGET NAME BELOW.
# Not required if starting Screenshare from iOS devices is not a feature of the app. Then Remove this Target snippet
target 'RNHMSExampleBroadcastUpload' do
  use_modular_headers!
  pod 'HMSBroadcastExtensionSDK'
end

# ENSURE TO SET THE CORRECT MAIN APP TARGET NAME BELOW
target 'RNHMSExample' do
  config = use_native_modules!
  permissions_path = '../node_modules/react-native-permissions/ios'

  use_react_native!(
    :path => config[:reactNativePath],
    # to enable hermes on iOS, change `false` to `true` and then install pods
    # :hermes_enabled => false
    :hermes_enabled => true
  )

  pod 'Permission-Camera', :path => "#{permissions_path}/Camera"
  pod 'Permission-Microphone', :path => "#{permissions_path}/Microphone"

  target 'RNHMSExampleTests' do
    inherit! :complete
    # Pods for testing
  end

  # Enables Flipper.
  #
  # Note that if you have use_frameworks! enabled, Flipper will not work and
  # you should disable the next line.
  use_flipper!()

  # POST INSTALL SCRIPT TO DISABLE BITCODE FROM ALL PODS & EXCLUDE arm64 FROM SIMULATORS
  post_install do |installer|
    react_native_post_install(installer)
    installer.pods_project.build_configurations.each do |config|
      config.build_settings["EXCLUDED_ARCHS[sdk=iphonesimulator*]"] = "arm64"
      config.build_settings['ENABLE_BITCODE'] = 'NO'
    end
  end
end

In Terminal, change the directory to ios and run pod install command.
Step 5 - Edit SampleHandler
Open the SampleHandler.swift file. It would be available in your TARGET_NAME > ExtensionName Xcode folder.
For example, RNHMSExample > ExtensionName then SampleHandler.swift file.
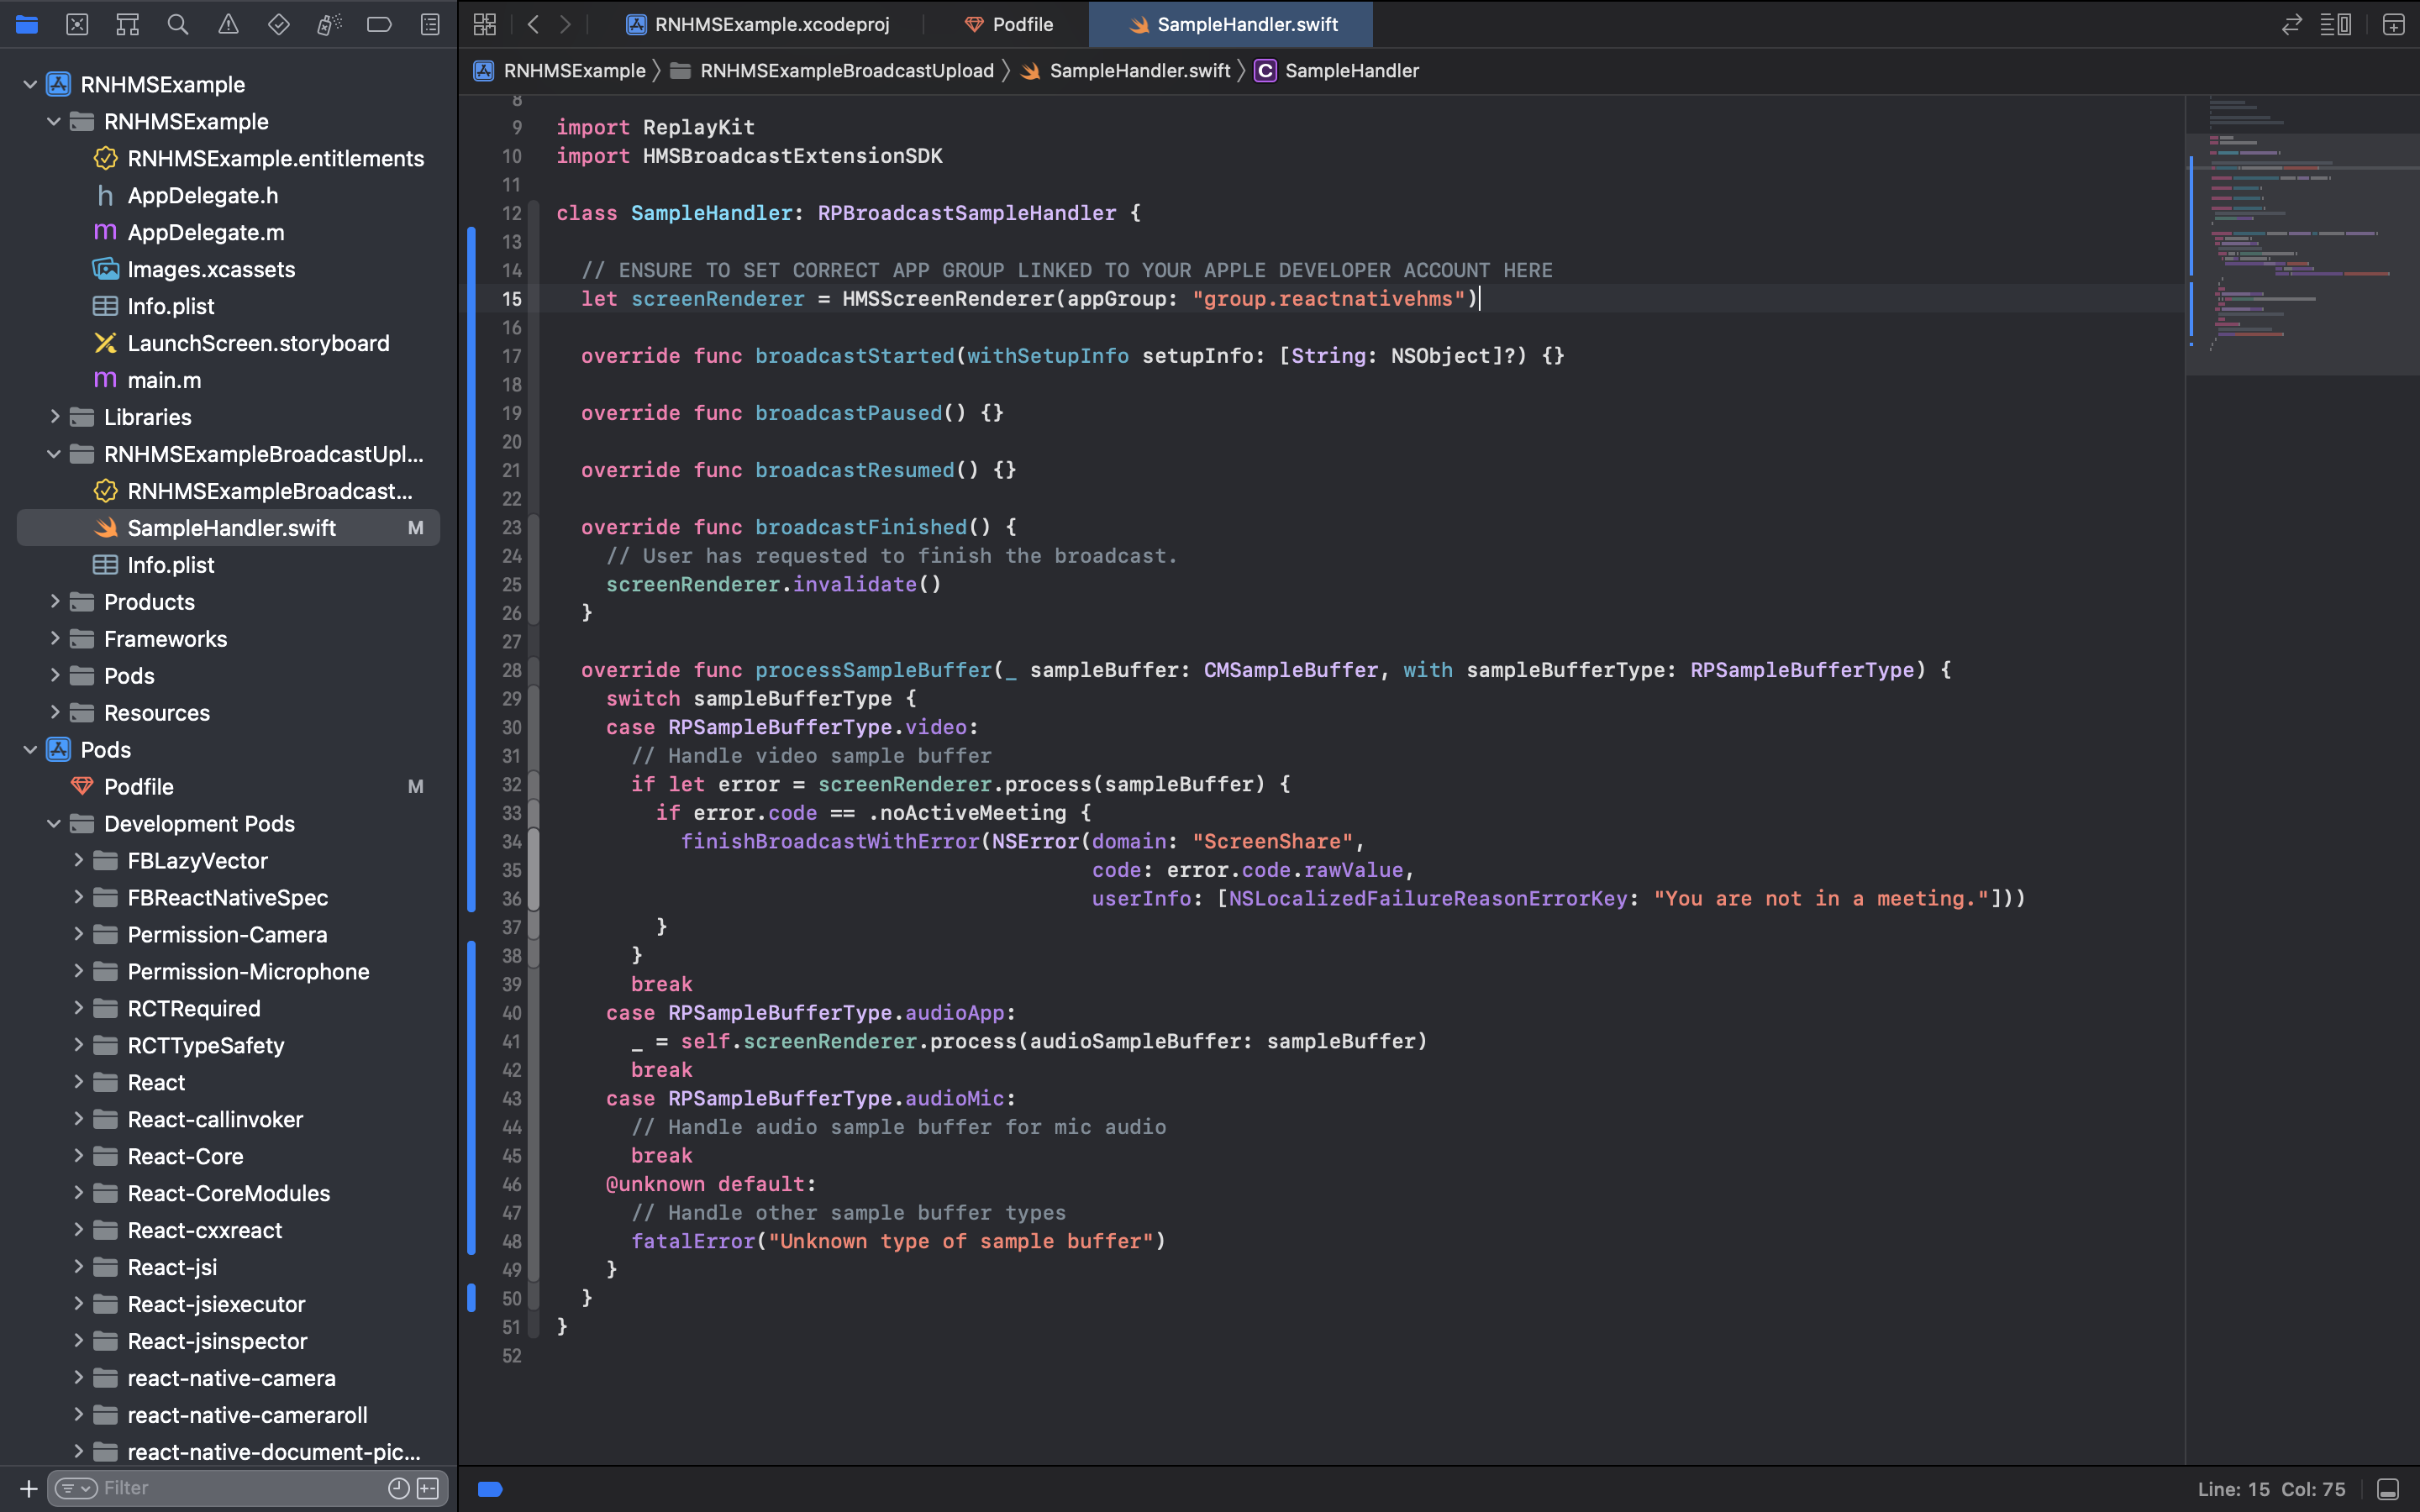
Replace the default SampleHandler.swift file with the code below and pset the correct App Group created for your Apple Developer Account.
import ReplayKit
import HMSBroadcastExtensionSDK

class SampleHandler: RPBroadcastSampleHandler {

  // ENSURE TO SET CORRECT APP GROUP LINKED TO YOUR APPLE DEVELOPER ACCOUNT HERE
  let screenRenderer = HMSScreenRenderer(appGroup: "group.reactnativehms")

  override func broadcastStarted(withSetupInfo setupInfo: [String: NSObject]?) {
  }

  override func broadcastPaused() {
  }

  override func broadcastResumed() {
  }

  override func broadcastFinished() {
    screenRenderer.invalidate()
  }

  override func processSampleBuffer(_ sampleBuffer: CMSampleBuffer, with sampleBufferType: RPSampleBufferType) {
    switch sampleBufferType {
    case RPSampleBufferType.video:
      // Handle video sample buffer
      if let error = screenRenderer.process(sampleBuffer) {
        if error.code == .noActiveMeeting {
          finishBroadcastWithError(NSError(domain: "ScreenShare",
                                           code: error.code.rawValue,
                                           userInfo: [NSLocalizedFailureReasonErrorKey: "You are not in a meeting."]))
        }
      }
      break
    case RPSampleBufferType.audioApp:
      _ = self.screenRenderer.process(audioSampleBuffer: sampleBuffer)
      break
    case RPSampleBufferType.audioMic:
      // Handle audio sample buffer for mic audio
      break
    @unknown default:
      // Handle other sample buffer types
      fatalError("Unknown type of sample buffer")
    }
  }
}
Start Screenshare
To start screen share, app needs to call the startScreenshare method of HMSSDK instance.
To start screen share in iOS you need to pass App Group and Preferred Extension name while creating HMSSDK instance as follows:
// Create `HMSSDK` instance with `appGroup` and `preferredExtension` properties
const hmsInstance = await HMSSDK.build({
    appGroup: 'group.reactnativehms', // ensure to pass the correct App Group linked to your Apple Developer Account
    preferredExtension: 'RHHMSExampleBroadcastUpload', // ensure to pass the correct Extension Target name created in Xcode
});

...

// Start Screenshare
try {
  await hmsInstance.startScreenshare();
  console.log('Start startScreenshare Success');
} catch(error) {
  console.log('Start startScreenshare Error: ', error);
}
You can find app group and extension name in Xcode under Signing and Capabilities section under target > yourExtensionName.
Stop Screenshare
To stop screen share, application needs to call the stopScreenshare method of HMSSDK instance.
try {
    await hmsInstance.stopScreenshare();
    console.log('Stop Screenshare Success');
} catch (error) {
    console.log('Stop Screenshare Error: ', error);
}
How to get Screen Share Status
Application needs to call the isScreenShared method of HMSSDK instance. This method returns true inscase Screenshare is currently active and being used, and false for inactive state.
try {
    await hmsInstance.isScreenShared();
    console.log('Is Screenshare Success');
} catch (error) {
    console.log('Is Screenshare Error: ', error);
}
Render Screenshare Track
You can get screenshare track in two ways:
- from
HMSUpdateListenerActions.ON_TRACK_UPDATEevent, when the track is added - from peers'
auxiliaryTracksproperty
Note: Screenshare track can be differentiated from normal track using tracks' source property - track.source === "SCREEN" for screenshare tracks
Code snippet to get screenshare track from HMSUpdateListenerActions.ON_TRACK_UPDATE event -
const [peerTrackNodes, setPeerTrackNodes] = useState([]);

// Get screenshare track from onTrackListener
const onTrackListener = ({
  peer,
  track,
  type,
}: {
  peer: HMSPeer;
  track: HMSTrack;
  type: HMSTrackUpdate;
}) => {
  if(
    type === HMSTrackUpdate.TRACK_ADDED && // track is added
    track.source === HMSTrackSource.SCREEN && // track source is screenshare
    track.type === HMSTrackType.VIDEO // track type is video
  ) {
    // Saving screenshare track and peer to render it
    setPeerTrackNodes(prevNodes => {
      return [
        { id: peer.peerID + track.trackId, peer, track, },
        ...prevNodes
      ];
    });
  }
};

...

const HmsView = hmsInstance.HmsView;

<HmsView trackId={peerTrackNodes[0]?.trackId} />
Code snippet to get screenshare track from peers' auxiliaryTracks property -
const remotePeers = await hmsInstance.getRemotePeers();

const firstPeer = remotePeers[0];

// Get screenshare track from peer
const firstPeerScreenshareTrack = firstPeer.auxiliaryTracks.find(auxiliaryTrack => {
  return (
    auxiliaryTrack.source === HMSTrackSource.SCREEN && // track source is screenshare
      auxiliaryTrack.type === HMSTrackType.VIDEO // track type is video
  );
});

...

const HmsView = hmsInstance?.HmsView;

<HmsView trackId={firstPeerScreenshareTrack?.trackId} />
Refer to Render Video docs to know more about HmsView component and help in rendering video.
Troubleshooting Guide
For starting Screenshare from iOS devices (iPhones or iPads) following are some common setup you should already have within your Apps -
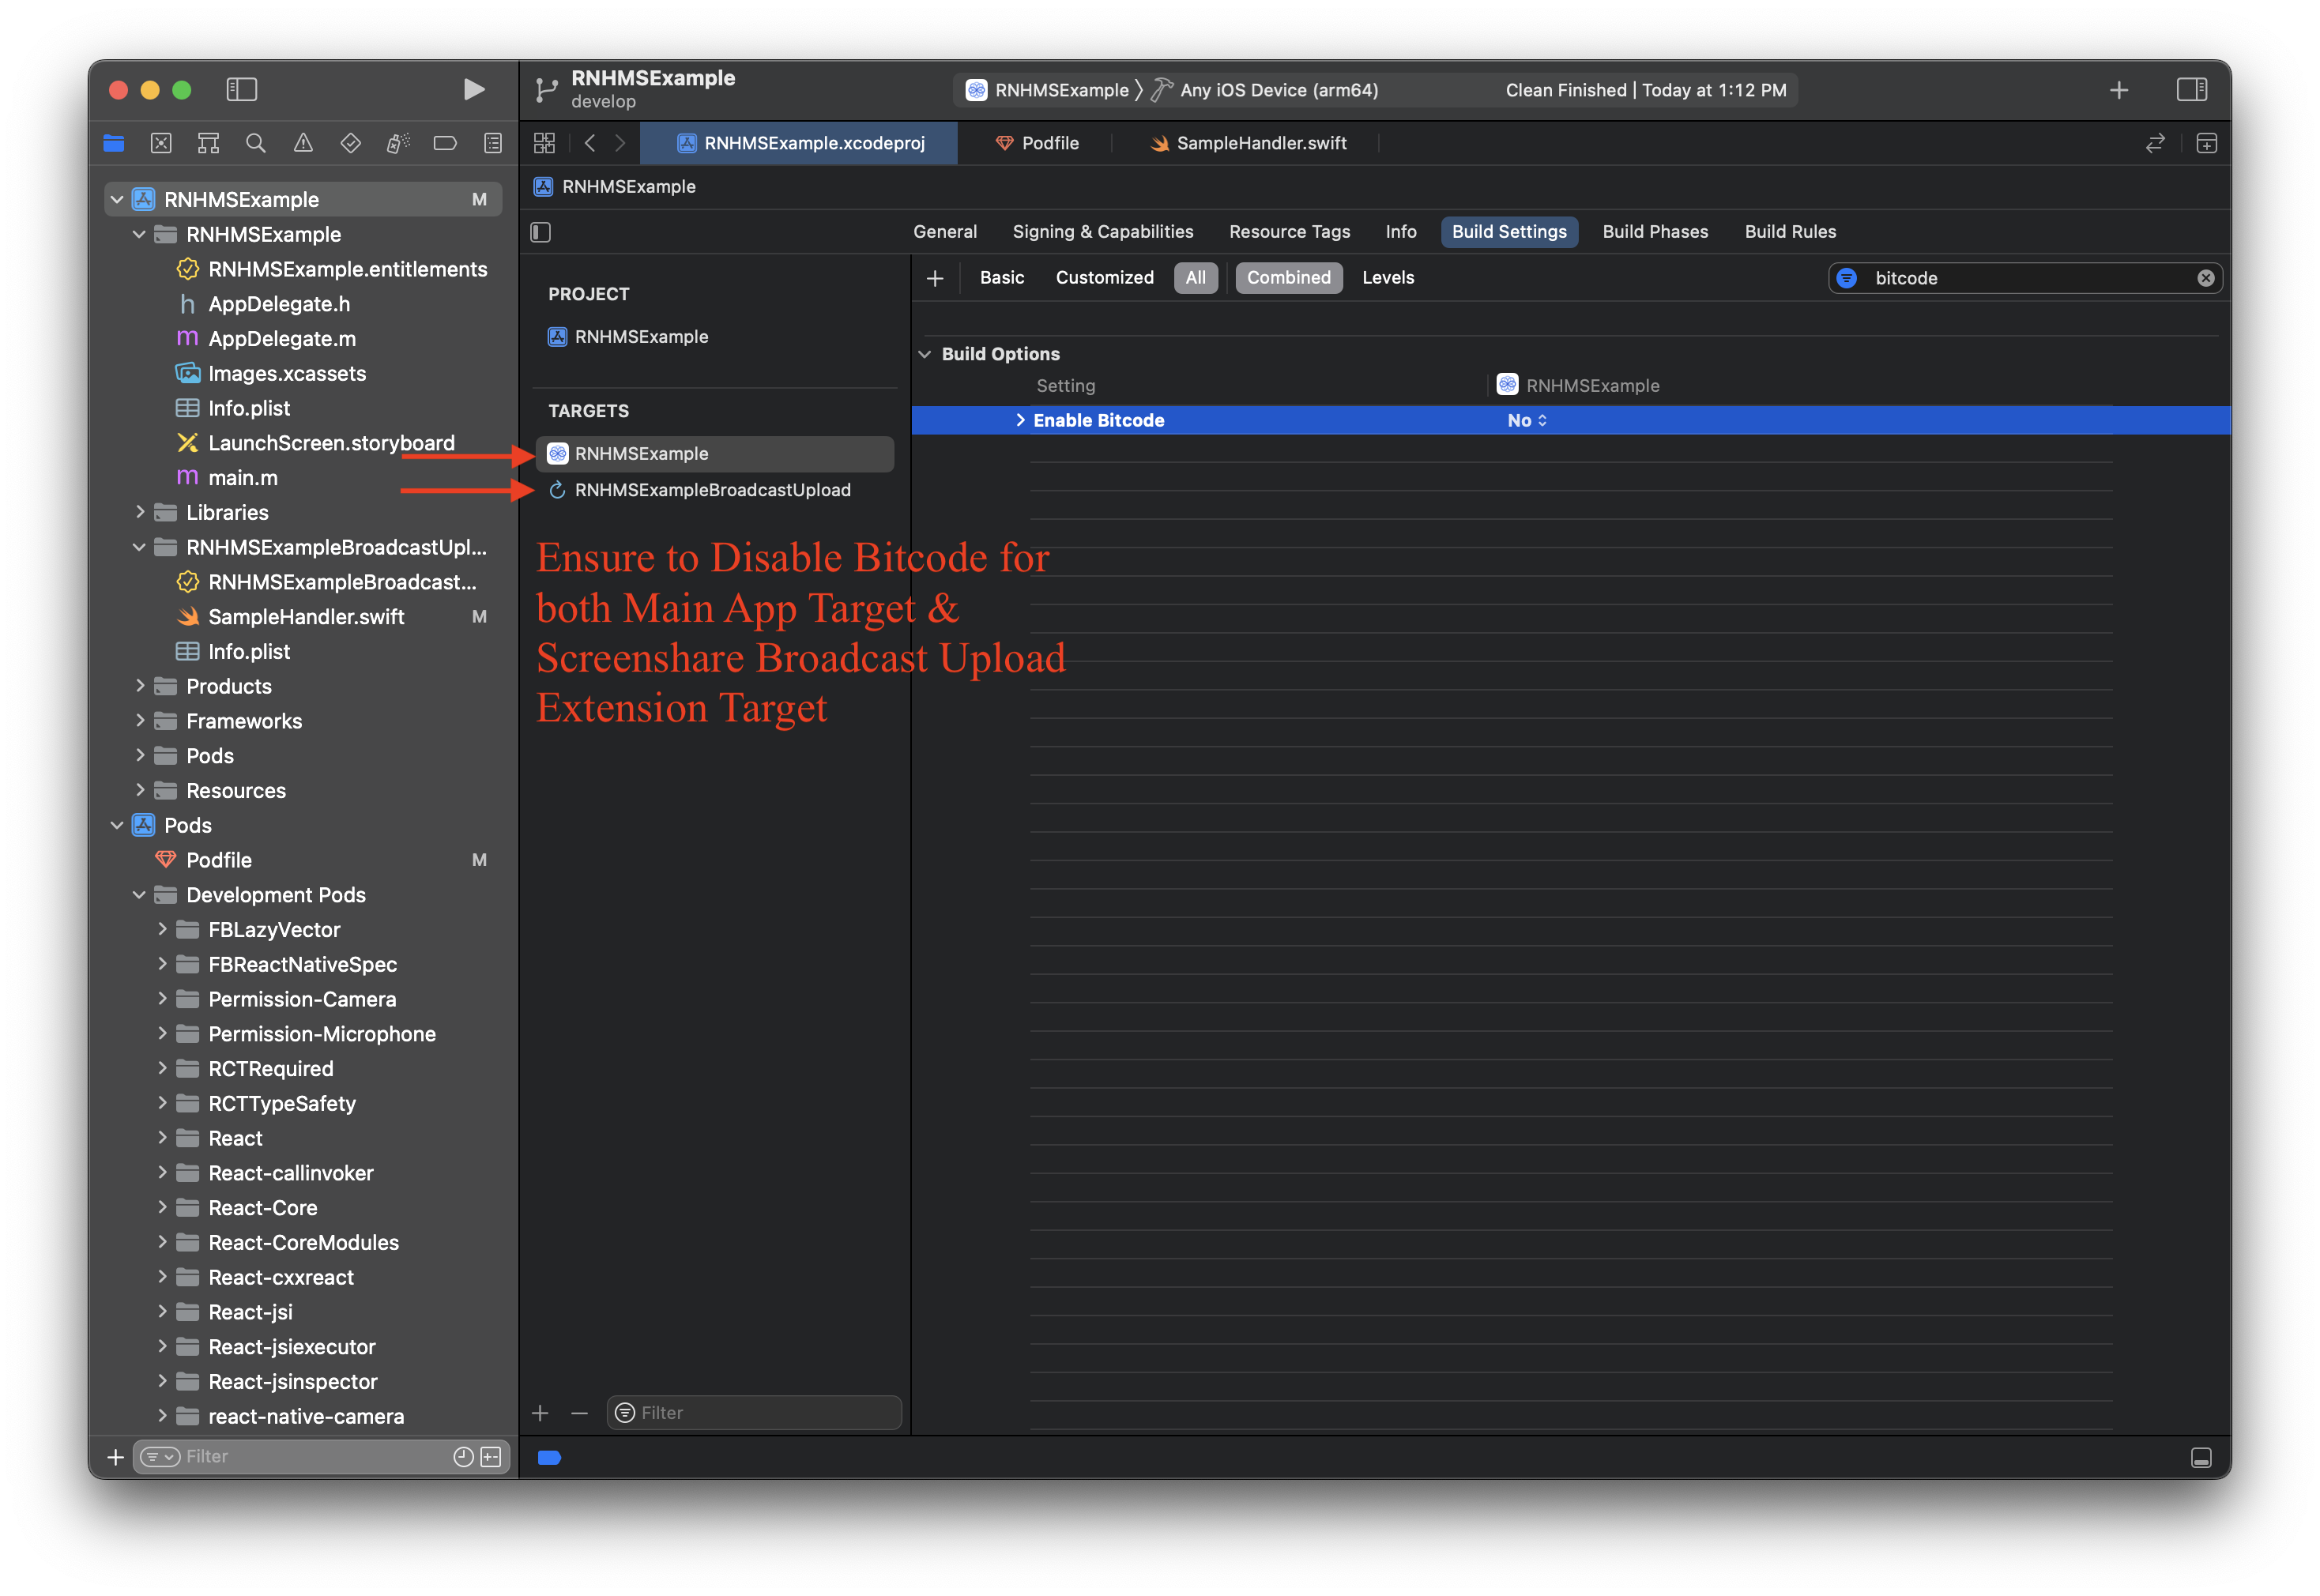
Bitcode Disabled
Bitcode has been disabled by Apple from Xcode 14 & iOS 16 and above. So 100ms packages also have Disabled Bitcode to ensure compatibility. Ensure that in your Xcode project Bitcode is Disabled for all Targets.
Podfile with Bitcode Disabled
You can use the following Podfile which has post_install script to Disable Bitcode for all Pods. Ensure that you modify the target for your Main App and the Broadcast Upload Extension.
In this sample Podfile, the Target names are RNHMSExample and RNHMSExampleBroadcastUpload. Change these to the actual Target names defined in your Xcode project.
require_relative '../node_modules/react-native/scripts/react_native_pods'
require_relative '../node_modules/@react-native-community/cli-platform-ios/native_modules'

platform :ios, '13.0'

# ENSURE TO SET THE CORRECT SCREENSHARE EXTENSION TARGET NAME BELOW.
# Not required if starting Screenshare from iOS devices is not a feature of the app. Then Remove this Target snippet
target 'RNHMSExampleBroadcastUpload' do
  use_modular_headers!
  pod 'HMSBroadcastExtensionSDK'
end

# ENSURE TO SET THE CORRECT MAIN APP TARGET NAME BELOW
target 'RNHMSExample' do
  config = use_native_modules!
  permissions_path = '../node_modules/react-native-permissions/ios'

  use_react_native!(
    :path => config[:reactNativePath],
    # to enable hermes on iOS, change `false` to `true` and then install pods
    # :hermes_enabled => false
    :hermes_enabled => true
  )

  pod 'Permission-Camera', :path => "#{permissions_path}/Camera"
  pod 'Permission-Microphone', :path => "#{permissions_path}/Microphone"

  target 'RNHMSExampleTests' do
    inherit! :complete
    # Pods for testing
  end

  # Enables Flipper.
  #
  # Note that if you have use_frameworks! enabled, Flipper will not work and
  # you should disable the next line.
  use_flipper!()

  # POST INSTALL SCRIPT TO DISABLE BITCODE FROM ALL PODS & EXCLUDE arm64 FROM SIMULATORS
  post_install do |installer|
    react_native_post_install(installer)
    installer.pods_project.build_configurations.each do |config|
      config.build_settings["EXCLUDED_ARCHS[sdk=iphonesimulator*]"] = "arm64"
      config.build_settings['ENABLE_BITCODE'] = 'NO'
    end
  end
end
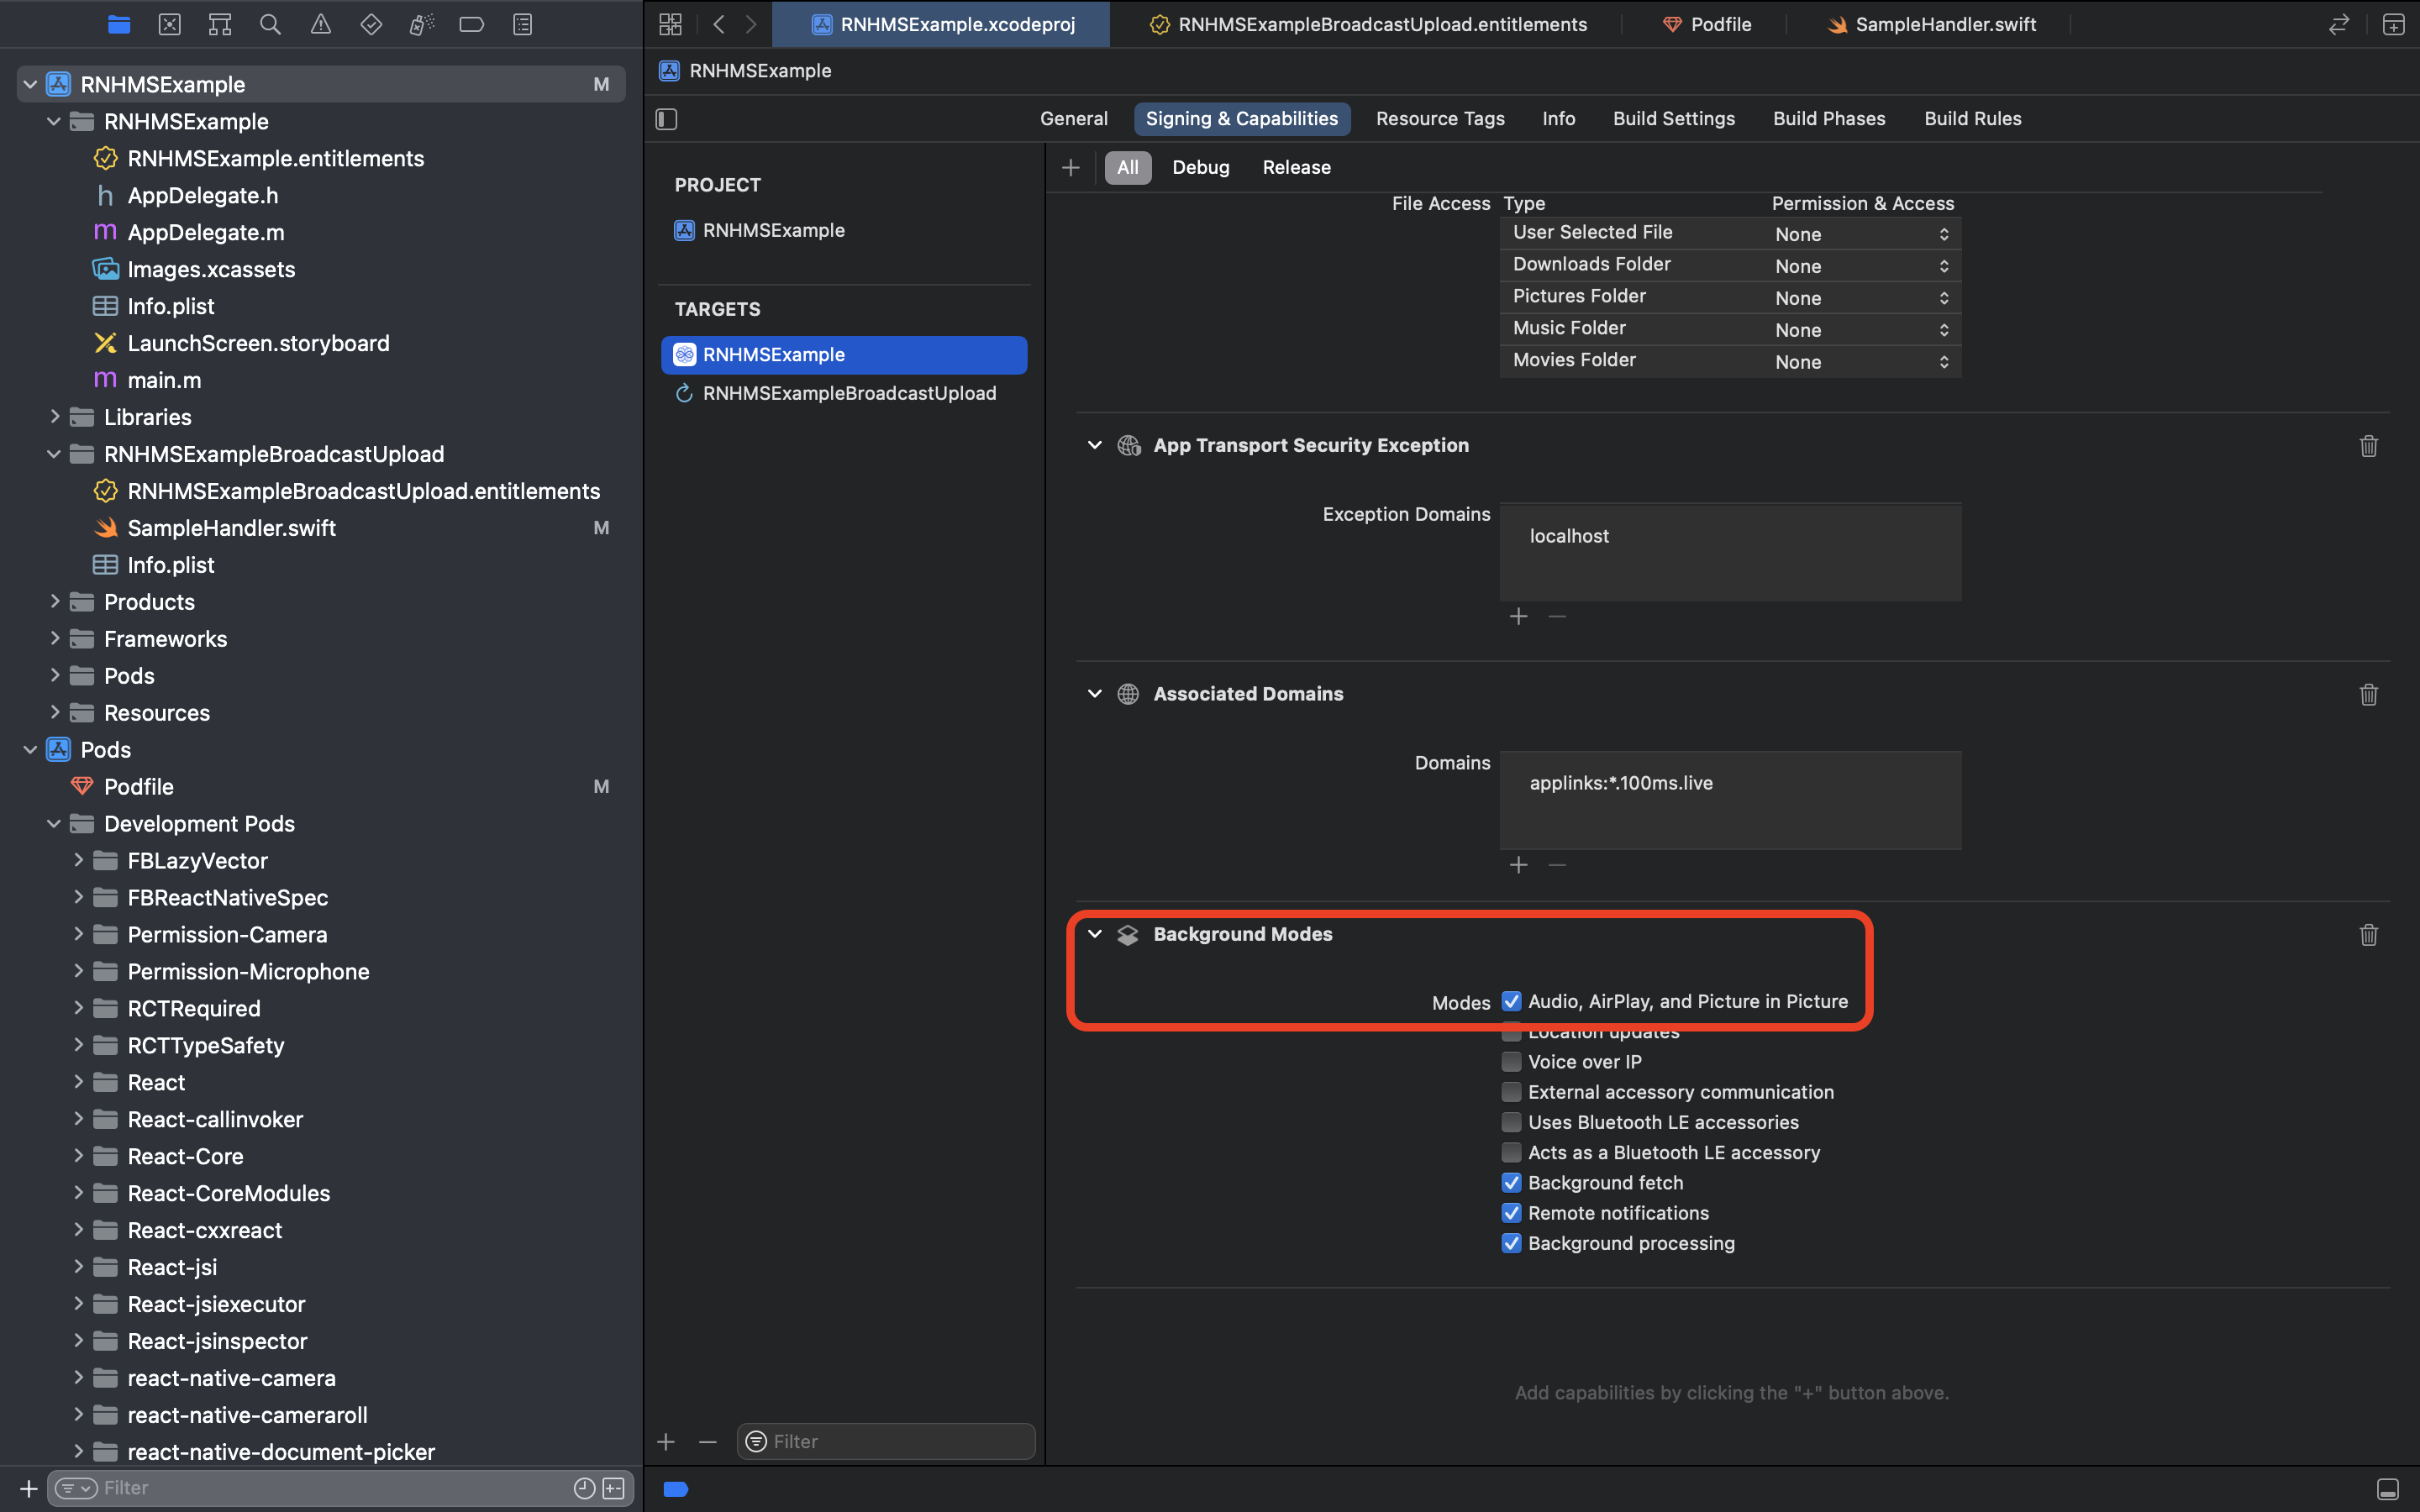
Background Modes Enabled
In majority use-cases, playing audio from Room would be required when app is in Background Mode. Mostly, if users are starting Screenshare from their iPhones/iPads they would want to continue listening to audio from the Room. So, ensure that you have Background Modes Enabled in your Xcode project.
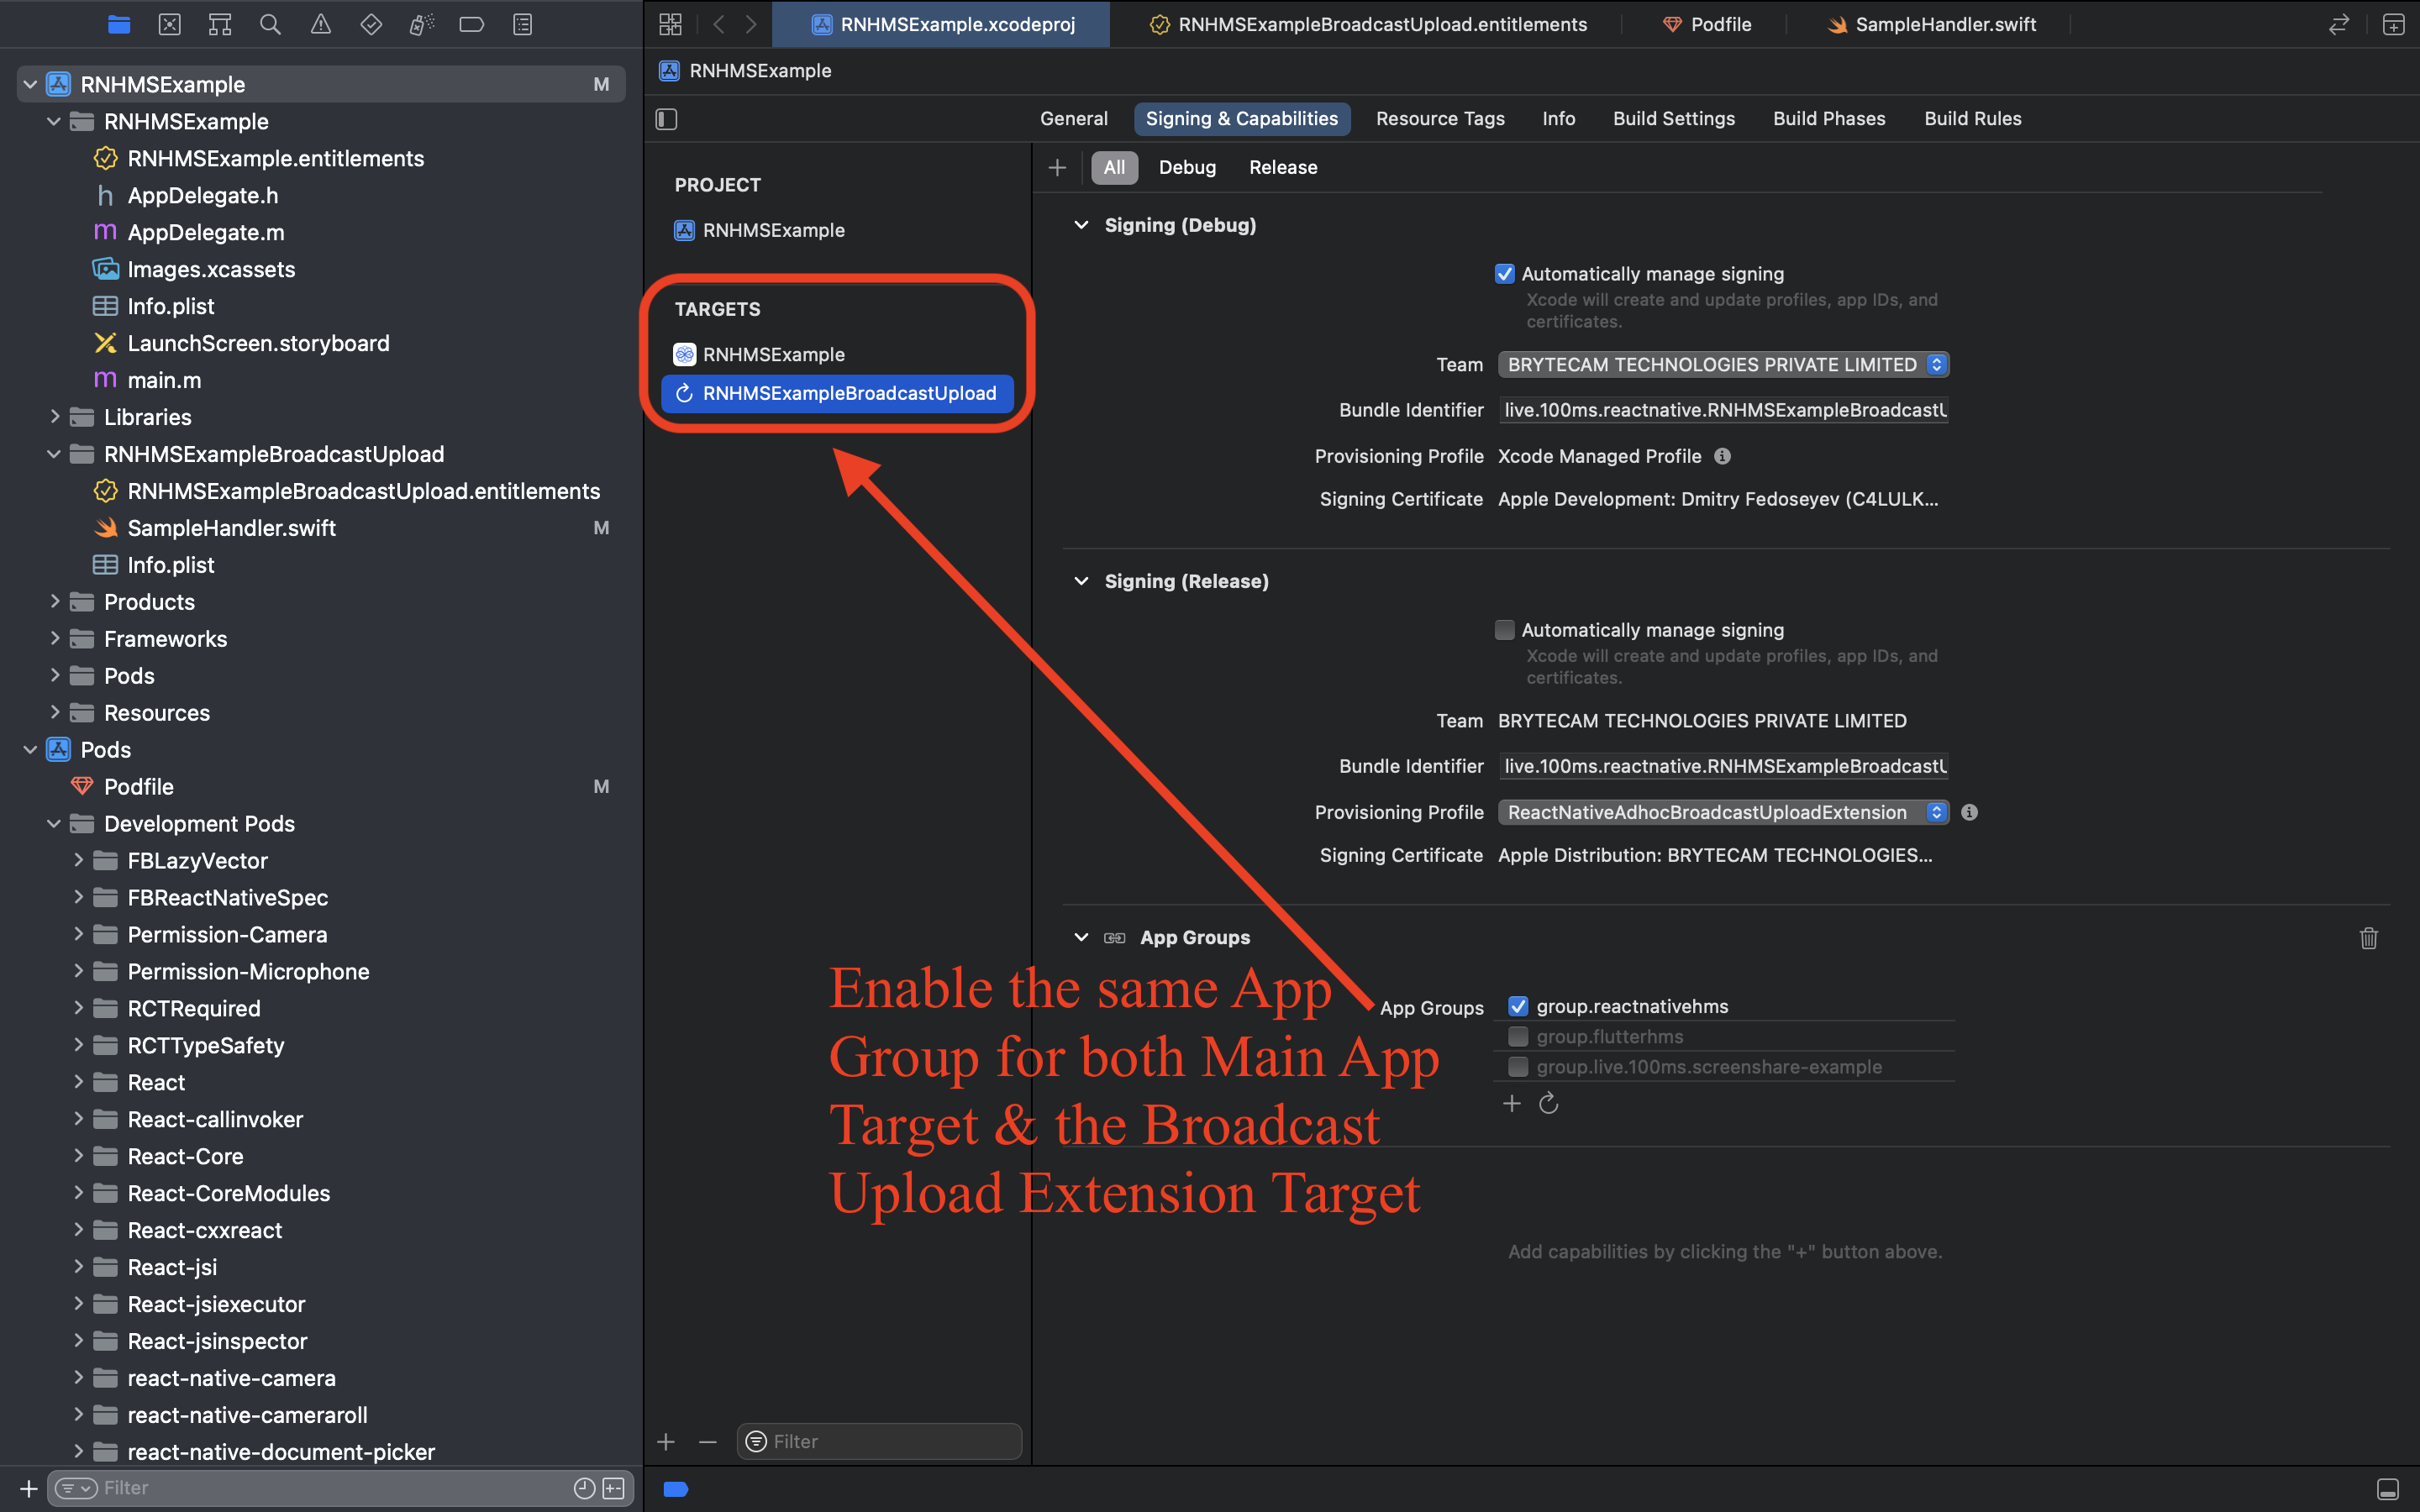
App Groups Enabled
Ensure that you have enabled App Groups for both your Main App Target & the newly created Broadcast Extension Target. If the same App Group is not enabled on both Targets then the App & the Screenshare Extension won't be able to communicate & starting Screenshare from your iOS device will fail.
Also, ensure that there's no typo / spelling mis-matches between the App Group enabled on Main App Target & the Screenshare Broadcast Extension Target.

Permission Denied EXC_BAD_ACCESS error
100ms Example Apps already have configurations for starting Screenshare on iOS devices. The values for App Group & Preferred Extension used in 100ms Example Apps cannot be reused by any other apps as they won't be linked to your Apple Developer Account.
If the 100ms values for App Group which is "group.flutterhms" & Preferred Extension which is "FlutterBroadcastUploadExtension" are resued by your apps then you will have an Xcode exception containing Permission Denied EXC_BAD_ACCESS error message similar to the one shown below -
CFMessagePort: bootstrap_register(): failed 1100 (0x44c) 'Permission denied', port = 0xbc03, name = 'group.flutterhms.88C5E70E-F40F-4C36-A48C-E65736E85CAC.audio.mach.port'
See /usr/include/servers/bootstrap_defs.h for the error codes.
* thread #1, queue = 'com.apple.main-thread', stop reason = EXC_BAD_ACCESS (code=1, address=0x8)
    frame #0: 0x00000001c03ddc78 CoreFoundation_CFGetNonObjCTypeID + 92
...
To resolve this issue ensure that you create a Unique App Group which is linked to your Apple Developer Account. If you do not have an Active Apple Developer Account or do not have permissions to create a New App Group, then you won't be able to this feature.
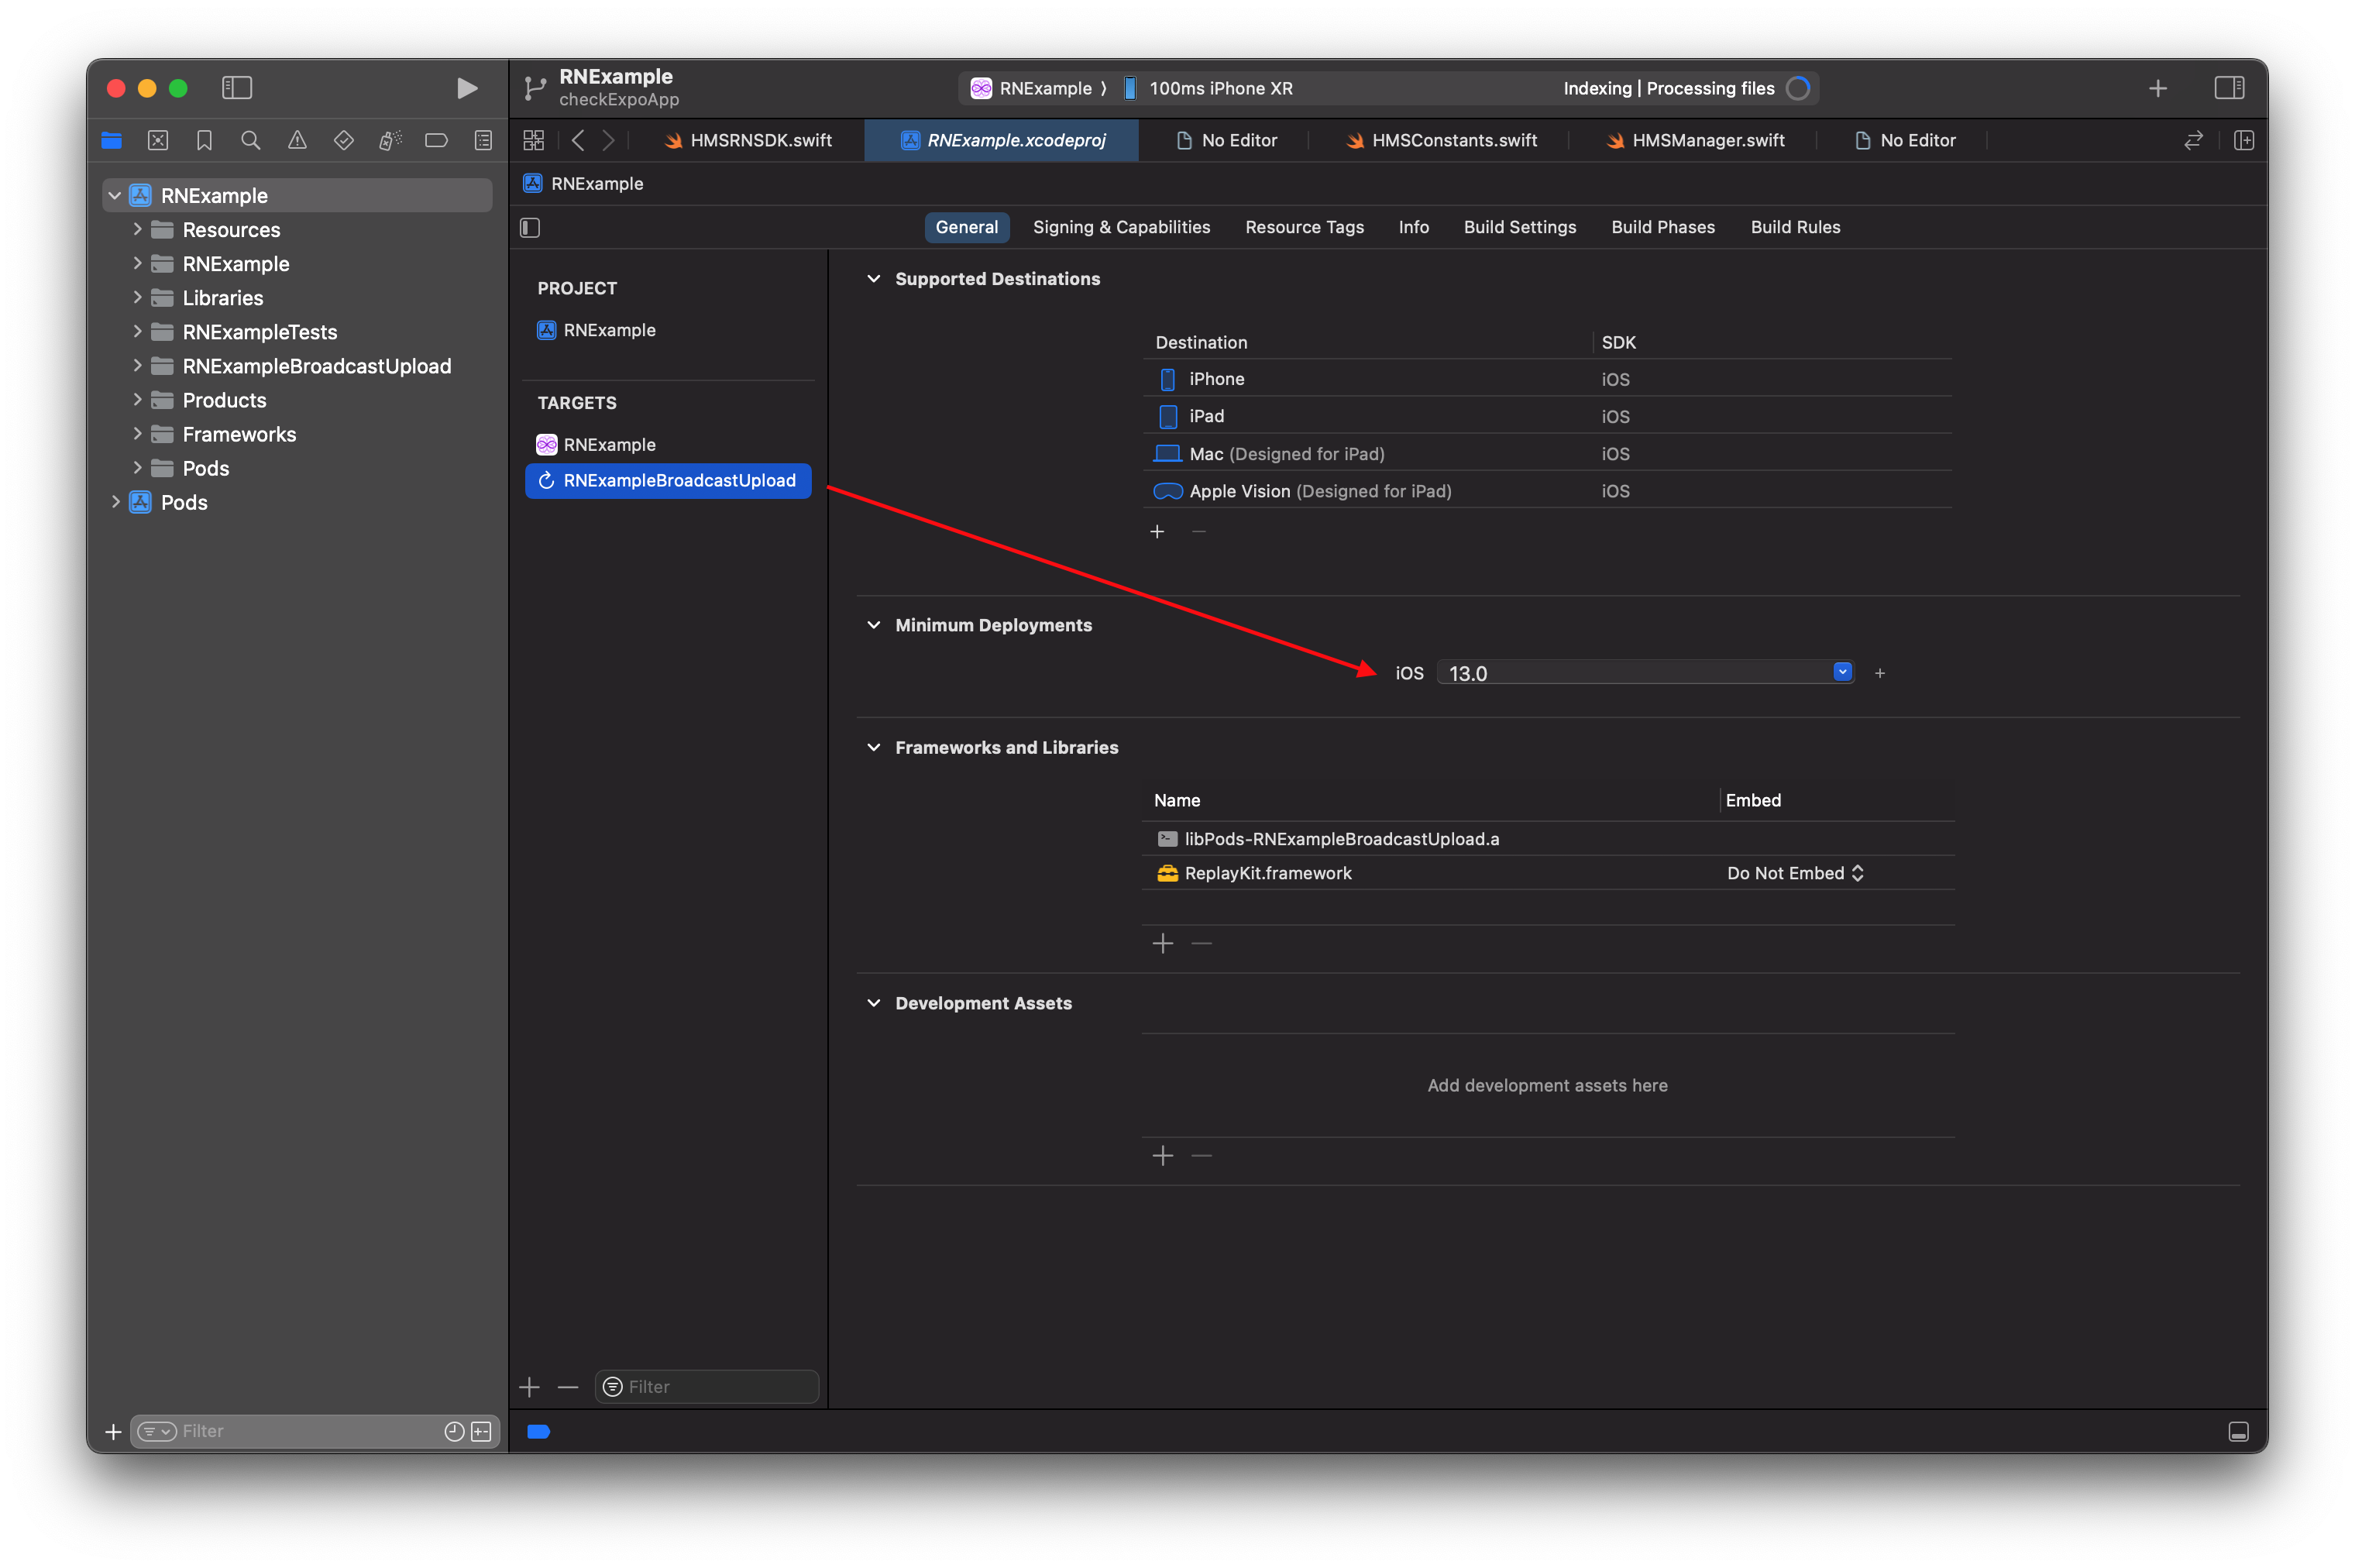
Same Minimum iOS Deployment Version on Extension Target and Main App
Ensure that the Minimum iOS Deployment Target Version is set to 13.0 or above in your Xcode project & the Podfile.
Ensure that both Targets - Main app & the Screenshare Extension have the same Minimum iOS Deployment version.
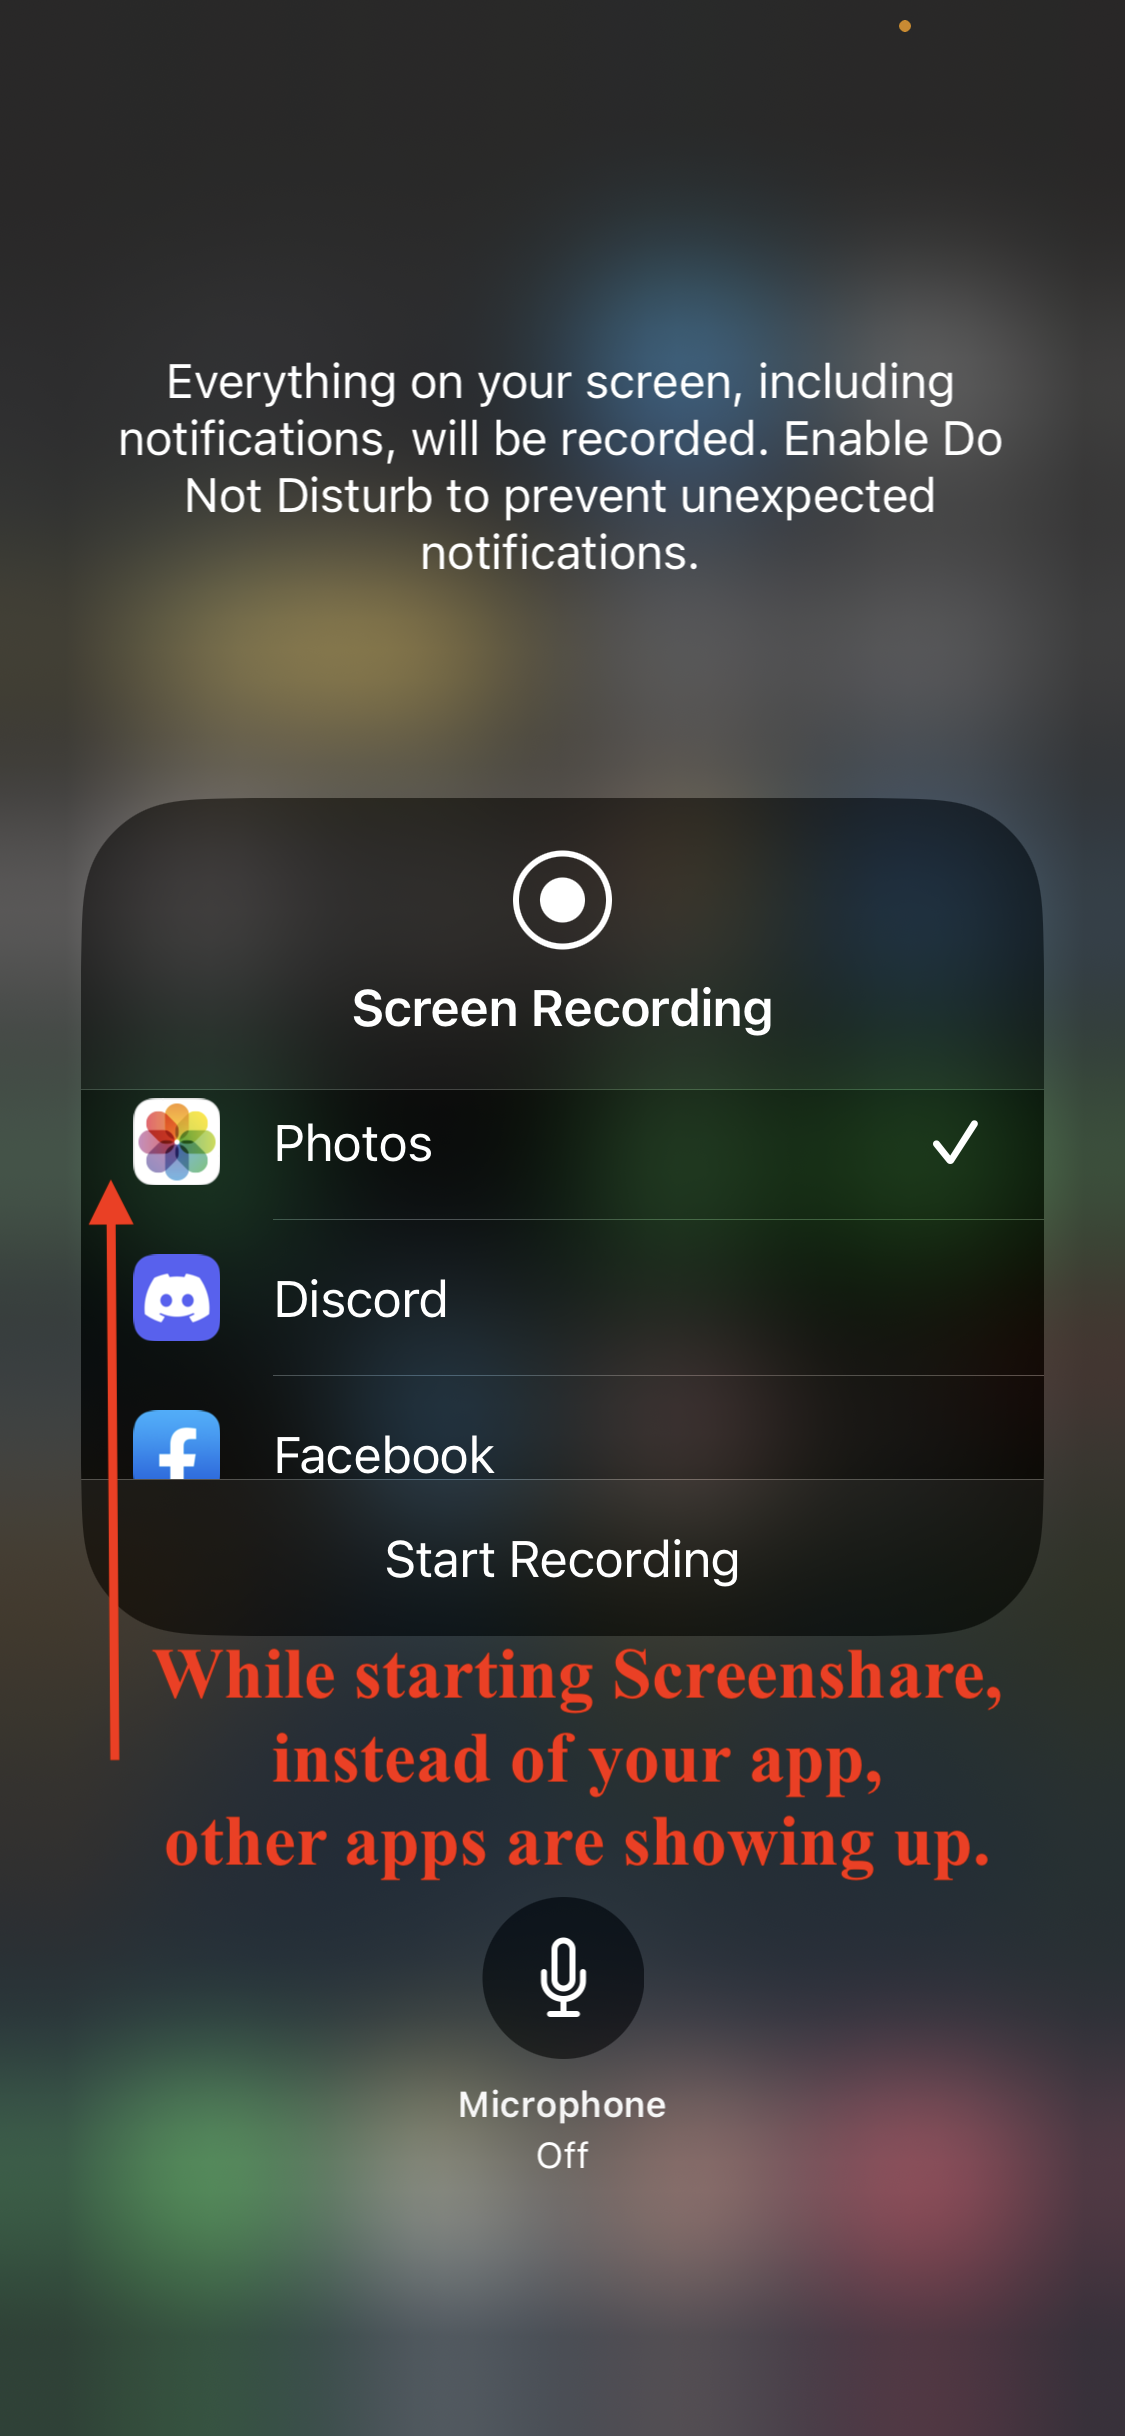
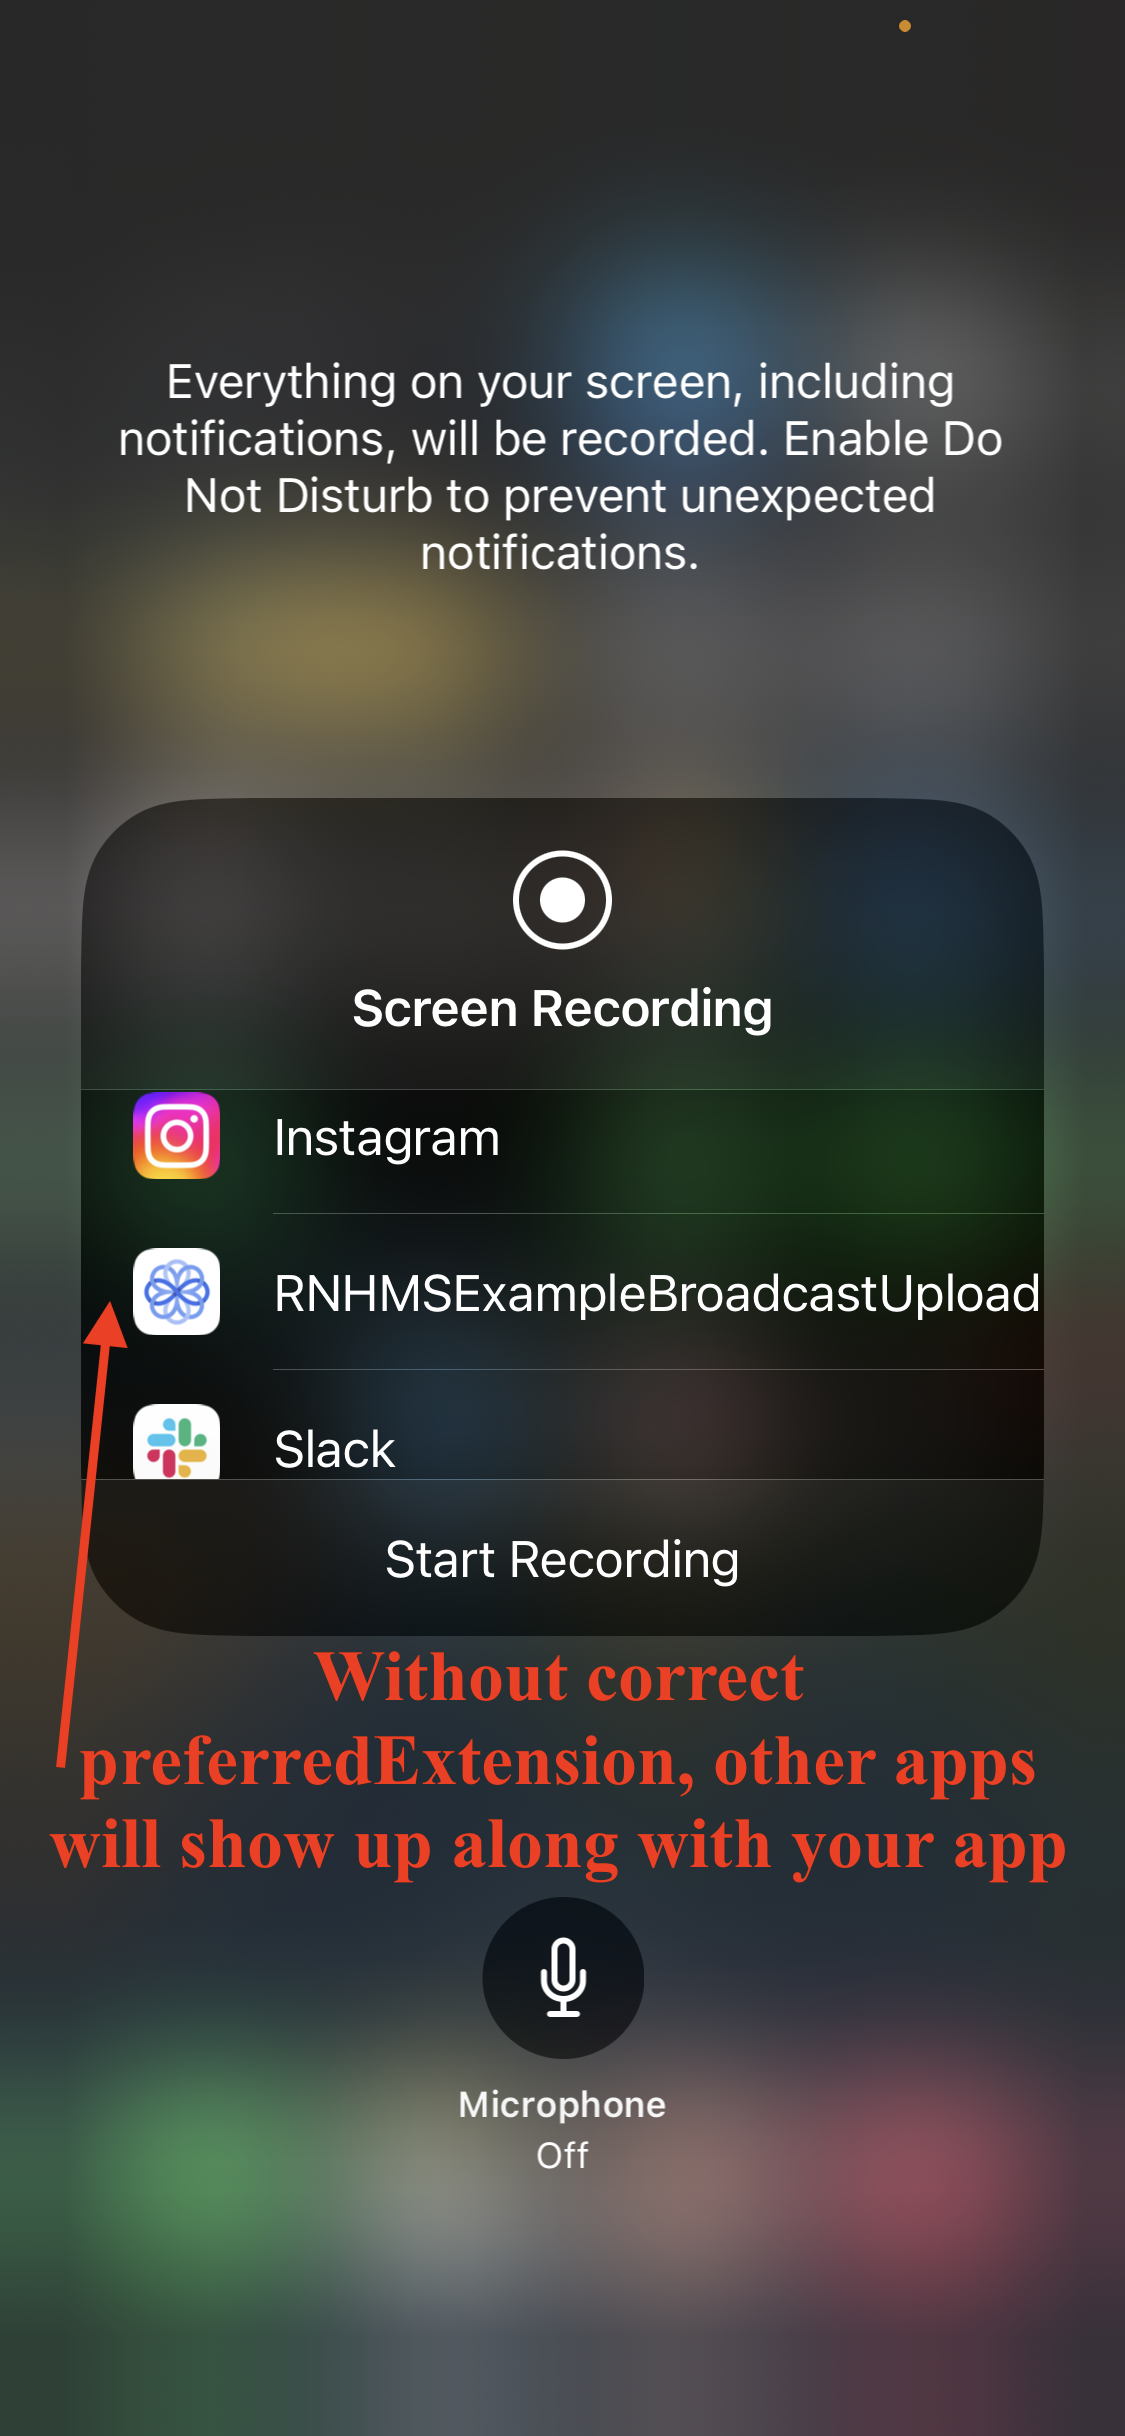
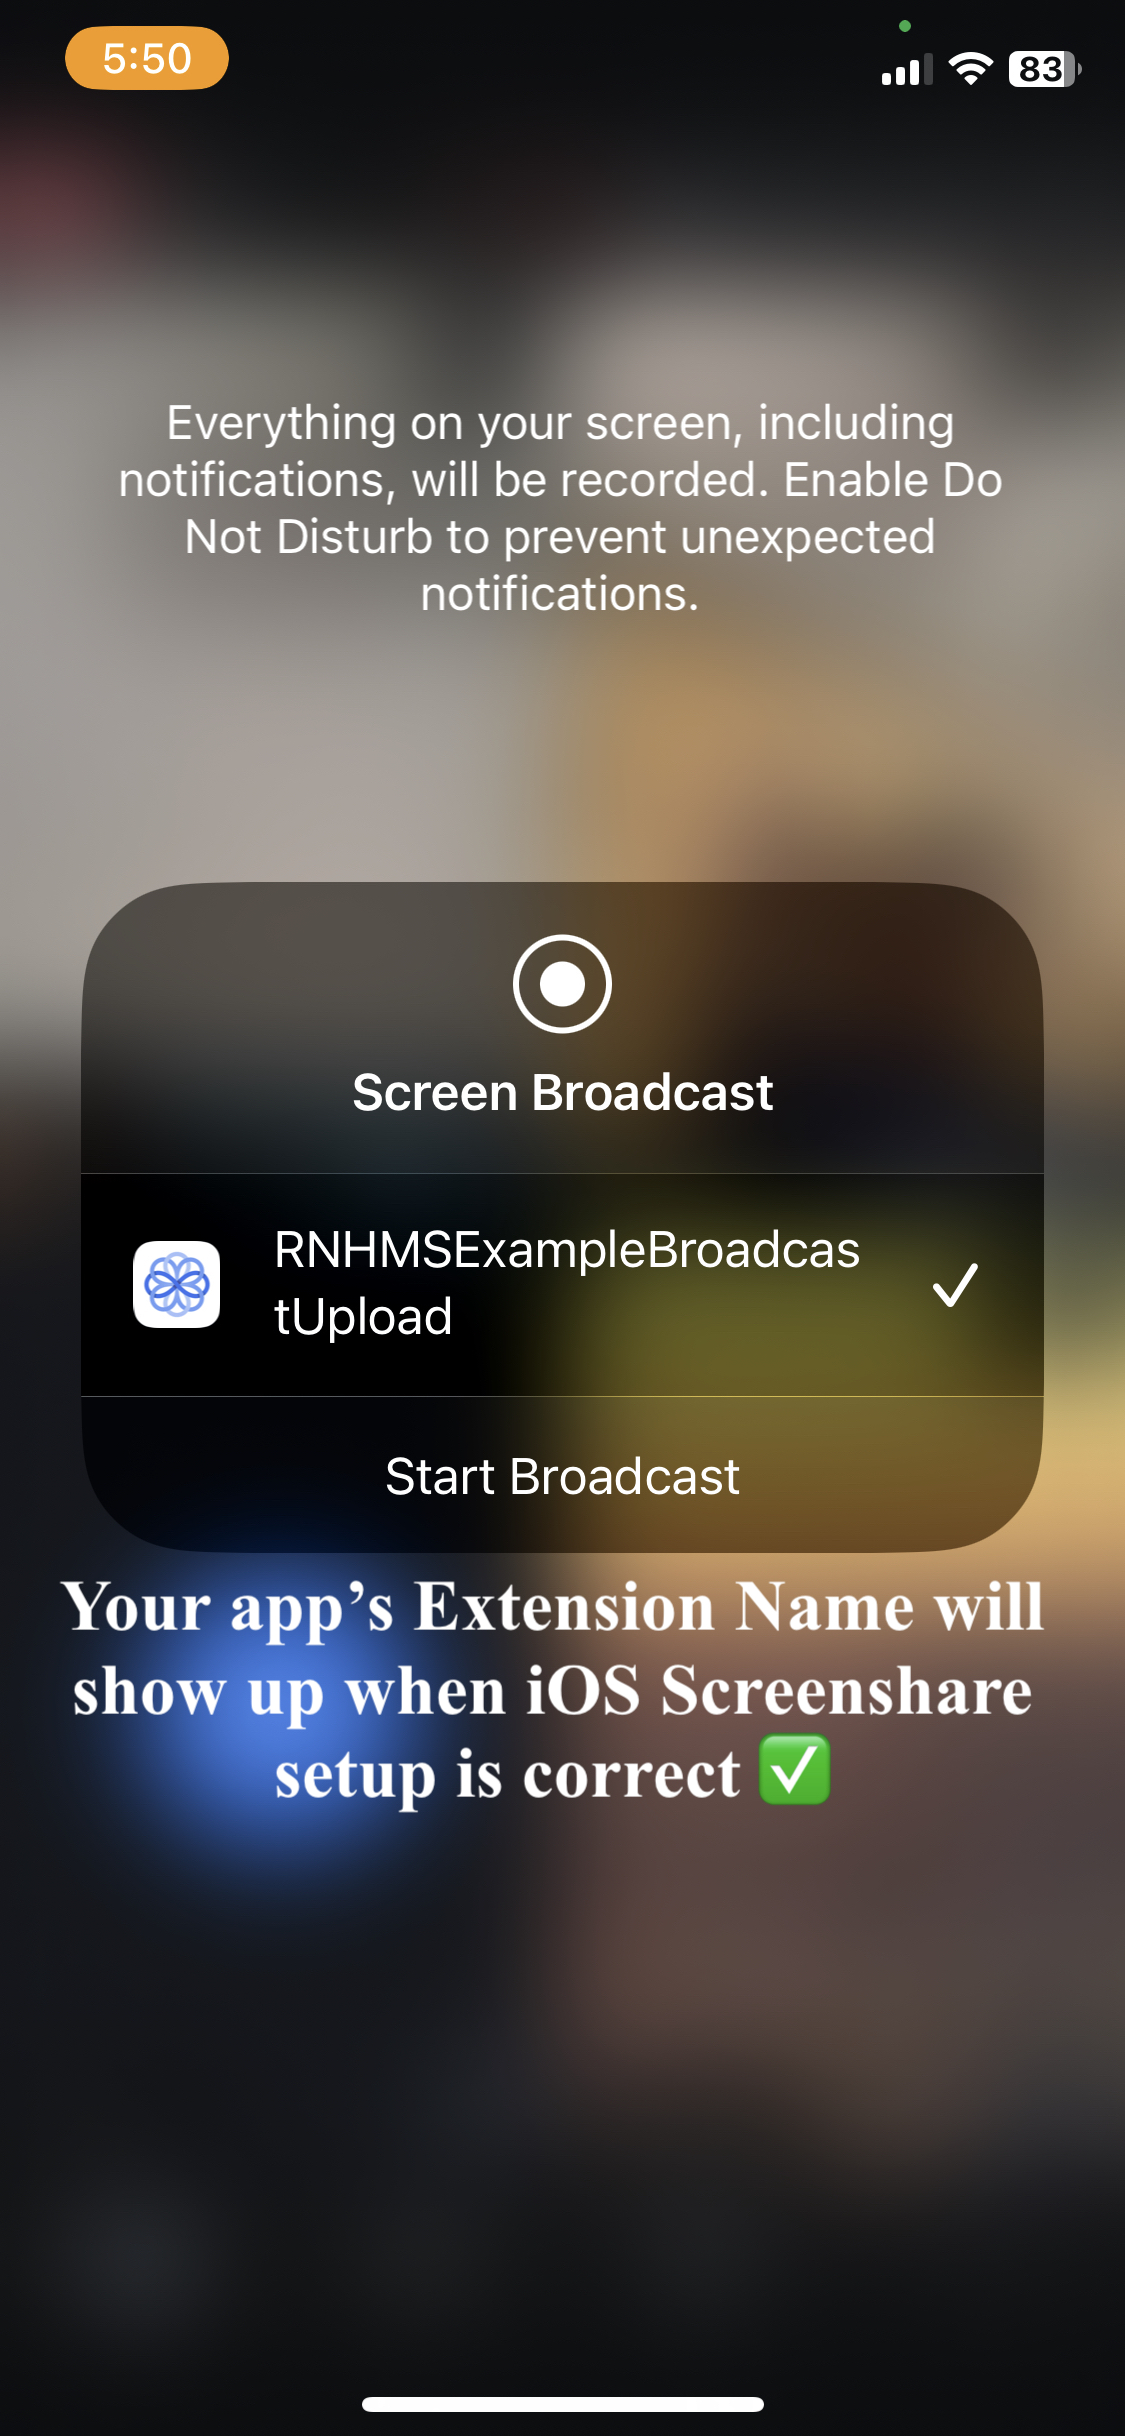
Show only my app name when starting iOS screenshare
Ensure that your app's Screenshare extension name is passed as the preferredExtension name while calling HMSSDK.build
Ensure that there are no typos/spelling mistakes in the name passed.
Your preferredExtension name in Xcode is under Signing and Capabilities section under Target > yourExtensionName.
// Create `HMSSDK` instance with `appGroup` and `preferredExtension` properties
const hmsInstance = await HMSSDK.build({
    appGroup: 'group.reactnativehms', // ensure to pass the correct App Group linked to your Apple Developer Account
    preferredExtension: 'RHHMSExampleBroadcastUpload', // pass correct preferredExtension to show only your app name while starting Screenshare
});
Running on Simulator
Starting Screenshare from an Simulator is not supported by Apple. You can start Screenshare only from an actual iOS device like an iPhone or iPad.
iOS Deployment Target Version
100ms React Native Package is supported for iOS 12 and above versions. Ensure that the Minimum iOS Deployment Target Version is set to 12.0 or above in your Xcode project & the Podfile.
Role has Screenshare Permission
Ensure that the Role used to Join the Room has Screenshare permission Enabled from the 100ms Dashboard. If the Screenshare permission is not Enabled from the Dashboard, any users joining with this Role won't be able to start Screenshare. These users would still be able to see Screenshare performed by other Peers who have Screenshare permissions.