Post Call Transcription and Summarization
This is a guide to enable 100ms post call transcription with speaker labels and AI-generated summary. In case you're looking to enable live transcription, refer to this documentation.
Getting Started
Since recording is a pre-requisite to having the transcript, you will need to start the recording either through the SDK during the session, or through the Recording API or Live Stream API with recording configured. You can use auto-start in Recordings to auto-transcribe all room sessions condition to transcription being enabled.
![]() The above flowchart shows the entire workflow of transcript and summary generation and their consumption.
The above flowchart shows the entire workflow of transcript and summary generation and their consumption.
Enabling Post Call Transcription and Summarization
Method 1: Dashboard Implementation
You can enable transcription for all the rooms under a particular template.
-
Access an existing template via the sidebar.
-
Navigate to the
Transcriptiontab in the template configuration. -
In the second card which says
Post Call Transcription, enable theTranscribe Recordingstoggle. -
Enabling
Post Call Transcriptionwill expose an extra configuration calledOutput Modesjust below the toggle. File format of the transcript output can be set using this. Following file formats are offered:- Text (.txt)
- Subtitle (.srt)
- Structured (.json) The example output for the above can be seen here.
-
In the same card, enable the
Summarize Transcriptstoggle. This will take the default settings for summary. -
Save the configuration.
-
Join a room to initiate a session. Start recording (or live stream with recording enabled) using the SDK or API. If it's your first time joining a 100ms room, you'll find the option to
Start Recordingin the created room. For more information on creating room templates, refer to this documentation.
Advanced Transcription Settings
When you enable the Transcribe Recordings toggle, you will observe an new card pop up below with Advanced Transcription Configuration as its heading. This will contain advanced settings which will be applicable for both Live Transcription (HLS) as well as Post Call Transcription.
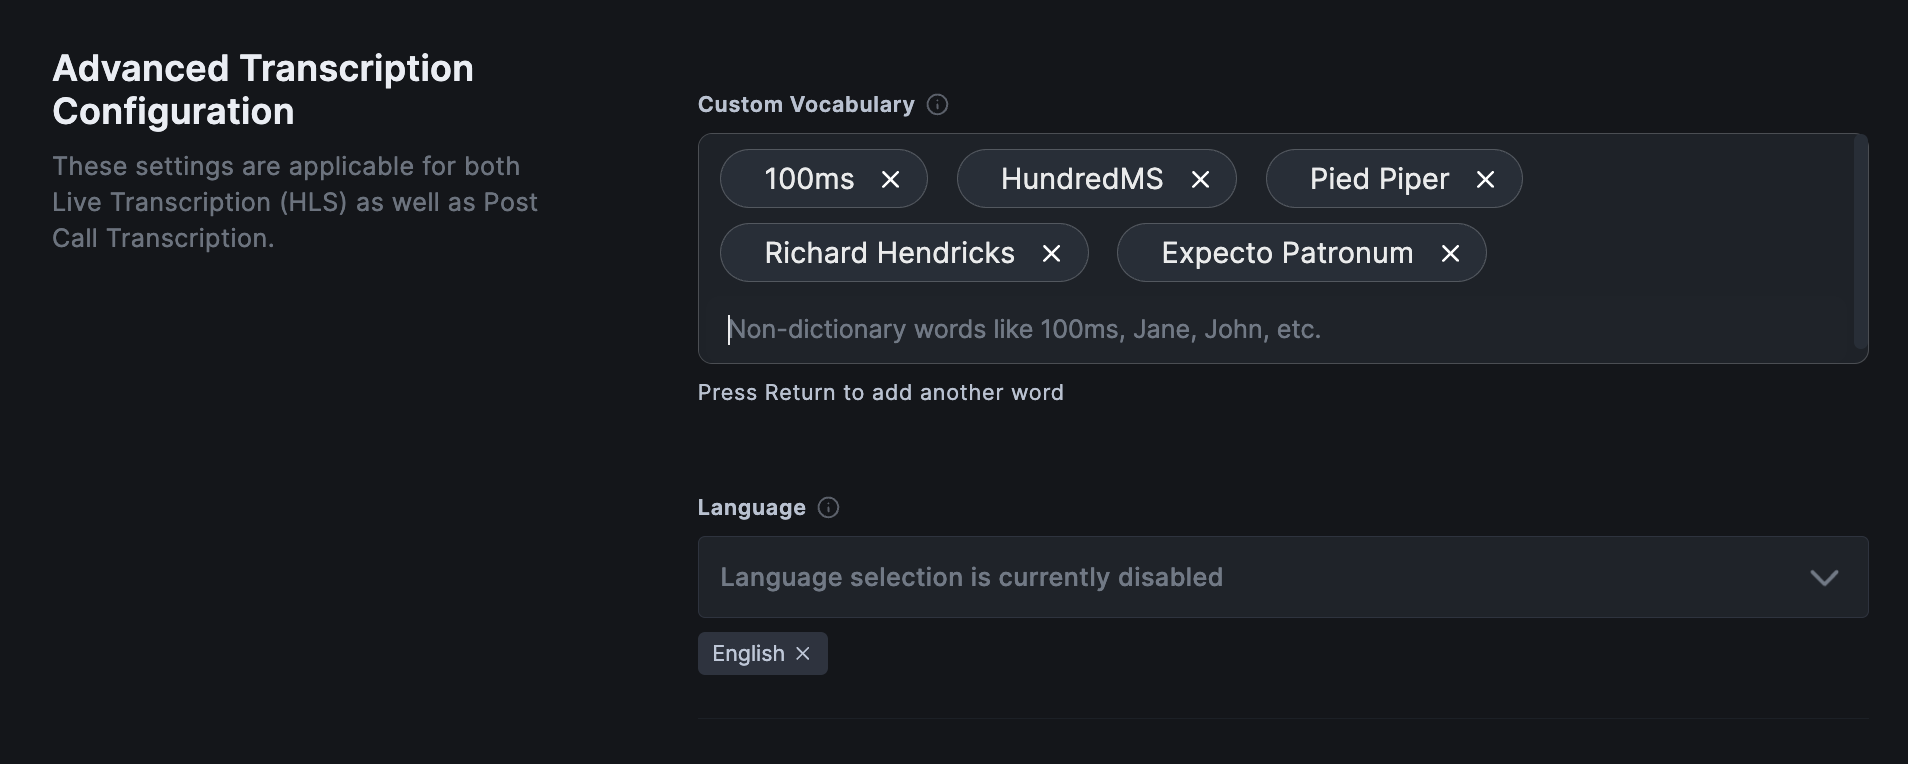
Custom Vocabulary: Add non-dictionary words which are expected to be spoken to enhance recognition. Useful for names, abbreviations, slang, technical jargon, and more.Language: Configure the primary spoken language that has to be transcribed. This will hint the AI model to perform transcription more accurately. Currently, only English is supported, which is the default. Support for more languages will follow soon.
Note - Dashboard Implementation Default Values
The following are the default values used in the template for transcription and summary. If you want to understand more about these and use custom values, you can refer to our Policy API.
{
 "transcription": {
   "modes": ["recorded"],
   "outputModes": ["txt", "srt","json"],
   "customVocabulary": [],
   "summary": {
     "enabled": true,
     "context": "",
     "sections": [
       {
         "title": "Agenda",
         "format": "bullets"
       },
       {
         "title": "Key Points Discussed",
         "format": "bullets"
       },
       {
         "title": "Follow Up Action Items",
         "format": "bullets"
       },
       {
         "title": "Short Summary",
         "format": "paragraph"
       }
     ],
     "temperature": 0.5
   }
 }
}
Example Output Files
Transcripts can be generated in the form of a txt, srt or a json file. Summaries are generated in the json file format only. Following are example outputs for reference:
John: Hello, hello, hello! How's your day been?

Sarah: Hey, long time no see! What have you been up to?
Consuming Transcripts and Summaries
The transcripts and summaries will be saved as Recording Assets. If you’ve configured storage on 100ms, they’ll be stored in your cloud bucket. Otherwise, they’ll be stored in 100ms’ storage for the same duration as the recording.
There are three ways to consume the generated transcripts and summaries.
Method 1: Dashboard
Once you’ve recorded a session with transcription and summary enabled, you can expect recording assets to be ready within 20% of the recording duration time period.
To access transcripts and summaries on the dashboard:
- Navigate to the
Sessionstab in the sidebar to view previous sessions. - Locate the session with transcription enabled. The
Recording Statuscolumn will indicate the status of the recording. - Click on the
Completedstatus of the chosen session ID. - This will open the Session Details page. Access the
Recording Logto find the available assets and view them. - Click on
View Assetsto open a pop-up with pre-signed URLs for the recording, chat, transcripts, and summary.
Limitations
- The transcription and summary won't be available immediately. The processing and delivery will take a minimum of 5 minutes and 20% of the recording duration to be generated.
- This feature does not work with SFU Recordings (
room-composite-legacy). - Presently, you can only input a maximum of 6 sections in the summary through the API.
- There are chances of incomplete summary generation in case of recordings which are longer than 90 minutes.
- This feature only supports the English language as of now.
Frequently Asked Questions (FAQs)
- How many languages are supported?
Presently, only English language is supported. But support for other popular languages like French, Portuguese, Spanish and more is coming soon.
- What happens if multiple languages are being spoken in the live stream?
The bits which are spoken in the selected language will be transcribed. There might be some gibberish text though due to hallucinations by the AI.
- Can multiple summaries be generated or re-generated with different prompts for the same transcript?
This is not possible at this point of time. But we intend to bring the functionality of re-running transcription and summarization functions to enable users to test and build their own summaries.
- Is this a chargeable feature?
Yes, these are chargeable features. To know more, check our pricing page.
- What can be done if the speaker label is not working?
There are two possible options here:
- If you are using an older webSDK version, please update to the latest. Refer to our web documentation here.
- Add the following snippet to enable speaker logging.
- Create a new file
src/components/AudioLevel/BeamSpeakerLabelsLogging.jsxcontaining the following code snippet.
import { useEffect } from "react"; import { useHMSActions } from "@100mslive/react-sdk"; export function BeamSpeakerLabelsLogging() { const hmsActions = useHMSActions(); useEffect(() => { // to be called if you are passing custom url for beam recording, preferably before join. hmsActions.enableBeamSpeakerLabelsLogging(); }, [hmsActions]); return null; } - Create a new file