React Quickstart Guide
Getting started
Hello there! In this guide, we'll build a video conferencing application using our React SDK. We'll be using functional components with the powerful hooks provided by our SDK and build an app where you can have a video call with your friends.
TL;DR - Try out this complete example in CodeSandbox.
If you get stuck at any point or need help in understanding a concept, you can put your query in at support@100ms.live.
Prerequisites
To get started you should be familiar with the basics of React.
Installing the dependencies
## npm
npm install --save @100mslive/react-sdk@latest
## yarn
yarn add @100mslive/react-sdk@latest
Initializing the SDK
Let us start with initializing the libraries. We need to wrap the entire application with <HMSRoomProvider /> component.
This will let us use the hooks for state and actions.
import { StrictMode } from "react";
import ReactDOM from "react-dom";
import { HMSRoomProvider } from "@100mslive/react-sdk";

import App from "./App";

const rootElement = document.getElementById("root");
ReactDOM.render(
  <StrictMode>
    <HMSRoomProvider>
      <App />
    </HMSRoomProvider>
  </StrictMode>,
  rootElement
);
hmsStore will hold the complete state of the application such as details of all the participants. We can also visualize this state at any time using the
devtools extension.
hmsActions will help us perform actions such as joining the room, muting our audio/video, and sending messages.
Concepts
Room: When we join a conference call, the participants are said to be in a video callroom.Peer: A participant in the video call. You are thelocal peerwhile others areremote peers.Track: Media. There are two types of tracks a peer can have - audio and video.
Joining a room
To join a room (a video call), we need to call the join method on hmsActions and it requires us to pass a config object.
The config object must be passed the following fields:
userName: The name of the user. This is the value that will be set on thepeerobject and be visible to everyone connected to the room.authToken: A client-side token that is used to authenticate the user.- In order to create
authTokenon client, we will requireroomCode. A Room Code is a unique encrypted short code generated by 100ms for a given Role and Room. It represents a uniqueroleandroom_idcombination. For more details refer this.
- In order to create
For our application, let us collect userName and roomCode fields from the user using a form. Let's create a JoinForm component and add it to the application.
Note: join is async from this version
import { useState } from "react";
import { useHMSActions } from "@100mslive/react-sdk";

function JoinForm() {
  const hmsActions = useHMSActions();
  const [inputValues, setInputValues] = useState({
    name: "",
    token: ""
  });

  const handleInputChange = (e) => {
    setInputValues((prevValues) => ({
      ...prevValues,
      [e.target.name]: e.target.value
    }));
  };

  const handleSubmit = async (e) => {
    e.preventDefault();
    const {
      userName = '',
      roomCode = '',
    } = inputValues

    // use room code to fetch auth token
    const authToken = await hmsActions.getAuthTokenByRoomCode({ roomCode })

    try {
      await hmsActions.join({ userName, authToken });
    } catch (e) {
      console.error(e)
    }
  };

  return (
    <form onSubmit={handleSubmit}>
      <h2>Join Room</h2>
      <div className="input-container">
        <input
          required
          value={inputValues.name}
          onChange={handleInputChange}
          id="name"
          type="text"
          name="name"
          placeholder="Your name"
        />
      </div>
      <div className="input-container">
        <input
          id="room-code"
          type="text"
          name="roomCode"
          placeholder="Room code"
          onChange={handleInputChange}
        />
      </div>
      <button className="btn-primary">Join</button>
    </form>
  );
}

export default JoinForm;
Let's add this form to our <App> component, and let's add CSS for the components added till now.
import "./styles.css";
import JoinForm from "./JoinForm";

export default function App() {
    return (
        <div className="App">
            <JoinForm />
        </div>
    );
}

Congratulations! you now have an audio-only conference ready to use. If you have a friend join from another device, you can have a nice friendly chat with them.
Leaving the room
Before we go ahead with adding video, let us add a way to leave the room as well. We can call the leave method on hmsActions to leave the room.
We'll set up the leave method to be called whenever the user closes the window or refreshes the tab.
import "./styles.css"; import JoinForm from "./JoinForm";import { useEffect } from "react";import { useHMSActions } from "@100mslive/react-sdk";export default function App() {const hmsActions = useHMSActions();useEffect(() => {window.onunload = () => {hmsActions.leave();};}, [hmsActions]);return ( <div className="App"> <JoinForm /> </div> ); }
Adding video tiles
Let us next add a way to show a tile for every participant in the room. We'll need a list of peers connected to the room.
Fetching information from state
At any point in time we can get a list of peers with:
import { useHMSStore, selectPeers } from '@100mslive/react-sdk';

function Component() {
    const peers = useHMSStore(selectPeers);
    return <Peers peers={peers} />;
}
Let's take a moment to discuss how hmsStore works. The store maintains the state of the video call which includes
the list of peers, the connection state of the room, the tracks, track states, etc.
We can use "selectors" that return a slice of the state to get the data piece we're interested in.
The hmsStore is also reactive, which means any component using the HMSStore hook will re-render when the slice of the state, it listens to, changes.
This allows us to write declarative code.
Let us now create a Conference component that will render a list of peers. We'll get the peers from the store and render them.
Our component will get rerendered if this list of peers changes.
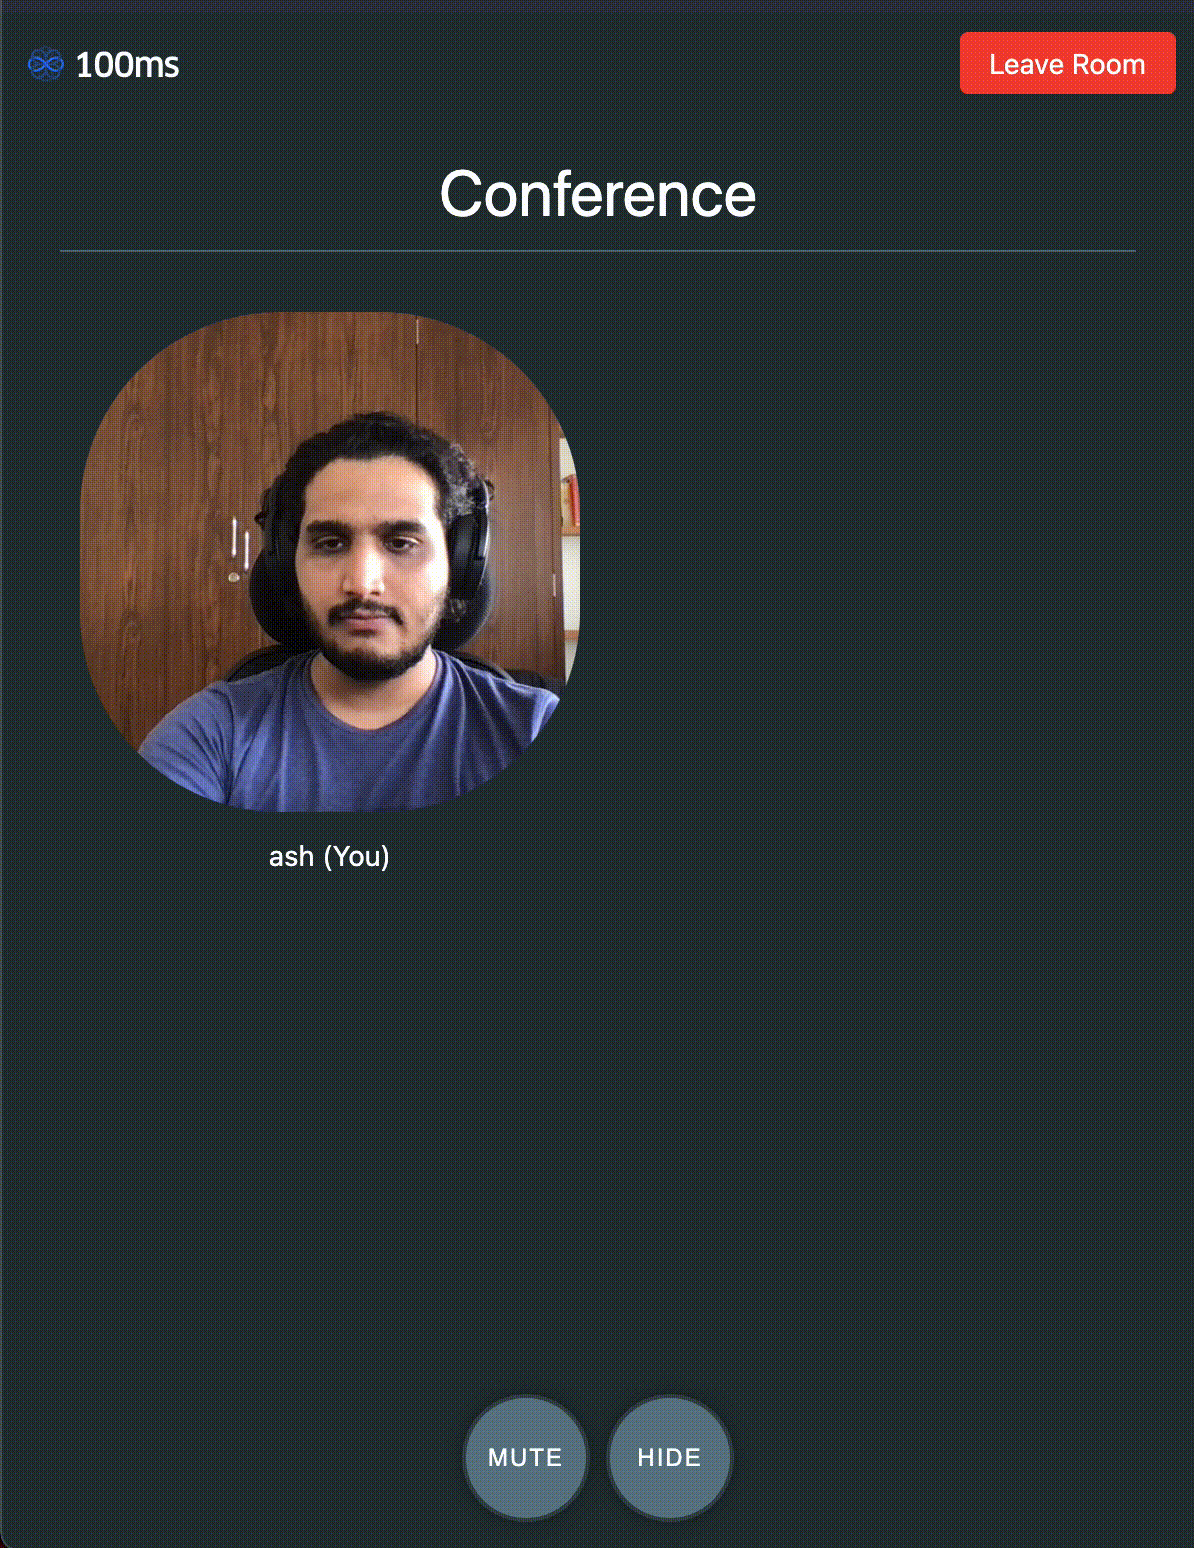
import { selectPeers, useHMSStore } from "@100mslive/react-sdk";
import React from "react";
import Peer from "./Peer";

function Conference() {
  const peers = useHMSStore(selectPeers);
  return (
    <div className="conference-section">
      <h2>Conference</h2>

      <div className="peers-container">
        {peers.map((peer) => (
          <Peer key={peer.id} peer={peer} />
        ))}
      </div>
    </div>
  );
}

export default Conference;
For each peer, we'll render a <video> element and a <div> element with their name.
To render the video, we need to call attachVideo method of hmsActions, which accepts a trackId and a DOM element.
But we have abstracted this implementation inside useVideo hook for ease. This hook will return an object videoRef given a video trackId. The returned videoRef can be used to set on a video element meant to display the video. The hook will take care of attaching and detaching video, and will automatically detach when the video goes out of view to save on bandwidth.
import { useVideo } from "@100mslive/react-sdk";

function Peer({ peer }) {
  const { videoRef } = useVideo({
    trackId: peer.videoTrack
  });
  return (
    <div className="peer-container">
      <video
        ref={videoRef}
        className={`peer-video ${peer.isLocal ? "local" : ""}`}
        autoPlay
        muted
        playsInline
      />
      <div className="peer-name">
        {peer.name} {peer.isLocal ? "(You)" : ""}
      </div>
    </div>
  );
}

export default Peer;
Note that height and width CSS properties need to be set on the <video> element to render the peer's video.
In case you aren't seeing the remote video after this step, do ensure that the role is subscribing to itself in the dashboard template.
Changing UI based on connection state
Right now, our join form shows even after we have joined the room. We need a way to know the connection state of the room and hide the form after we've connected.
We can do this with selectIsConnectedToRoom selector.
import "./styles.css"; import JoinForm from "./JoinForm";import Header from "./Header";import Conference from "./Conference";import { useEffect } from "react";import { selectIsConnectedToRoom, useHMSActions, useHMSStore } from "@100mslive/react-sdk";export default function App() {const isConnected = useHMSStore(selectIsConnectedToRoom);const hmsActions = useHMSActions(); useEffect(() => { window.onunload = () => {if (isConnected) {hmsActions.leave(); } };}, [hmsActions, isConnected]);return ( <div className="App"> <Header />{isConnected ? (<Conference />) : (<JoinForm />)}</div> ); }
Muting/unmuting local tracks
Right now we are publishing both audio and video feed of the user whenever they join the room. We may want to allow the user to mute/unmute their own tracks - both audio and video.
If you specifically need granular data like knowing the current video status you can use selectIsLocalVideoEnabled and for audio selectIsLocalAudioEnabled instead.
In this case, we can use useAVToggle hook which will give us the current audio/video status of the user and also give us functions to toggle them.
import { useAVToggle } from "@100mslive/react-sdk";

function Footer() {
  const {
    isLocalAudioEnabled,
    isLocalVideoEnabled,
    toggleAudio,
    toggleVideo
  } = useAVToggle();
  return (
    <div className="control-bar">
      <button className="btn-control" onClick={toggleAudio}>
        {isLocalAudioEnabled ? "Mute" : "Unmute"}
      </button>
      <button className="btn-control" onClick={toggleVideo}>
        {isLocalVideoEnabled ? "Hide" : "Unhide"}
      </button>
    </div>
  );
}

export default Footer;
We fetch the current state of the local audio and video and toggle them whenever the buttons are clicked.
And finally, let's add this component to the <App> component to render the buttons only when we are connected to the room.
That wraps it up for this guide. We hope you had fun. There is plenty of cool stuff which can be done with our SDK, be sure to check the features section for more information. -->
Here's the complete example.
You can join the above room using room code from dashboard. Refer this for more details on how to get room code from dashboard.
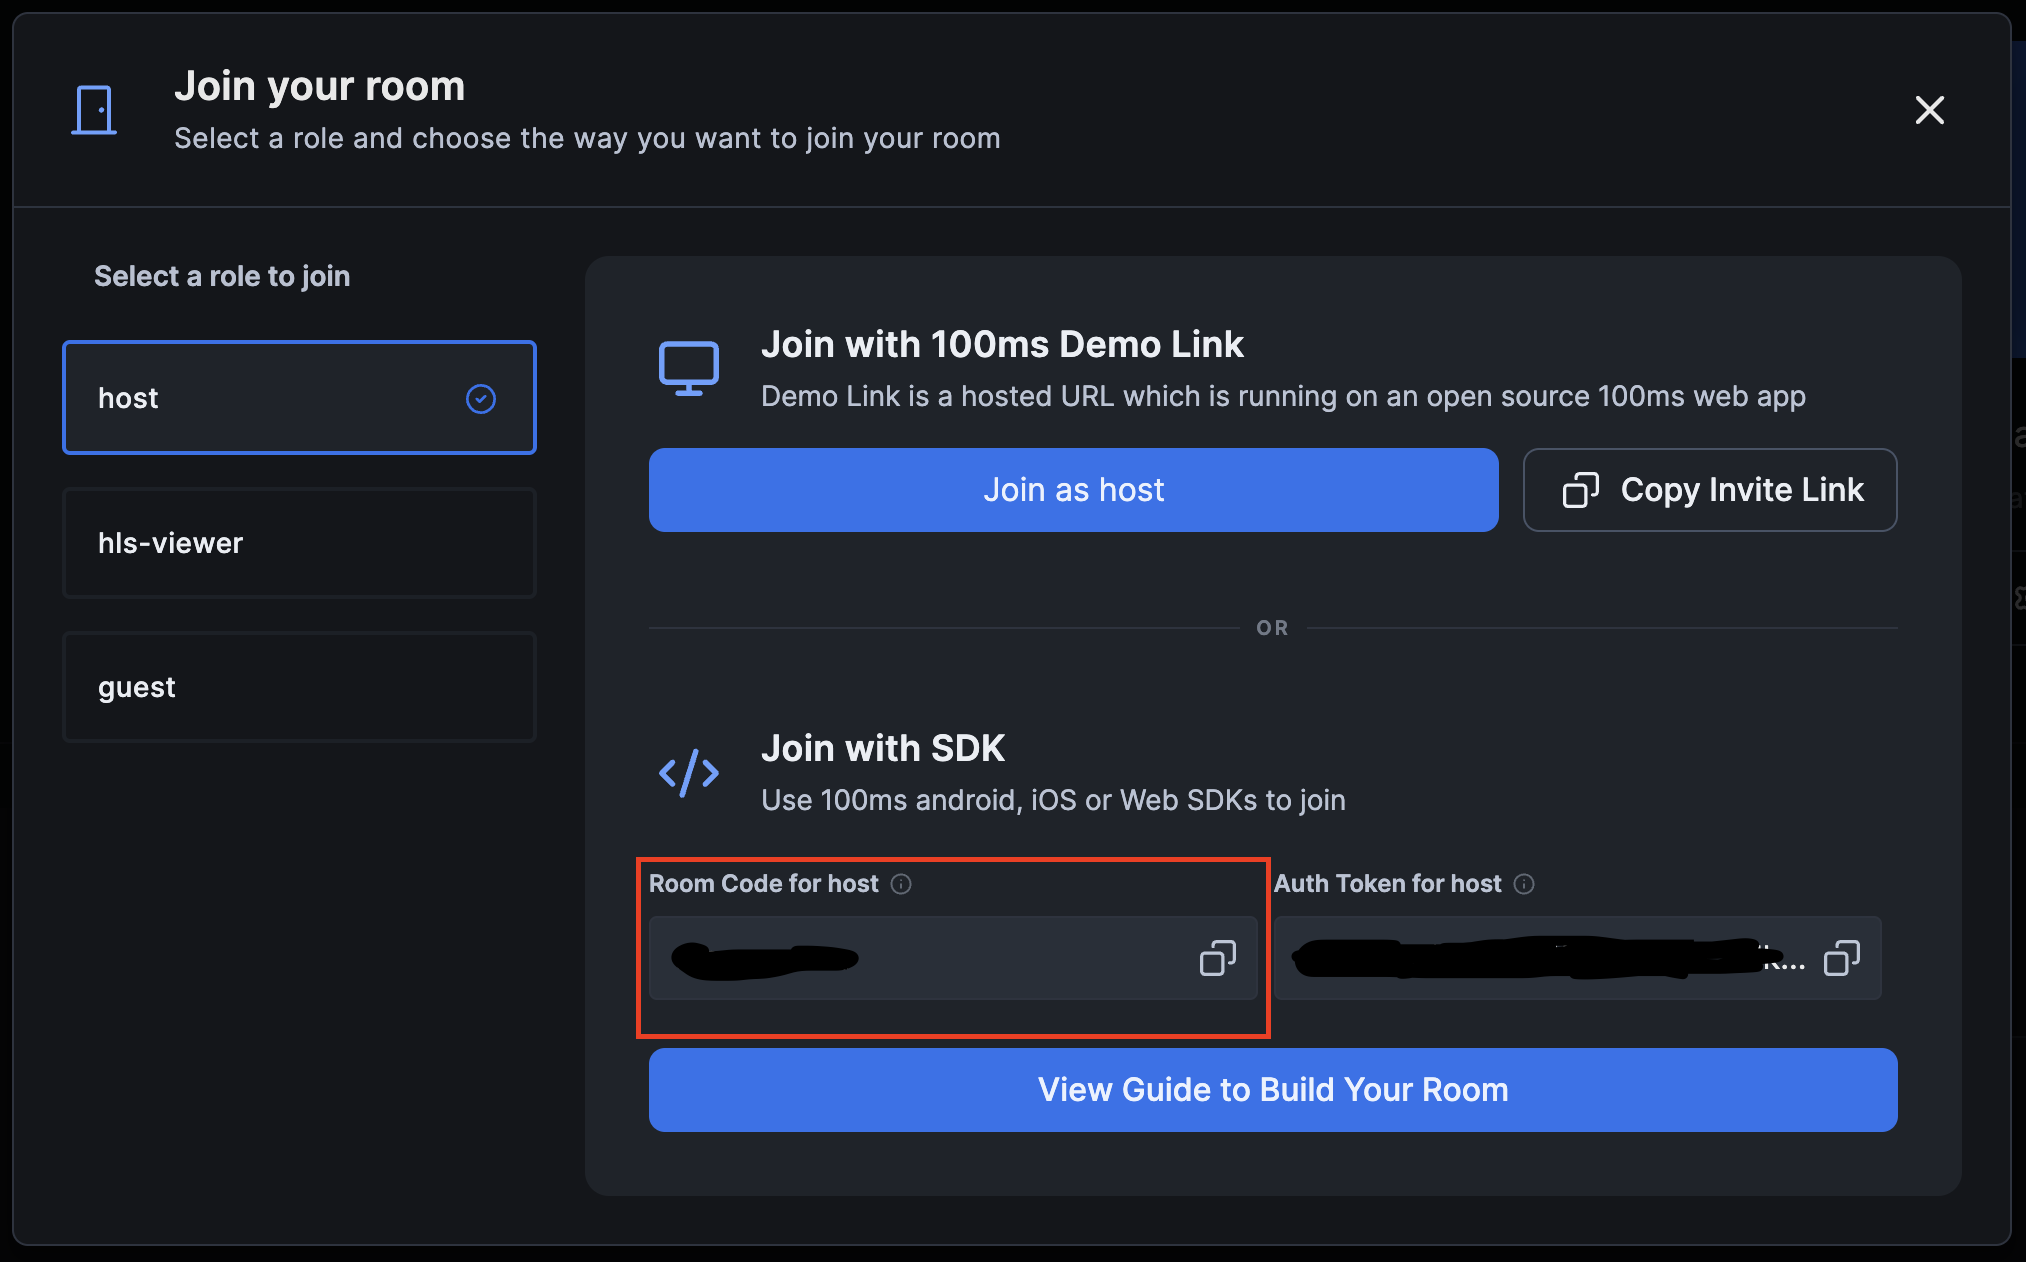
Refer this for more details about room code.